Openwrt Firewall
I have extended the capabilties of my Raspberry Pi As OpenWrt Router by creating zones in my home network and used the firewall feature in openwrt.
Please refer my previous post on how to configure Raspberry Pi As OpenWrt Router. I have listed the hardware (optional, as we already have the entire setup from Raspberry Pi As OpenWrt Router), architecture along with details on how to configure firewall in openwrt.
TABLE OF CONTENTS:
HARDWARE:
- Access point (I’m using GL-iNET Mango travel router with router disabled)
- Cat 6 ethernet cables (cat5 can give up to maximum of 100Mbps)
- PLC (power line communication) x 2 - Optional
🔝
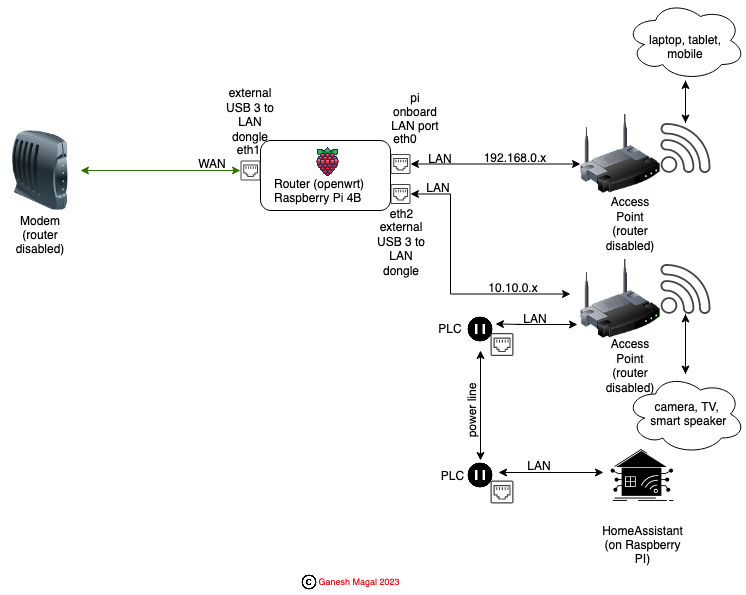
ARCHITECTURE:
STEPS:
Before I being, we already have the setup from my previous Raspberry Pi As OpenWrt Router post:
Modem -> Router (Raspberry Pi openwrt router - eth1) -> LAN 1(eth0) -> Access Point 1
                                                    |
                                                     -> LAN 2(eth2) -> Access Point 2 (upgraded setup)
LAN1 (eth0) has DHCP enabled in openwrt interface and the static IP address is 192.168.0.2 LAN2 (eth2) has DHCP enabled in openwrt interface and the static IP address is 10.10.0.1
Step 1:
I will be using Access Point 1 for devices such as laptops, mobile, tablets. Access Point 2 will be for IOT devices such as cameras, smart speaker, home automation setup (checkout my Home Automation post).
🔝
Step 2:
For Access Point 2, I’m using GL-iNET Mango travel router because of it’s form factor. After connecting this router to LAN 2 (eth2) on the Raspberry Pi openwrt router, check the openwrt page to note the IP address that is assigned to this router. Enter the IP address in the browser and login to the GL-iNET Mango travel router’s admin page (username and password will be on the back).
🔝
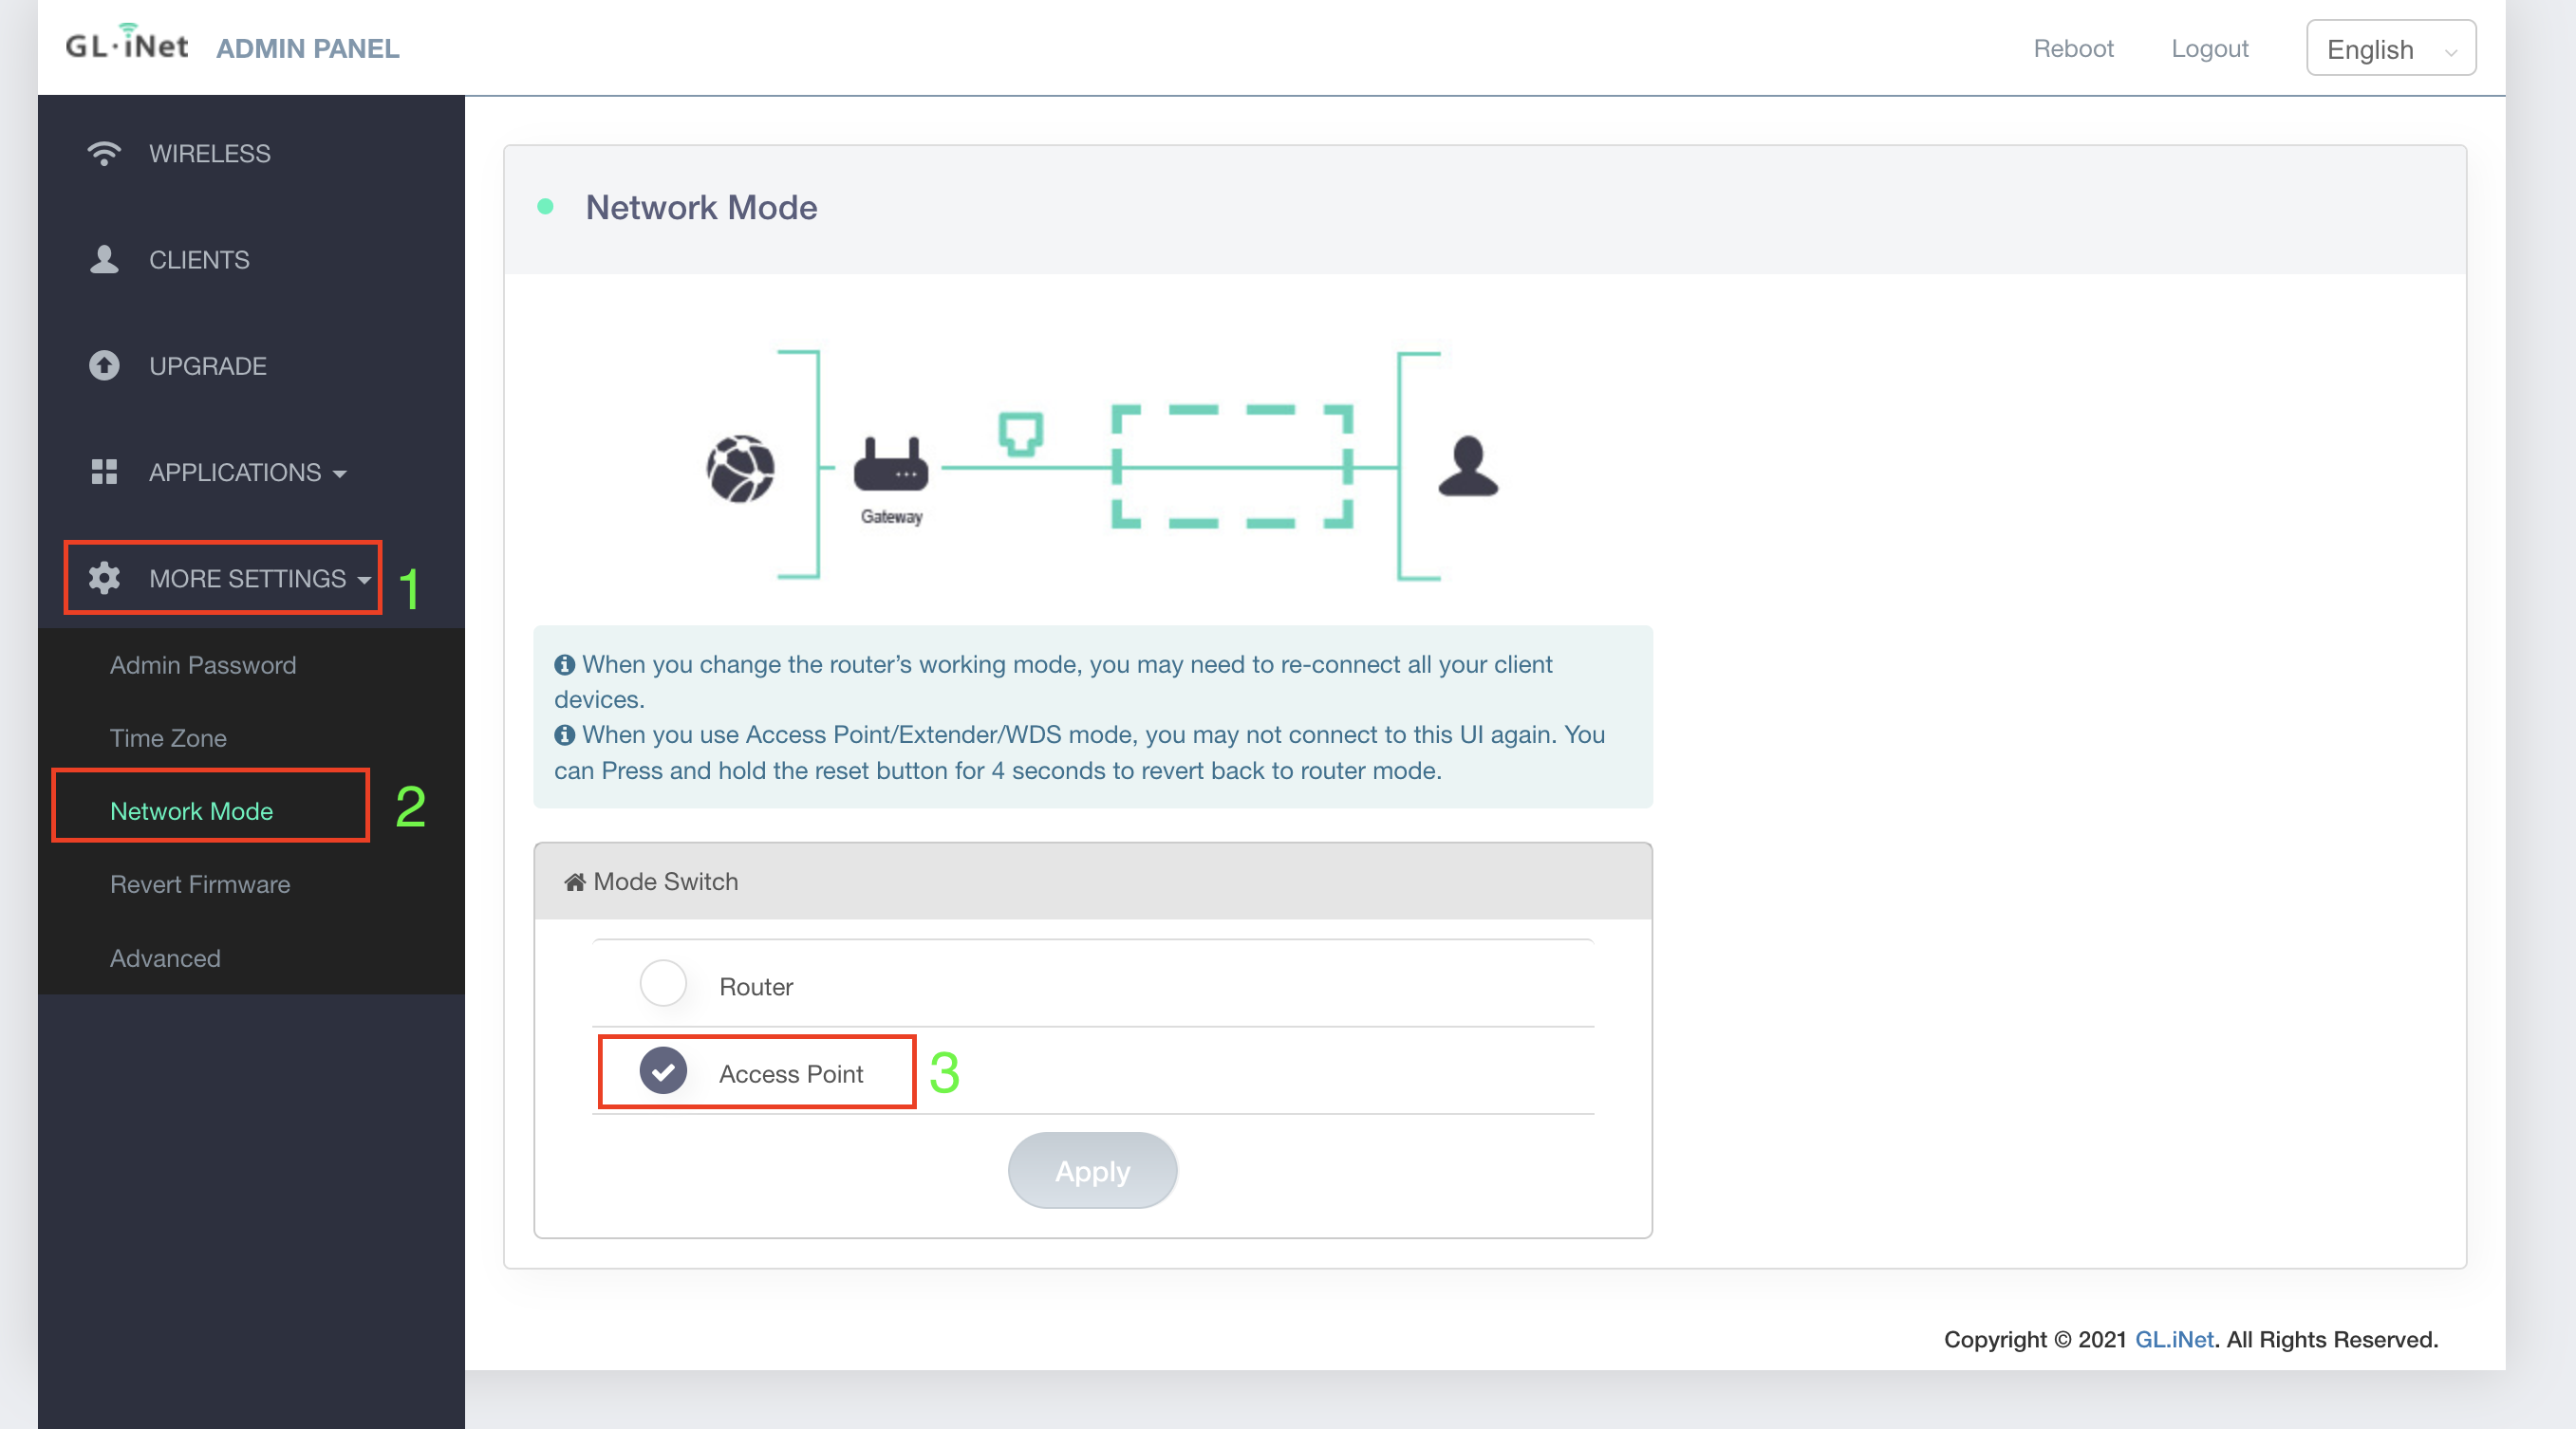
Step 3:
Enable the access point mode in GL-iNET Mango travel router. By default, the router mode is enabled. If you leave it in router mode, it will cause the Double NAT scenarion. Also, set the ssid name which you want to publish for this access point. Now any device that connects via this access point (wired or wireless) will be assigned an IP address 10.10.0.x.
🔝
Step 4:
I wanted to have wired connection to my home automation setup (running on Raspberry Pi). However it’s not near the router. So I have made use of PLC. Once you pair (will need a minimum of 2 - transmitter and receiver) the PLC (won’t be covering it here, it’s straight forward and should be clear in the documentation that comes with the product), I have connected an ethernet cable from Access Point 2 to one of the PLCs which is close to it. The other PLC is plugged close to the home automation setup and an ethernet cable is connected to it.
🔝
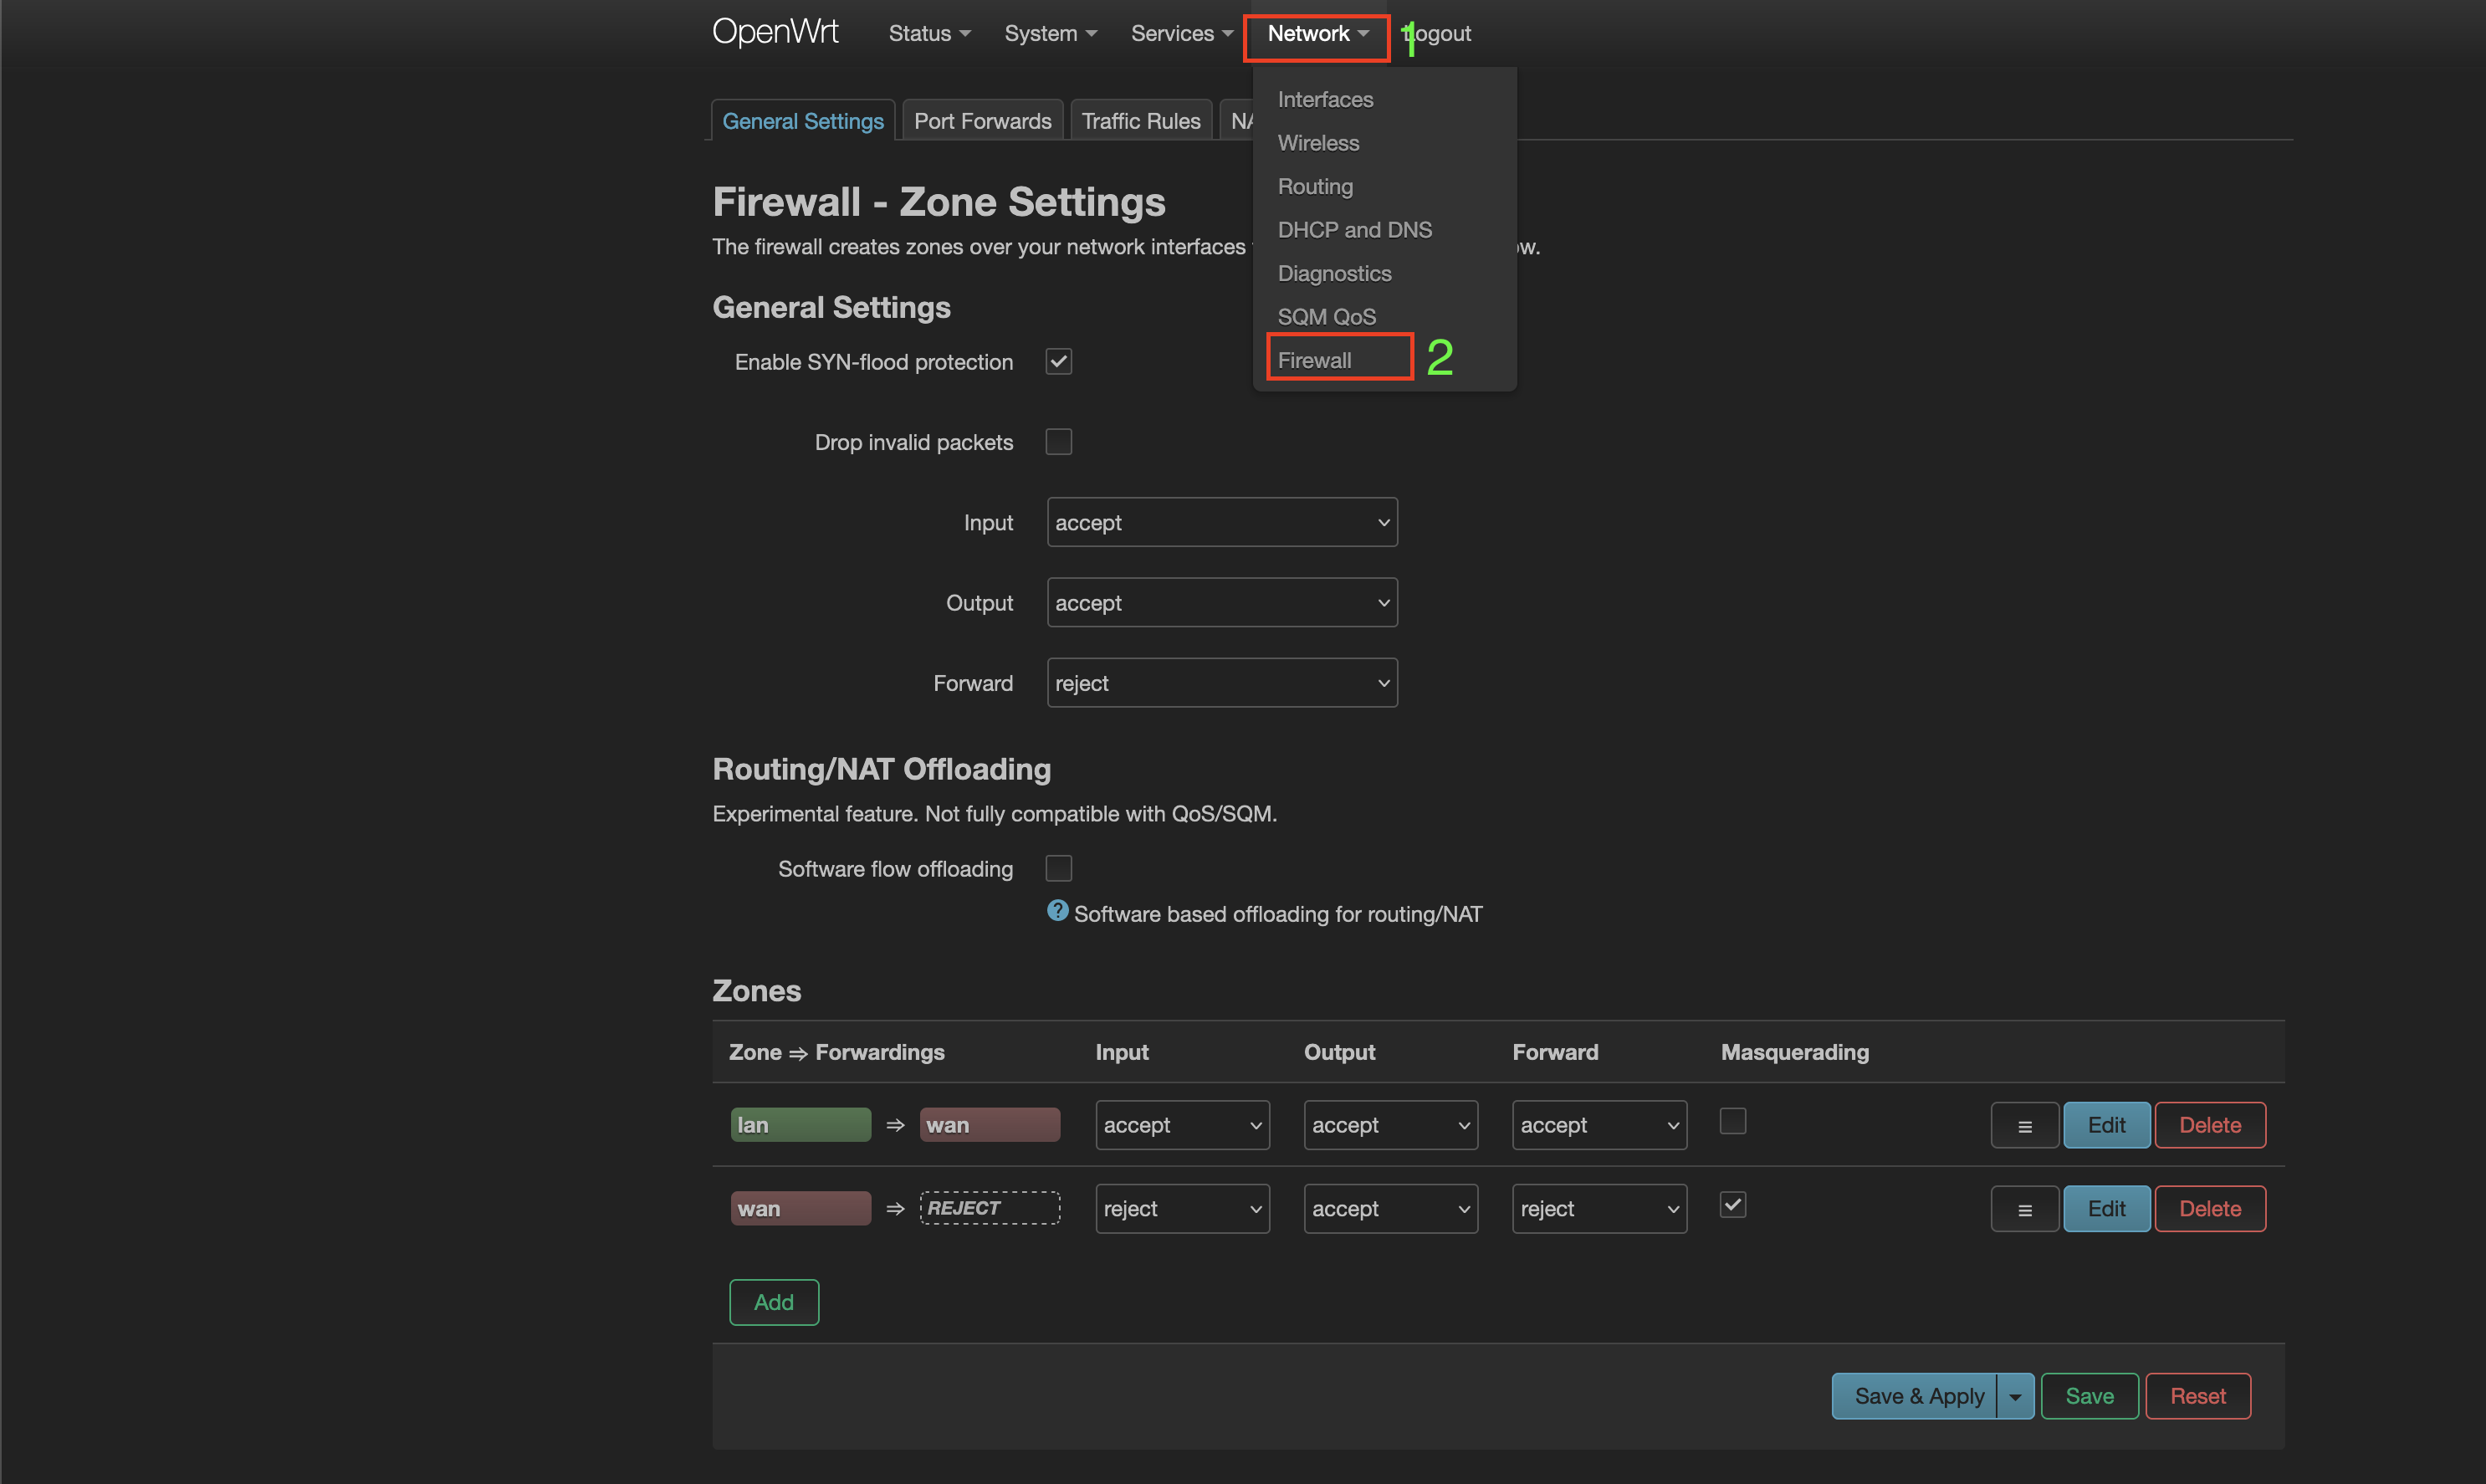
Step 5:
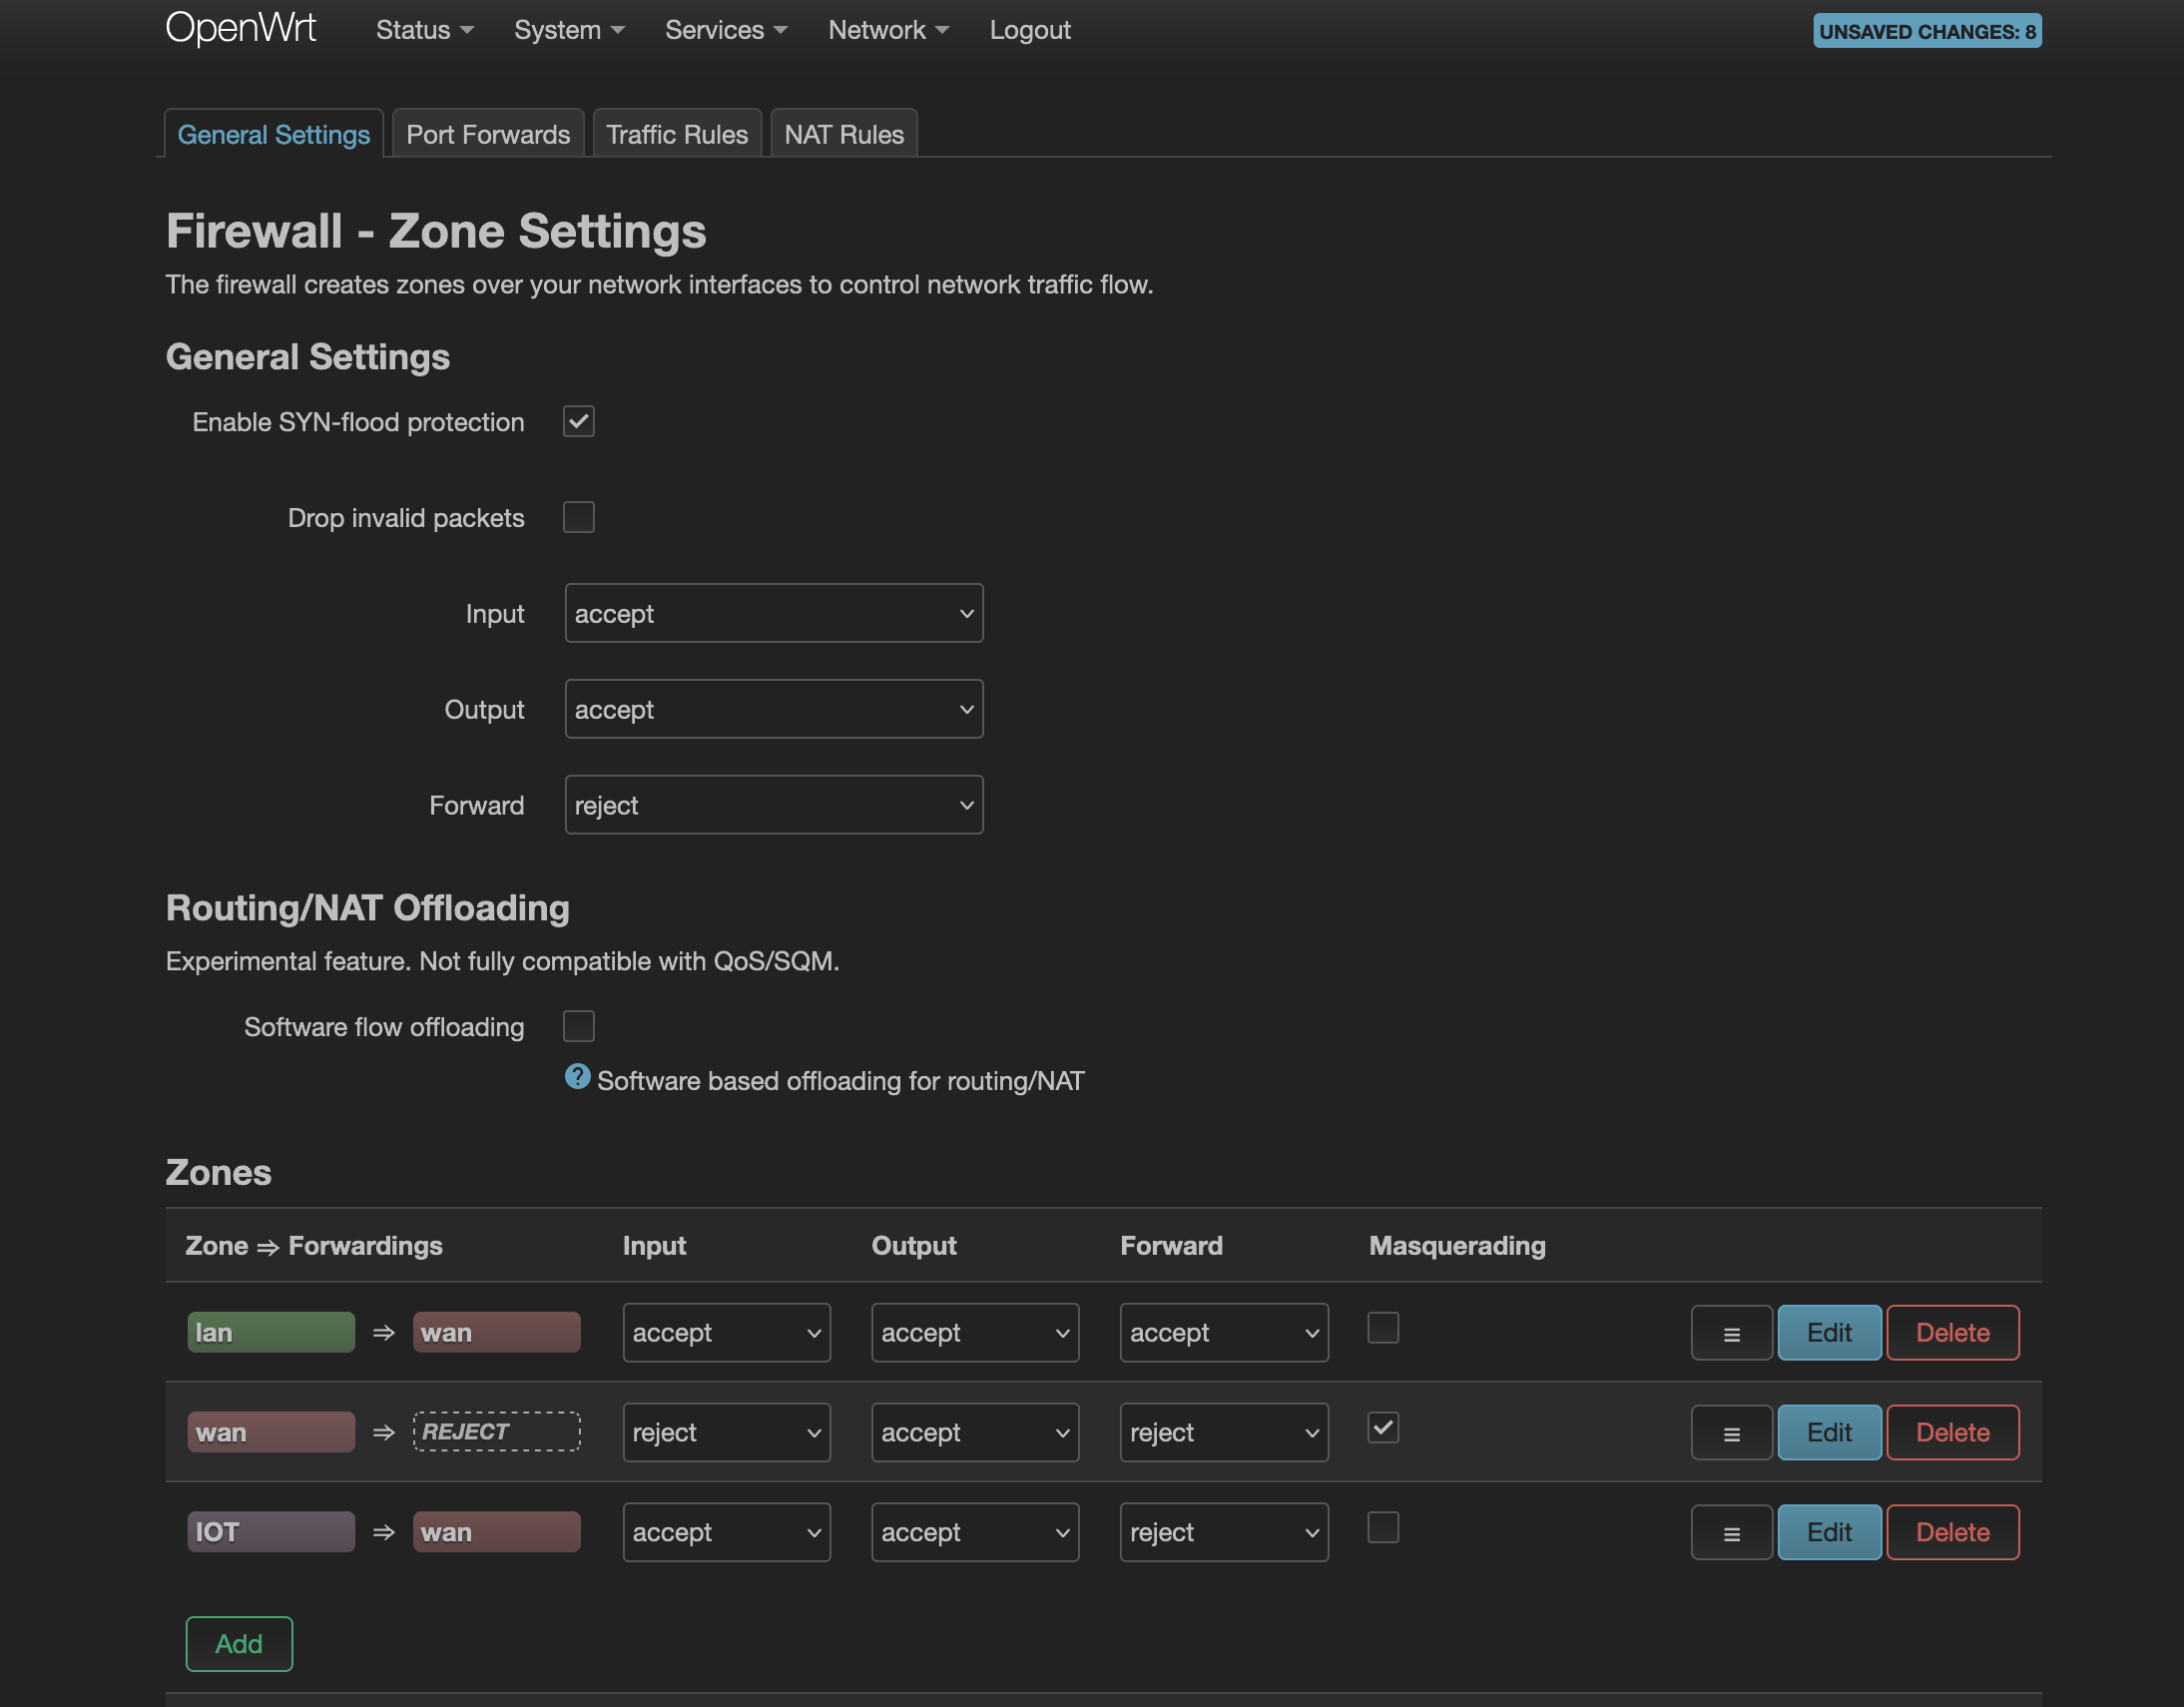
Login to openwrt admin page and navigate to Network > Firewall. The default setup should look like this.
🔝
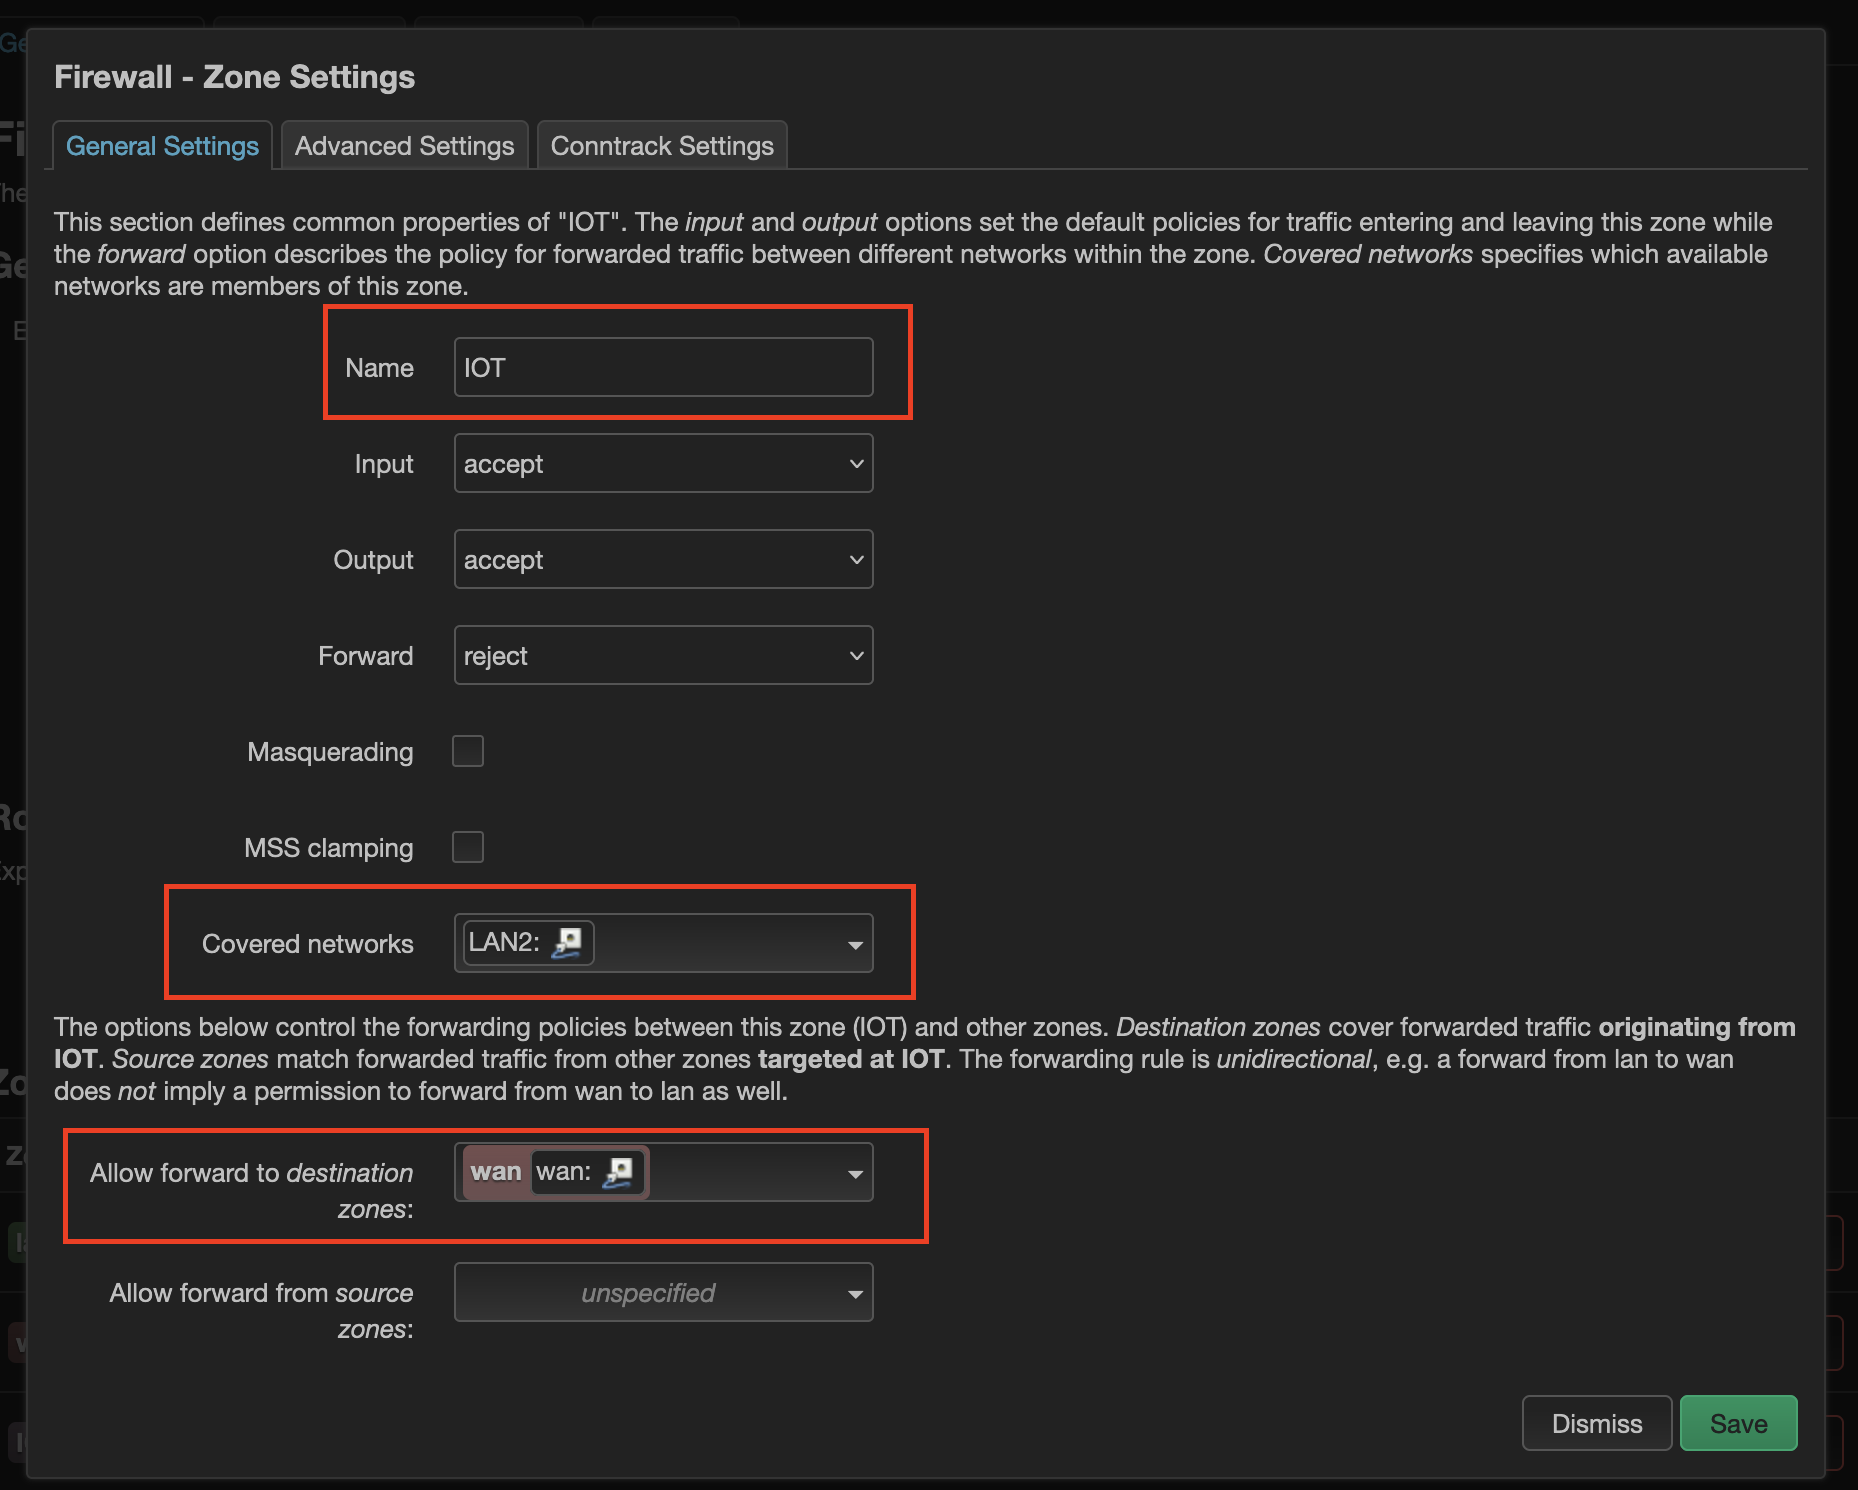
Step 6:
Click on Add to an add new Firewall zone. Enter the name as IOT (you can name anything). For Covered networks choose LAN2 (because we want this IOT zone to be tied to all devices connecting on LAN2 interface - that was defined in Raspberry Pi As OpenWrt Router post). For Allow Forward to destination zones: choose wan (because I want the IOT devices to be able to access wan i.e. internet). Leave other settings as-is, we will revisit later and change them. Save the zone.
🔝
Step 7:
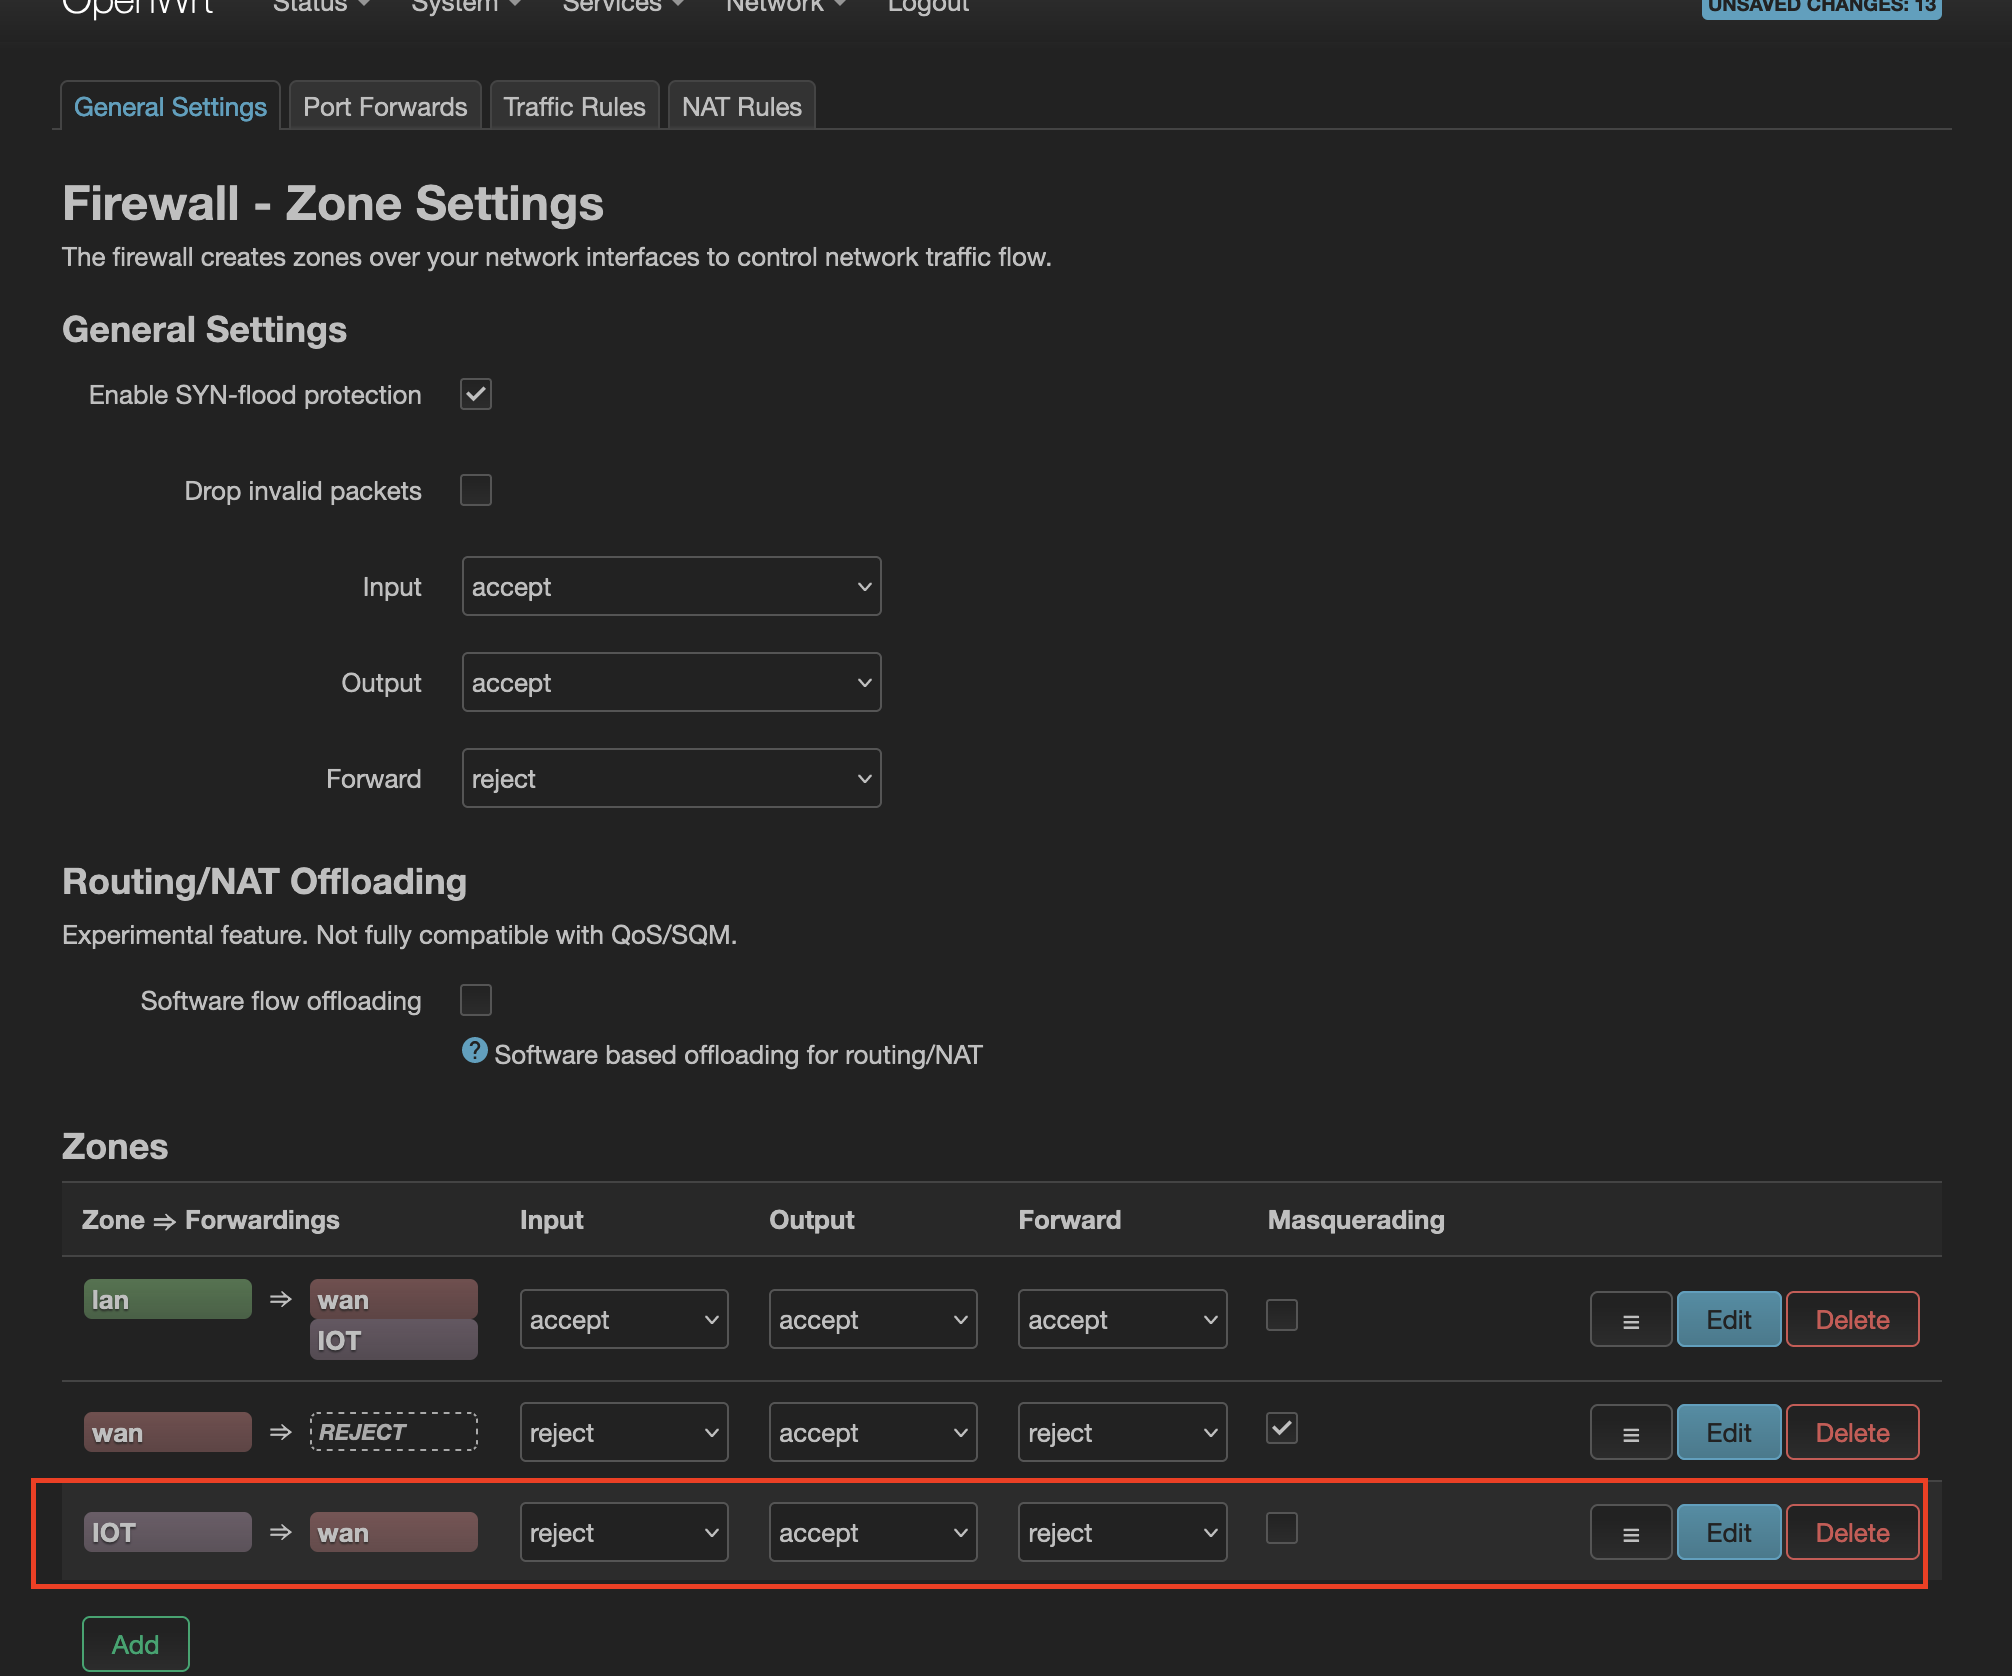
After saving, the firewall zone should look like this:
🔝
Step 8:
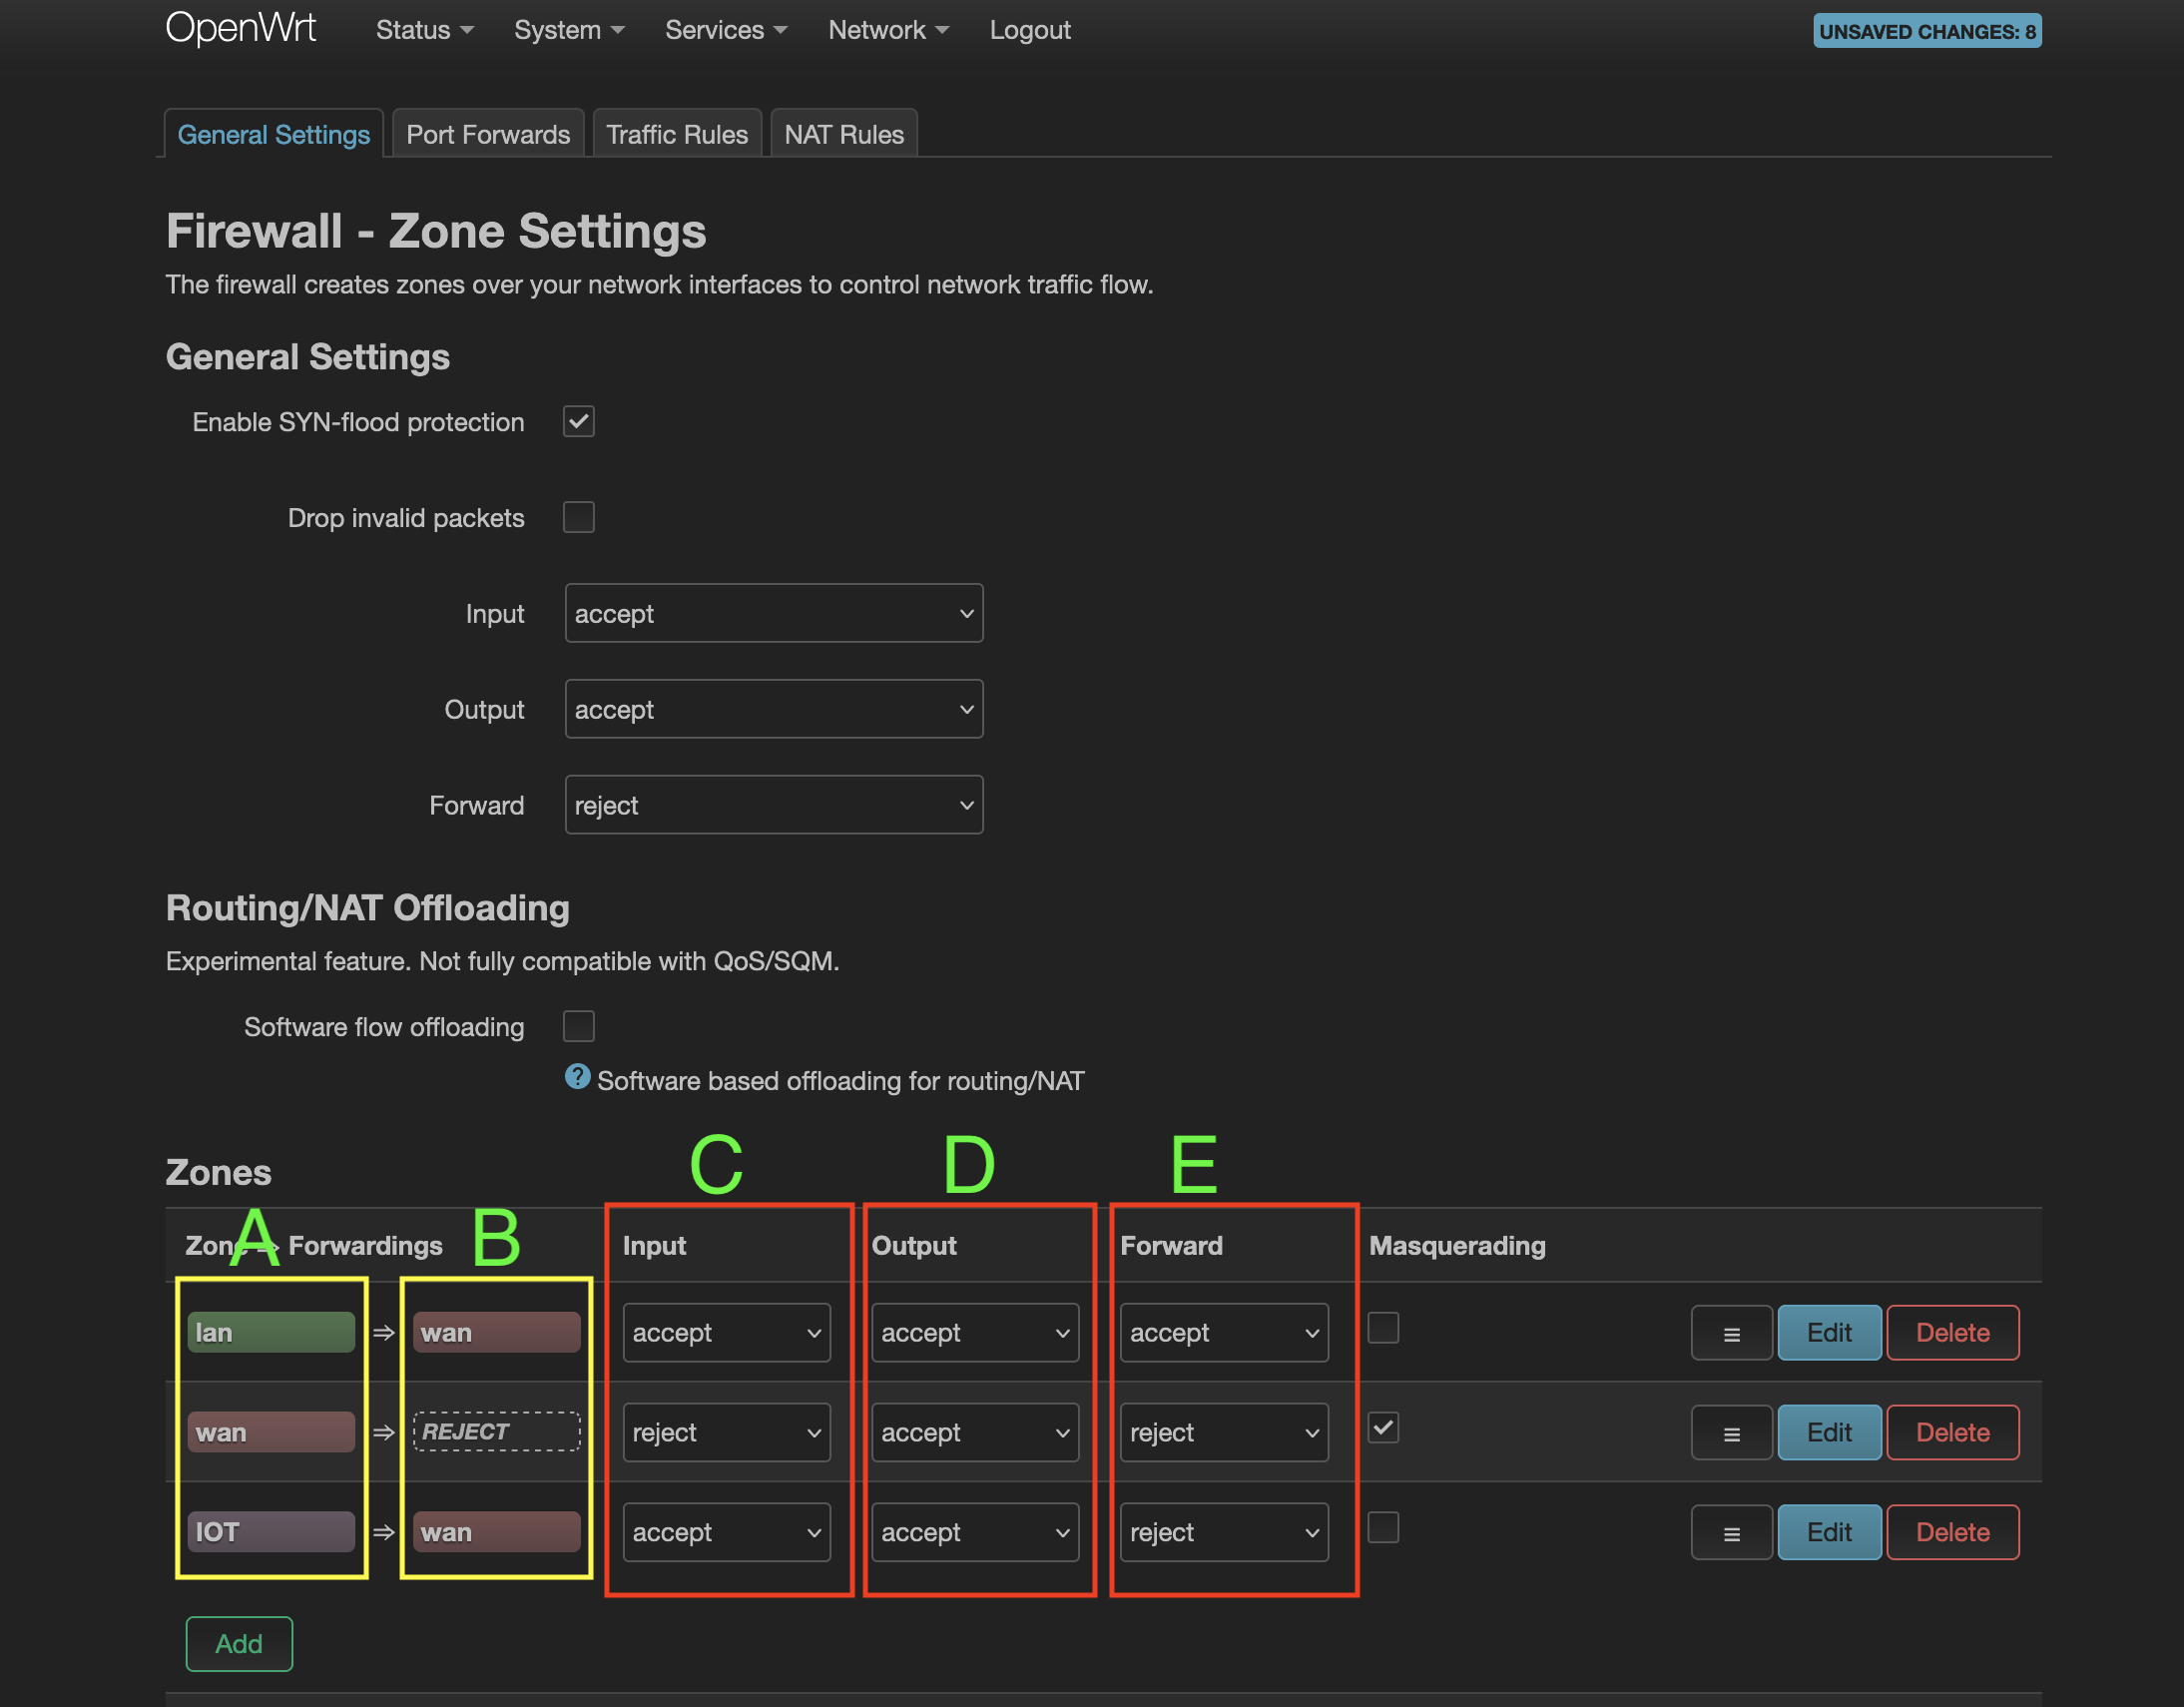
Before proceeding, I want to explain how to read and understand what we see on the screen. There are 5 columns - A to E. We will focus on A and B.
Let’s take the first row from both A and Bcolumns - it says devices that are tied to zone lan (column A) will be forwarding traffic to wan (column B).
Let’s take another example, second row from both A and B columns - it says devices that are tied to zone wan (column A) will not be forwarding traffic to anywhere REJECT in column B. This is because wan zone is the internet.
Let’s take one more example, third row from both A and B columns - it says devices that are tied to zone IOT (column A) will be forwarding traffic to wan (column B).
wan zone is tied to our eth1 which is connected to the internet (via modem). If you didn’t want IOT zone to reach out to internet, you will remove wan from column B third row (i.e. from Allow Forward to destination zones: which was set in Step6).
Now we know, how to make sense of columns A and B.
🔝
Step 9:
Now let’s focus on columns C, D and E. These 3 columns are to be read with respect to the router (i.e. the device on which openwrt is running - Raspberry Pi in my case).
Let’s take the first row, columns A, C, D and E (ignore column B as it’s not applicable) - it says openwrt router will accept/allow incoming connections (column C) from devices that are tied to zone lan (column A). It also says openwrt router will accept/allow outgoing connections (column D) from devices that are tied to zone lan (column A). Lastly, it says openwrt router will accept/allow forwarding connections (column E) from devices that are tied to zone lan (column A).
Phew!
Let’s take another example, second row, columns A, C, D and E (ignore column B as it’s not applicable) - it says openwrt router will reject incoming connections (column C) from devices that are tied to zone wan (column A). Because we don’t public to access our openwrt router servics. It also says openwrt router will accept/allow outgoing connections (column D) from devices that are tied to zone wan (column A). Lastly, it says openwrt router will rejectforwarding connections (column E) from devices that are tied to zone wan (column A).
Let’s take one more example, the third row, columns A, C, D and E (ignore column B as it’s not applicable) - it says openwrt router will accept/allow incoming connections (column C) from devices that are tied to zone IOT (column A). It also says openwrt router will accept/allow outgoing connections (column D) from devices that are tied to zone IOT (column A). Lastly, it says openwrt router will reject forwarding connections (column E) from devices that are tied to zone IOT (column A).
What does it mean when we said:
openwrt router will
accept/allow incoming connections (columnC) from devices that are tied to zonelan(columnA):
Openwrt router is running so many services such as DHCP, DNS and it has access to all the devices that are connected to the network (irrespective of which access point the devices are connected to). Any device that wants to open a webpage will need to first access the DNS service (which is running on openwrt router) - the device will first make a DNS lookup on the openwrt router. This is an incoming connection to the openwrt router. So if we had reject column C for any of the zones, that specific zone’s devices will not be able to access the openwrt router. The devices on that zone will not be even able to access the admin page or ping the openwrt router.
What does it mean when we said:
openwrt router will
accept/allow outgoing connections (columnD) from devices that are tied to zonelan(columnA):
Most of the activities will need the traffic to pass through (or go-out-of) the router. So if we had accept column D for any of the zones, that specific zone’s devices traffic will be able to go out of the openwrt router. If you reject columns D, services which needs the traffic to pass through the openwrt router will fail.
What does it mean when we said:
openwrt router will
accept/allow forwarding connections (columnE) from devices that are tied to zonelan(columnA):
Forward in column E is for forwarding traffic between different networks in the same zones (not very common).
🔝
Step 10:
Now we have setup firewall zones and understand how to read them.
My requirement is:
- devices on
lanzone will be able to access internet, will also be able to access devices onIOTzone. The router should accept- incoming, outgoing and forwarding. - no change to default
wanzone. - have one more bit complex requirement (covered in the next step).
For 1st requirement, click
Editin thelanzone row and addIOTin theAllow Forward to destination zones:field. Save it.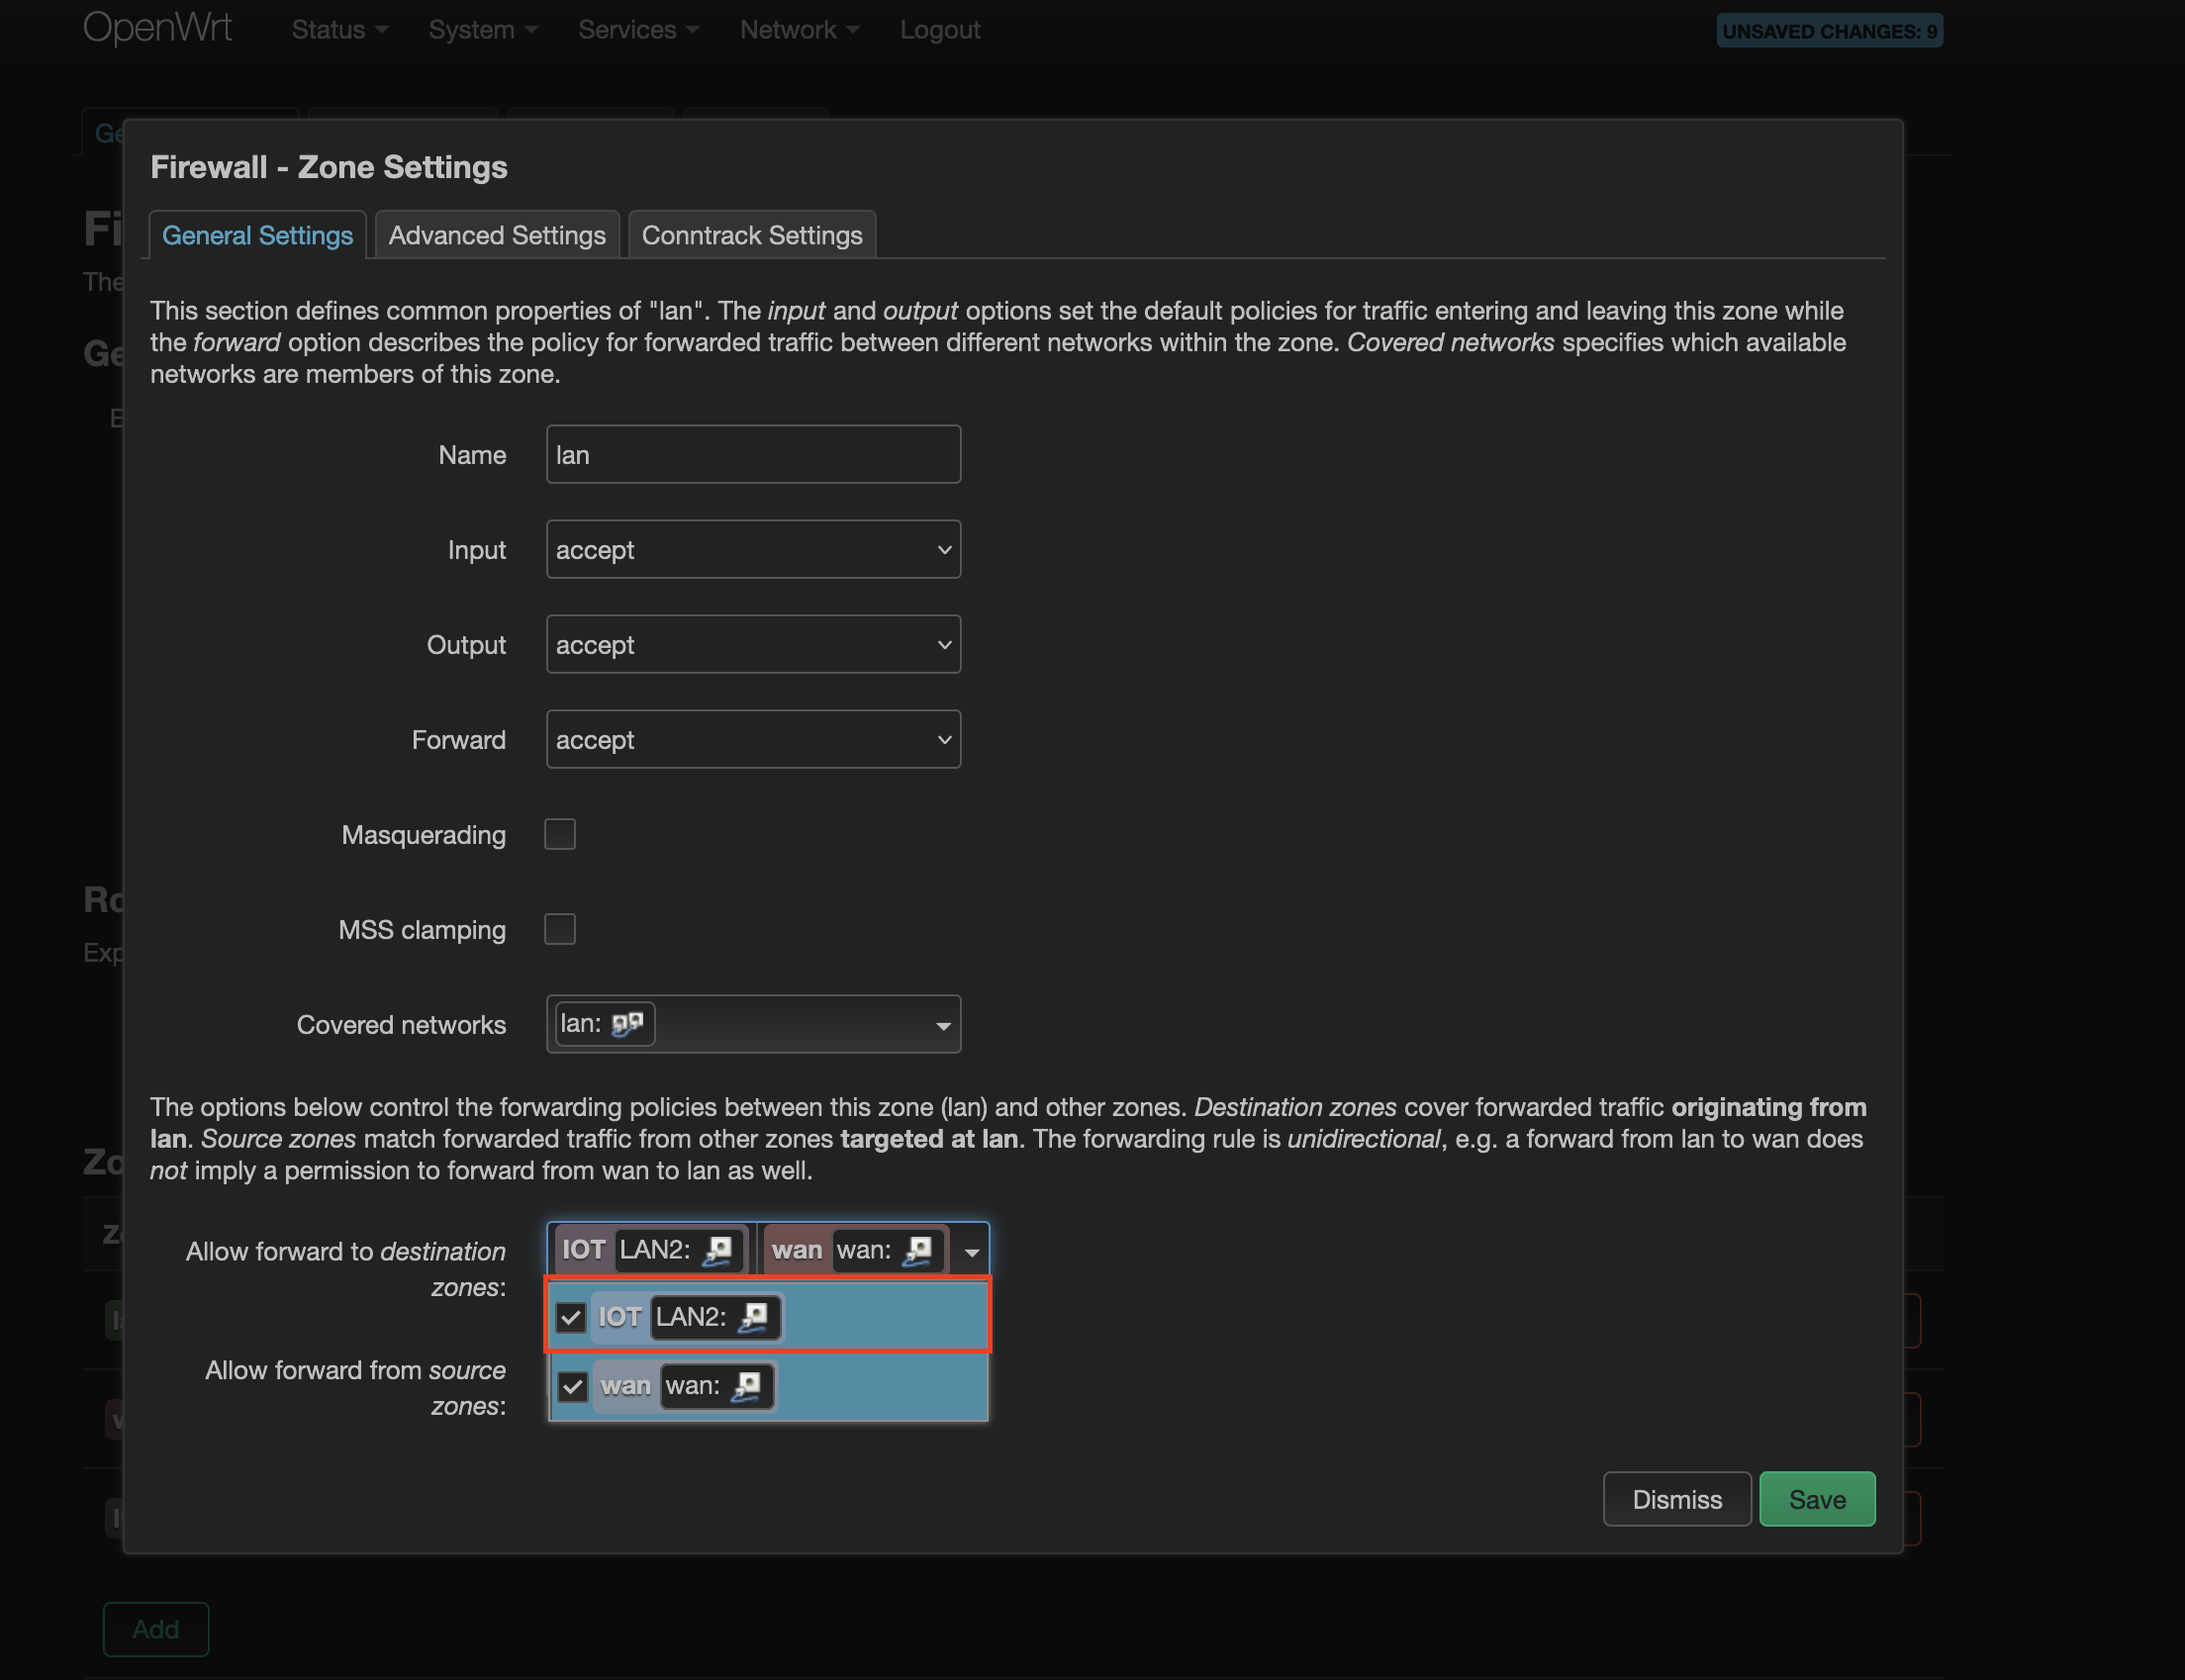 It should look like this:

🔝
Step 11:
The last requirement is:
- devices on
IOTzone will be able to access internet, will not be able to access devices onlanzone. The router should accept only outgoing connections. The router shouldrejectincoming and forwarding.
This part
devices on
IOTzone will be able to access internet, will not be able to access devices onlanzone
is already set as per the configuration we have so far.
Even this part
The router should accept only outgoing connections
is also set as per the configuration we have so far. However, we need to work on
The router should
rejectincoming and forwarding
To reject both incoming and forwarding to the router from IOT zone - click Edit in the IOT zone row. For Input and Forward choose reject. Save it.
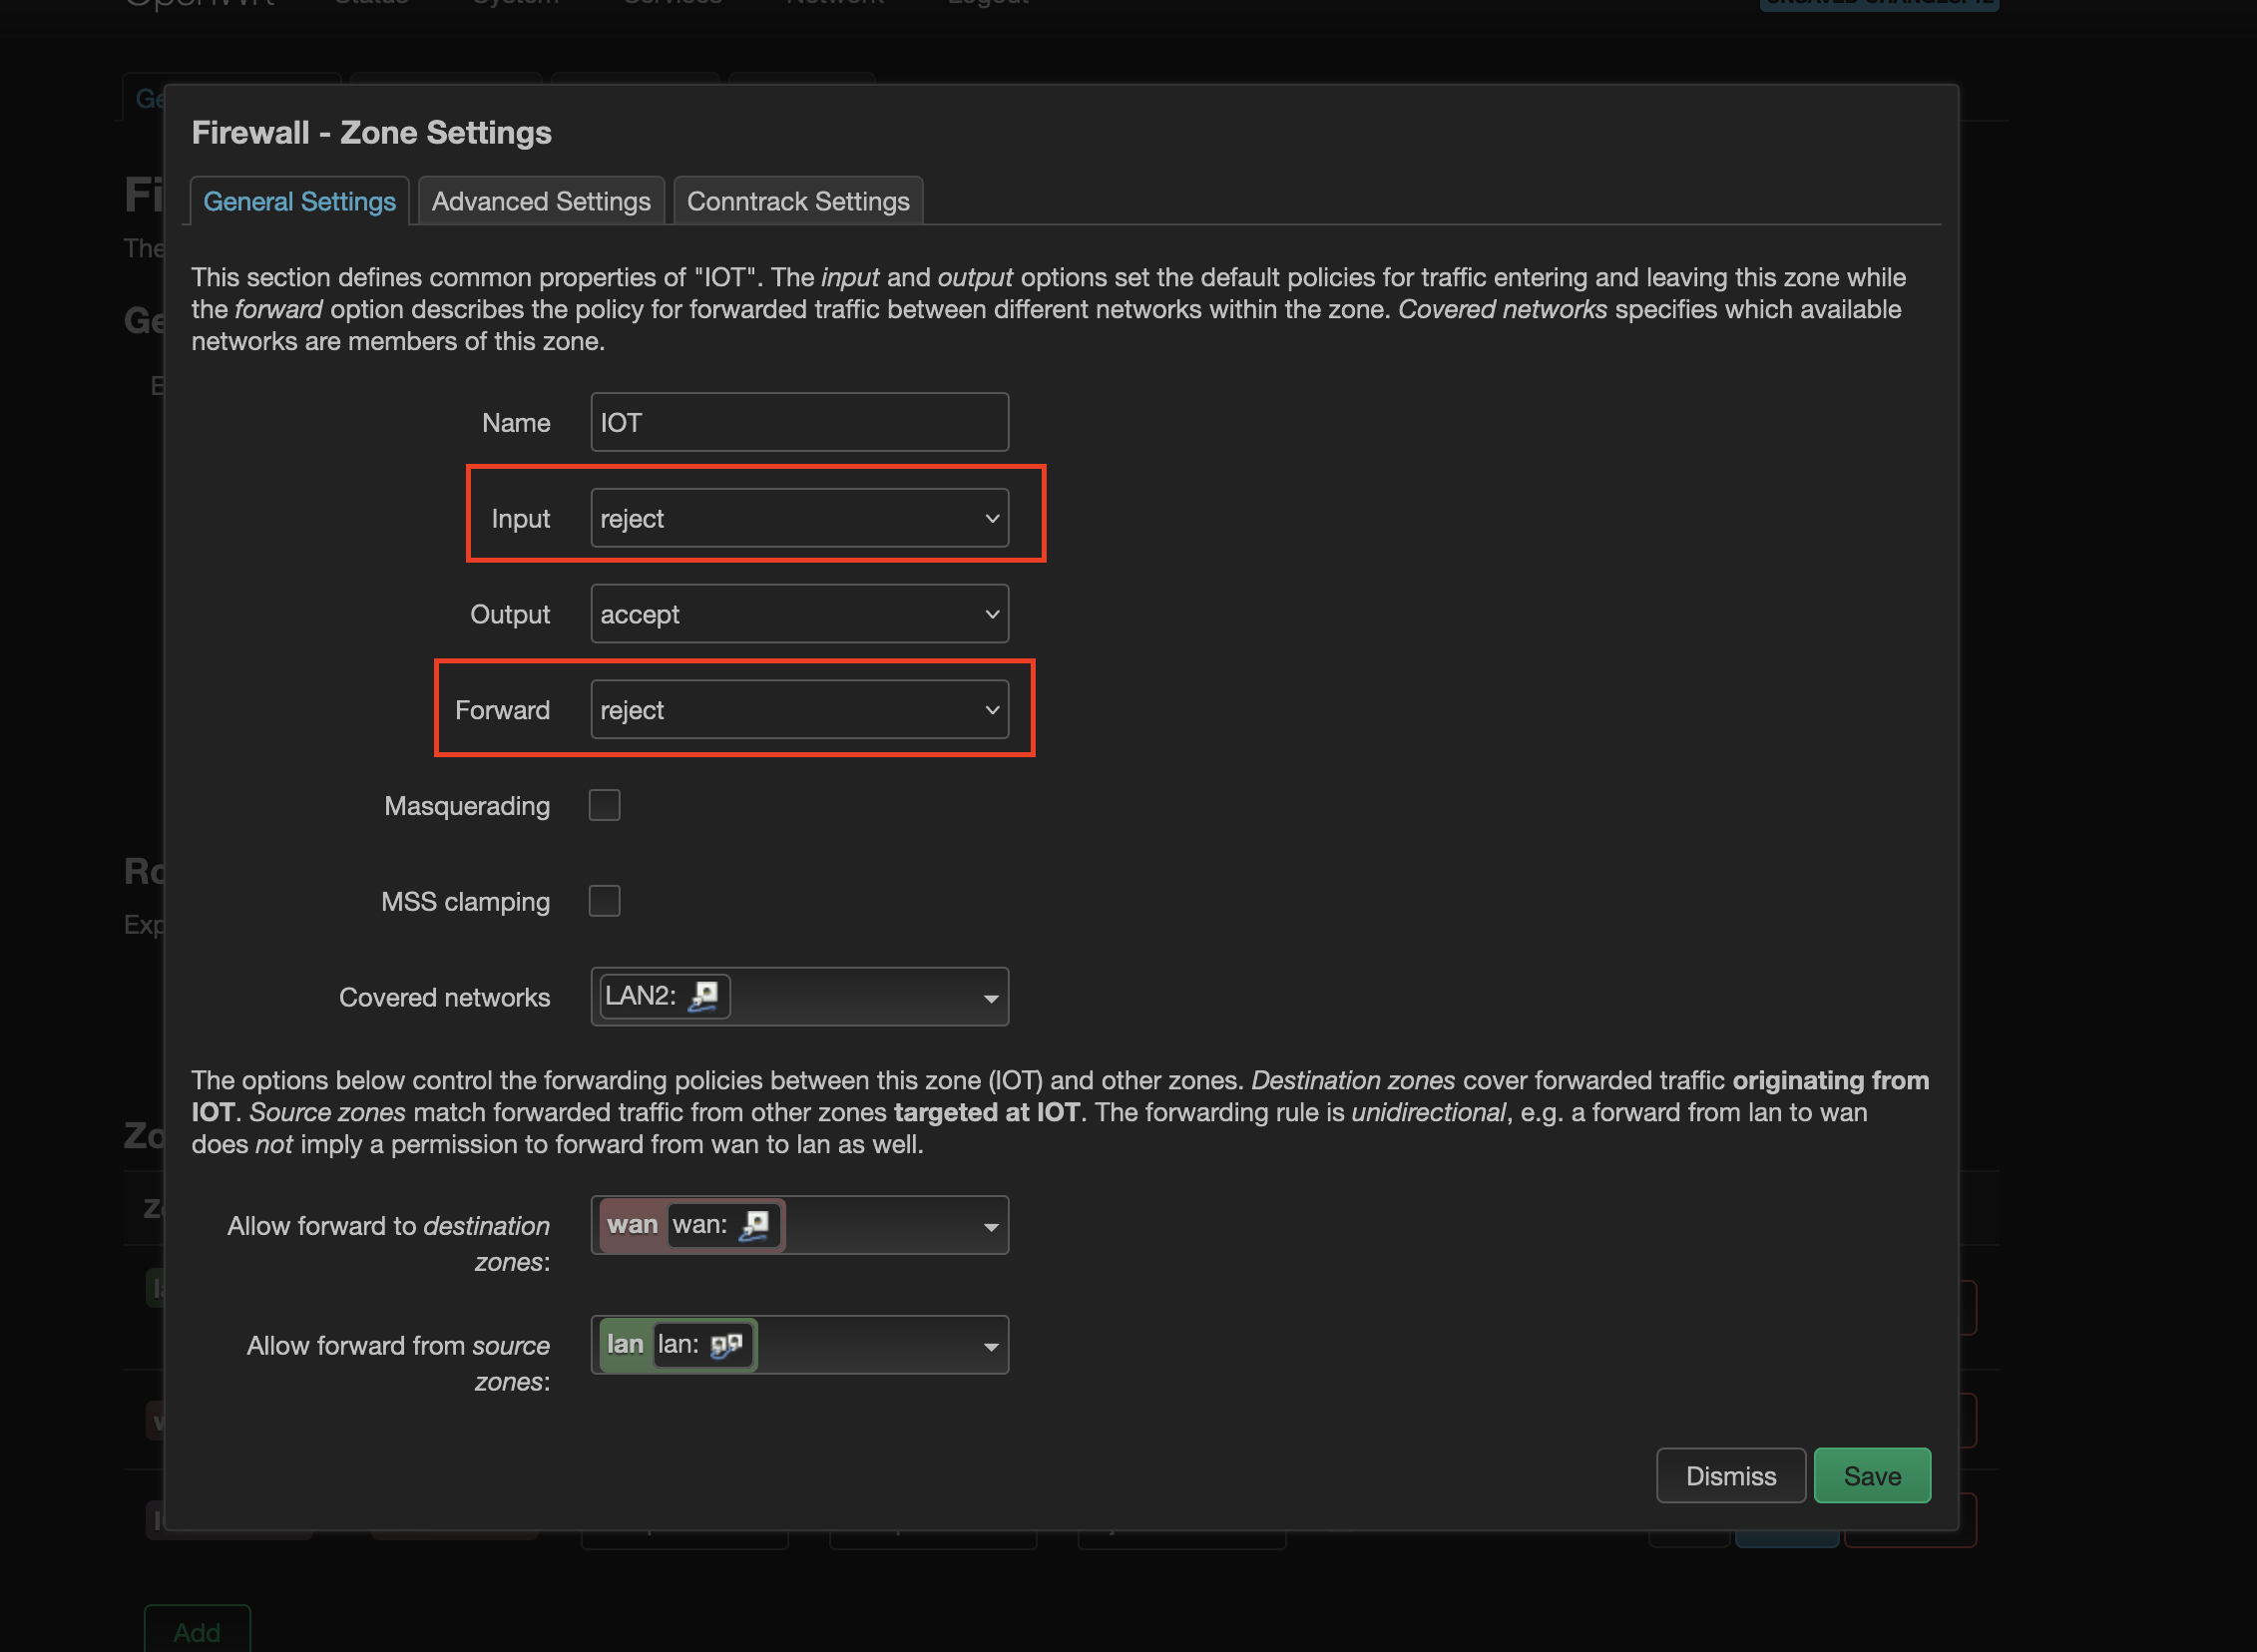 It should look like this:
All set? Not really, what we have done is asked openwrt router to reject incoming traffic from devices assocaited with IOT zone. That’s correct, we don’t want IOT devices accessing openwrt router’s admin page. However, this also means the openwrt router will reject incoming requests for DHCP, DNS lookup from IOT devices. So they won’t be able to access the internet too!
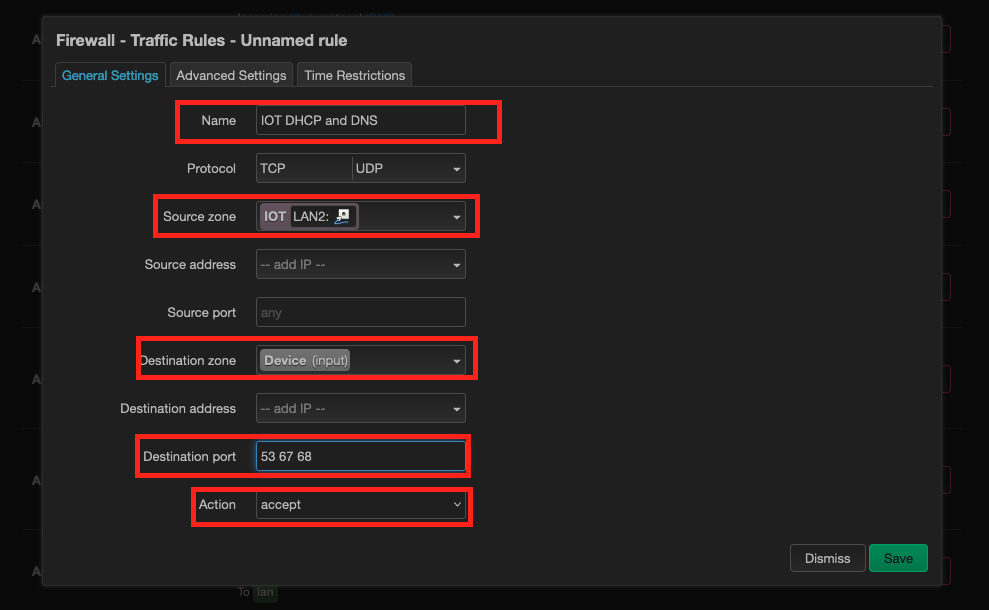
To fix this, we will add a Traffic Rules to allow only DHCP and DNS incoming request to be serviced by the openwrt router for IOT devices. To do this, click on Traffic Rules (on the top) > Add. Enter name as IOT DHCP and DNS (you can name anything). Source zone: IOT. Destination zone: Device (input). Destination port: 53 67 68 (these are the ports on which DHCP and DNS services run on openwrt router). Action: accept. Save this rule.
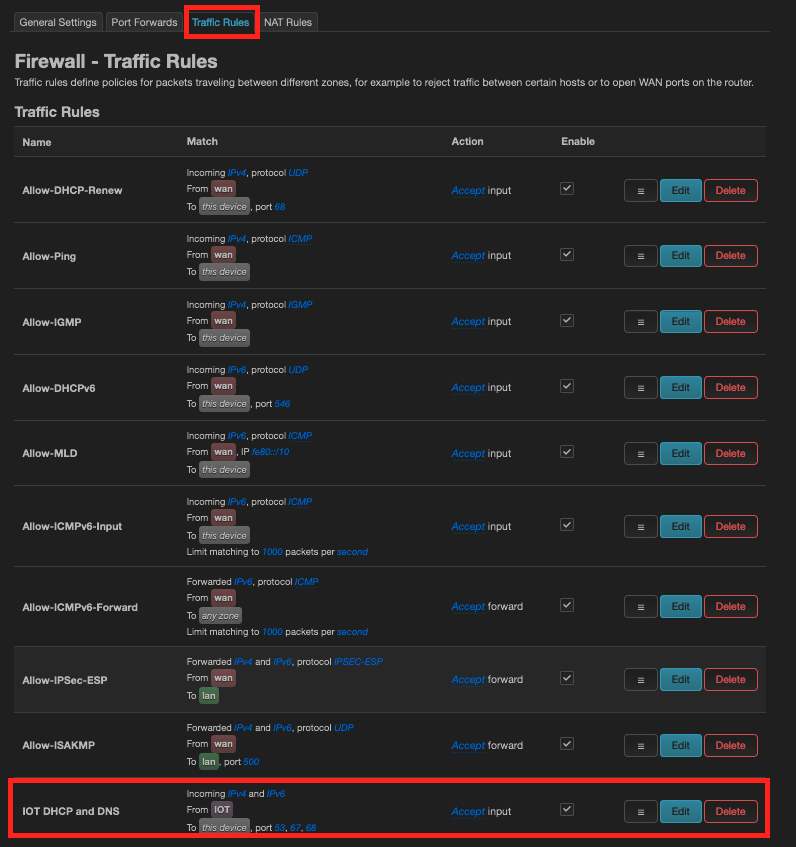
The Traffic Rules page should look like this now:
Done!
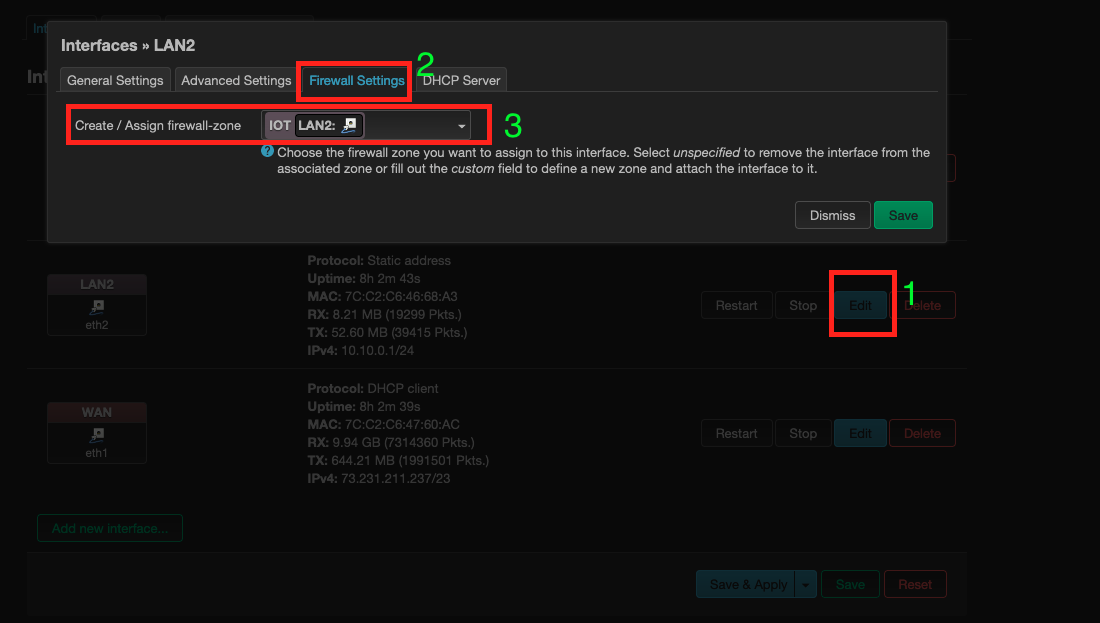
You can verify if the interface and firewall zone is associated correctly by going to Network > Inteface page and edit any of the interfaces and see the Firewall Settings it should show which zone the interface is tied to.
🔝
GLOSSARY:
What is the difference between reject and drop?
“reject” means that the firewall actively responds to the network traffic with a message that indicates the traffic has been rejected or blocked. However, this let’s the sender know that their request was rejected by the firewall and might also reveal information about the firewall. Potential security risk.
“drop”, on the other hand, means that the firewall simply dropped the network traffic without sending any response back to the sender. The sender will not know if their request was rejected or the host is not available. This is better in-terms of security.
Updated my setup to drop instead of reject:
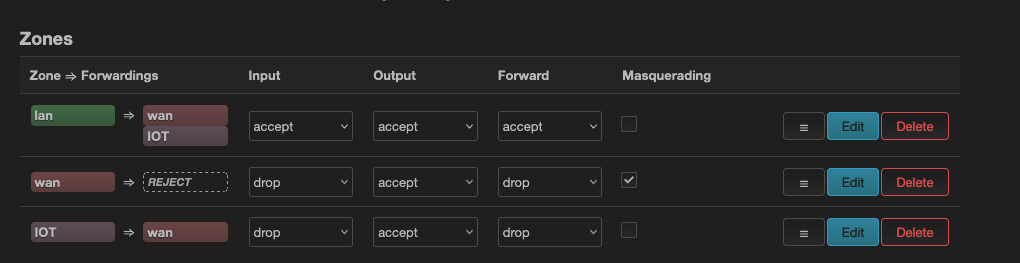
🔝