Raspberry Pi As Openwrt Router
This project started with the need for having a view into how much bandwidth each device on my home network was consuming.
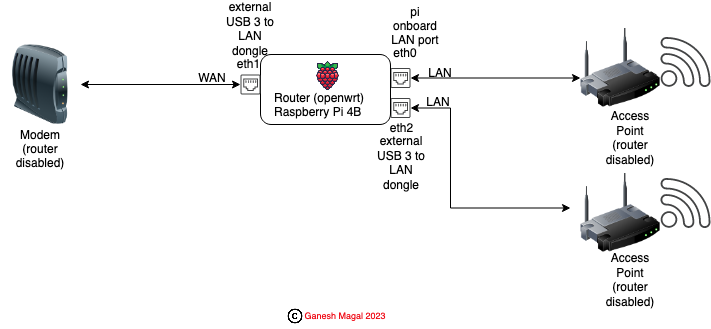
I currently have an old Netgear modem-router combination that doesn’t support custom firmware and it doesn’t provide the insights that I’m looking for out of the box. I tried finding for other add-on applications which can be used for my purpose and was impressed with the capabilities openwrt provides. However, the initial problem still remained - it wasn’t compatible with my existing modem-router and I didn’t want to upgrade my current setup. Raspberry Pi came to the rescue. Currently for my home network I have a Raspberry Pi acting as router running openwrt (architecture below). There is no compormise in the internet speed with Raspberry Pi running openwrt. I have listed the hardware, software and my current setup along with details on how to configure Raspberry Pi as a router running openwrt.
TABLE OF CONTENTS:
- Hardware
- Software
- Architecture
- Steps
- Other useful packages
- Issue(resolved) with my steup
- Setup upgrade(additional LAN port)
- Glossary
- References
HARDWARE:
- Raspberry pi 4B
- TP-Link USB-Ethernet-Adapter-Gigabit-Switch
- MicroSD card
- Existing modem-router combination (or just modem)
- Access point (any) - only if you don’t want to use the raspberry pi’s onboard wifi (which is not powerful enough to act like access point)
- Cat 6 ethernet cables (cat5 can give up to maximum of 100Mbps)
🔝
SOFTWARE:
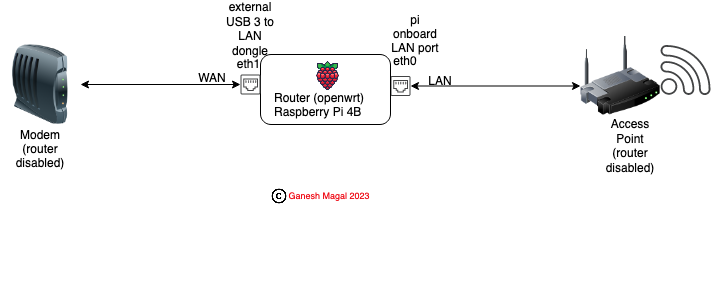
ARCHITECTURE:
STEPS:
Step 1:
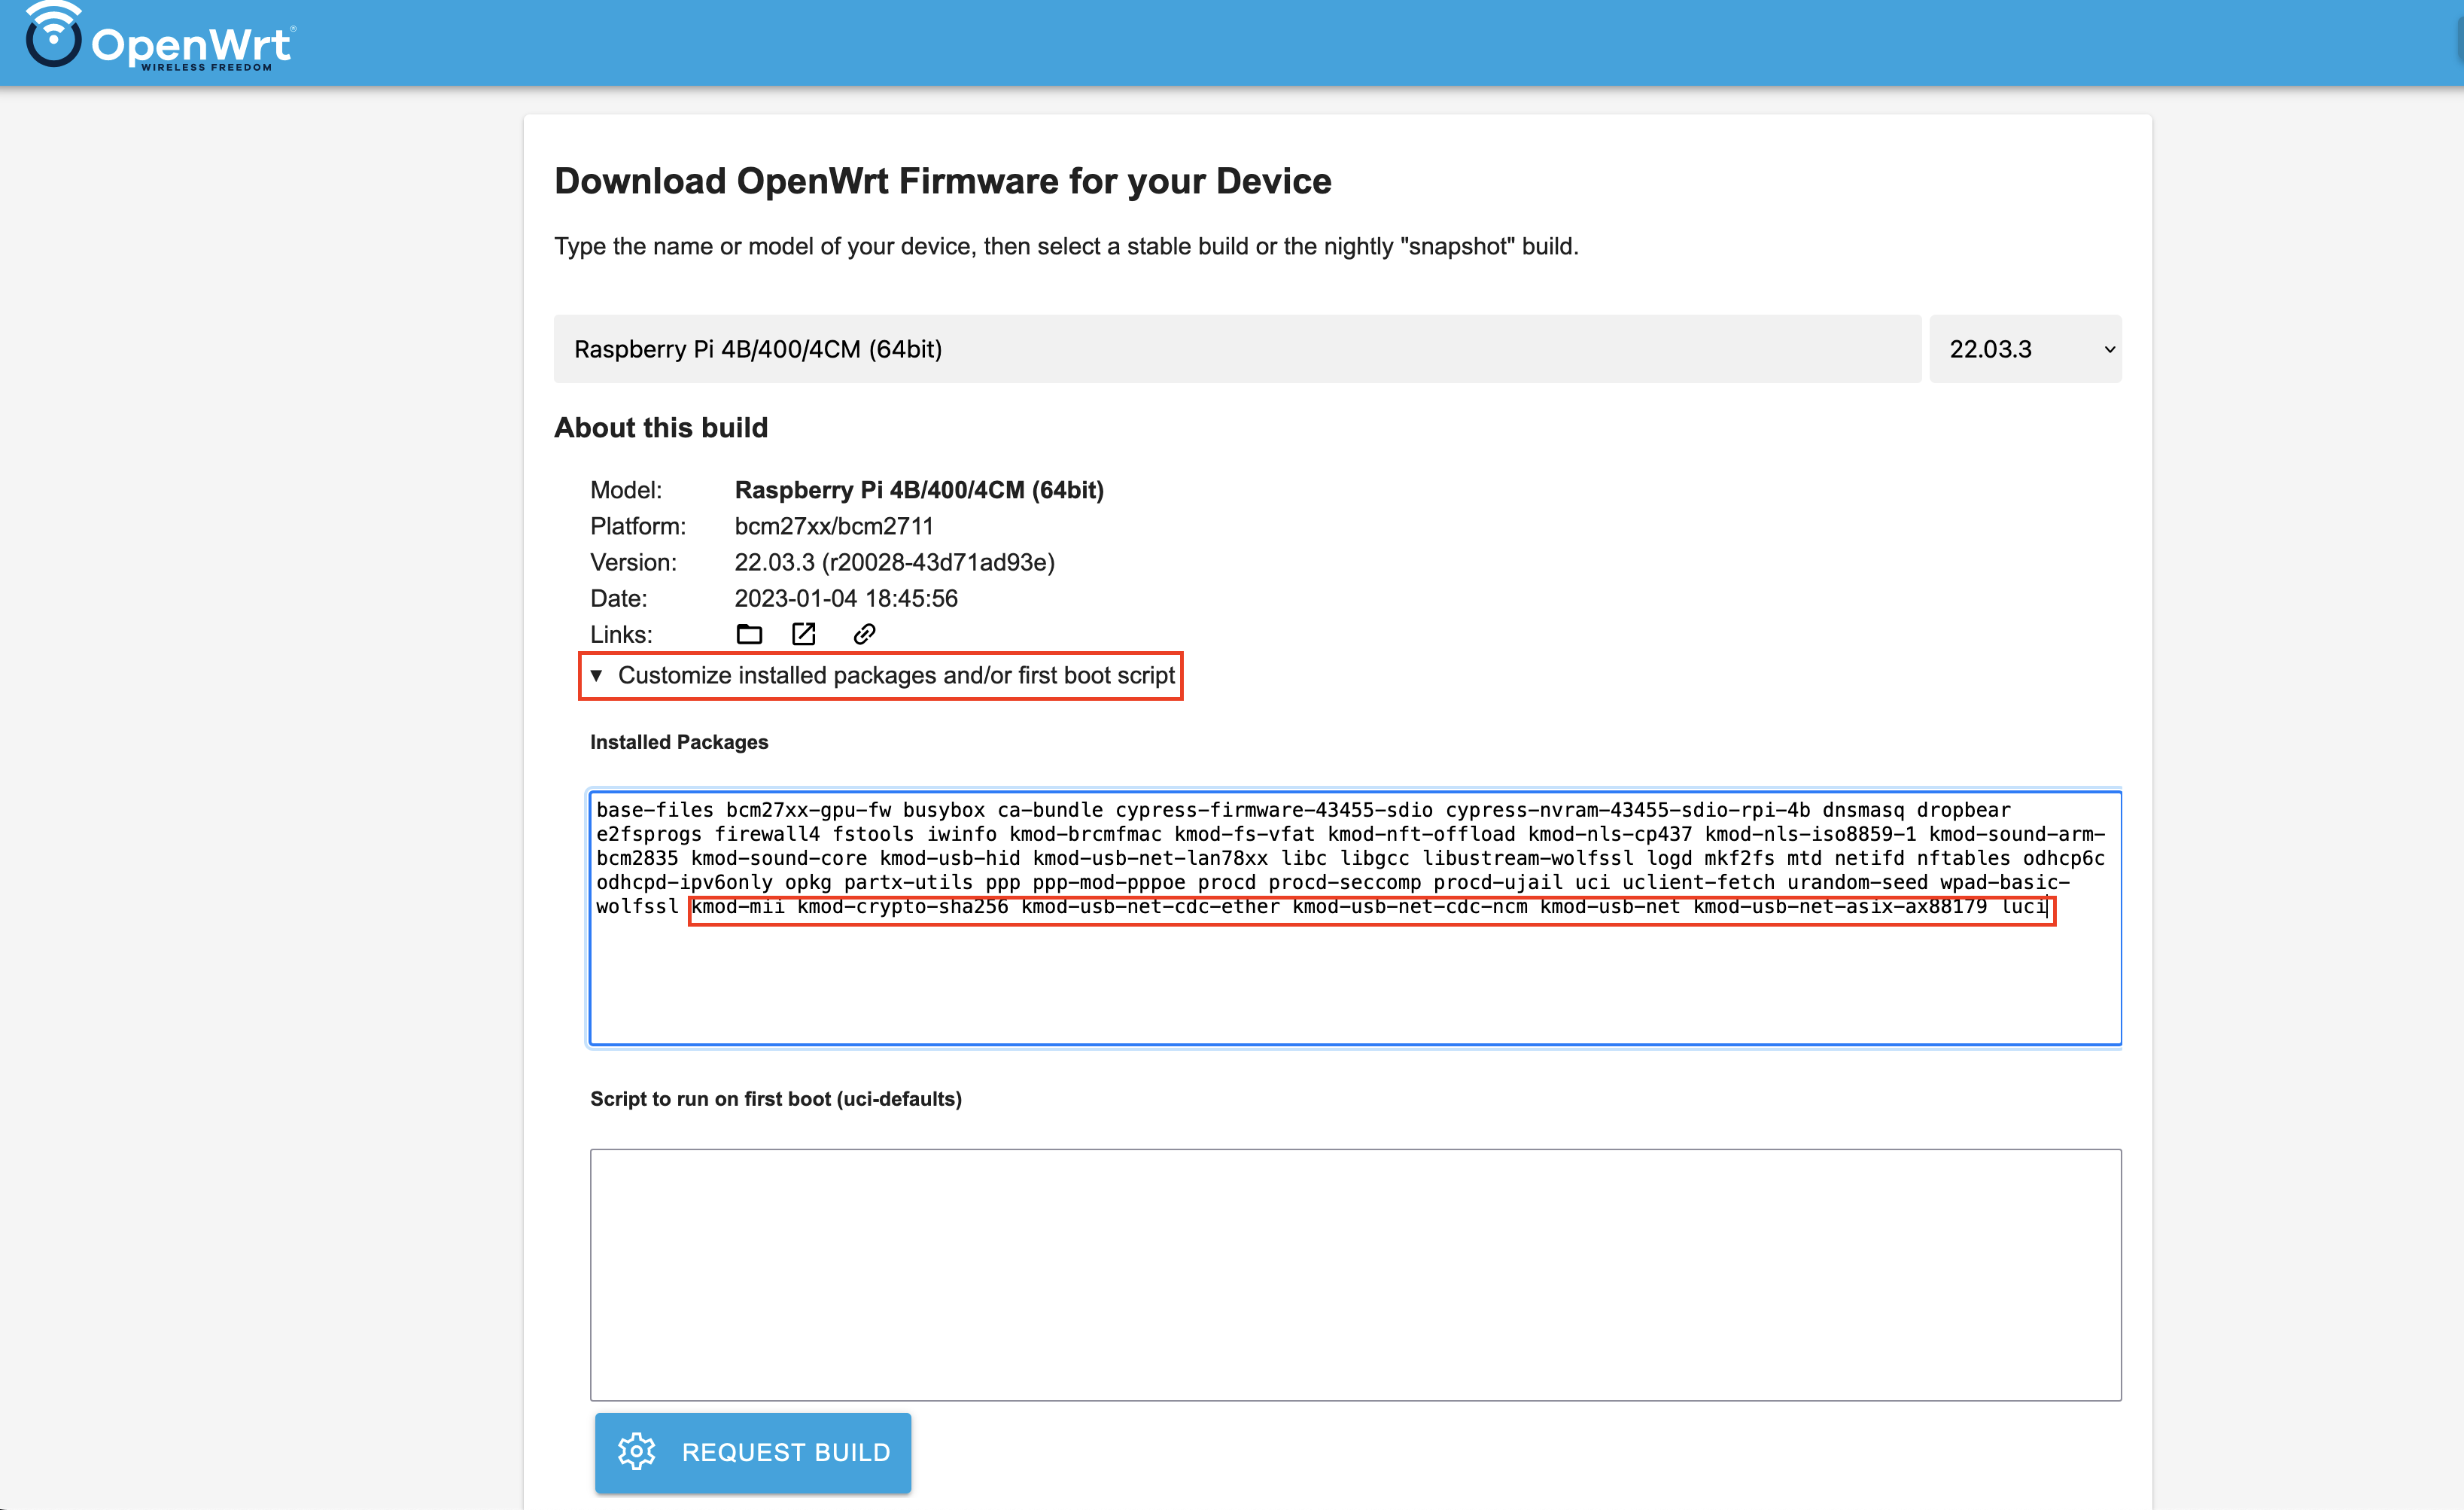
Navigate to openwrt firmware selector page and search for Raspberry Pi. Choose the model which you will be using.
🔝
Step 2:
Before downloading the firmware, we will add few more packages that we want to be included in the firmware (this can be done later too after the entire setup). The additional package is the driver for TP-Link USB-Ethernet-Adapter-Gigabit-Switch. We will using this as the 2nd LAN port for Raspberry Pi (as it has only 1 LAN port on the board). Expand Customize installed packages and/or first boot script and under Installed Packages add the below line towards the end.
kmod-mii kmod-crypto-sha256 kmod-usb-net-cdc-ether kmod-usb-net-cdc-ncm kmod-usb-net kmod-usb-net-asix-ax88179 luci
Step 3:
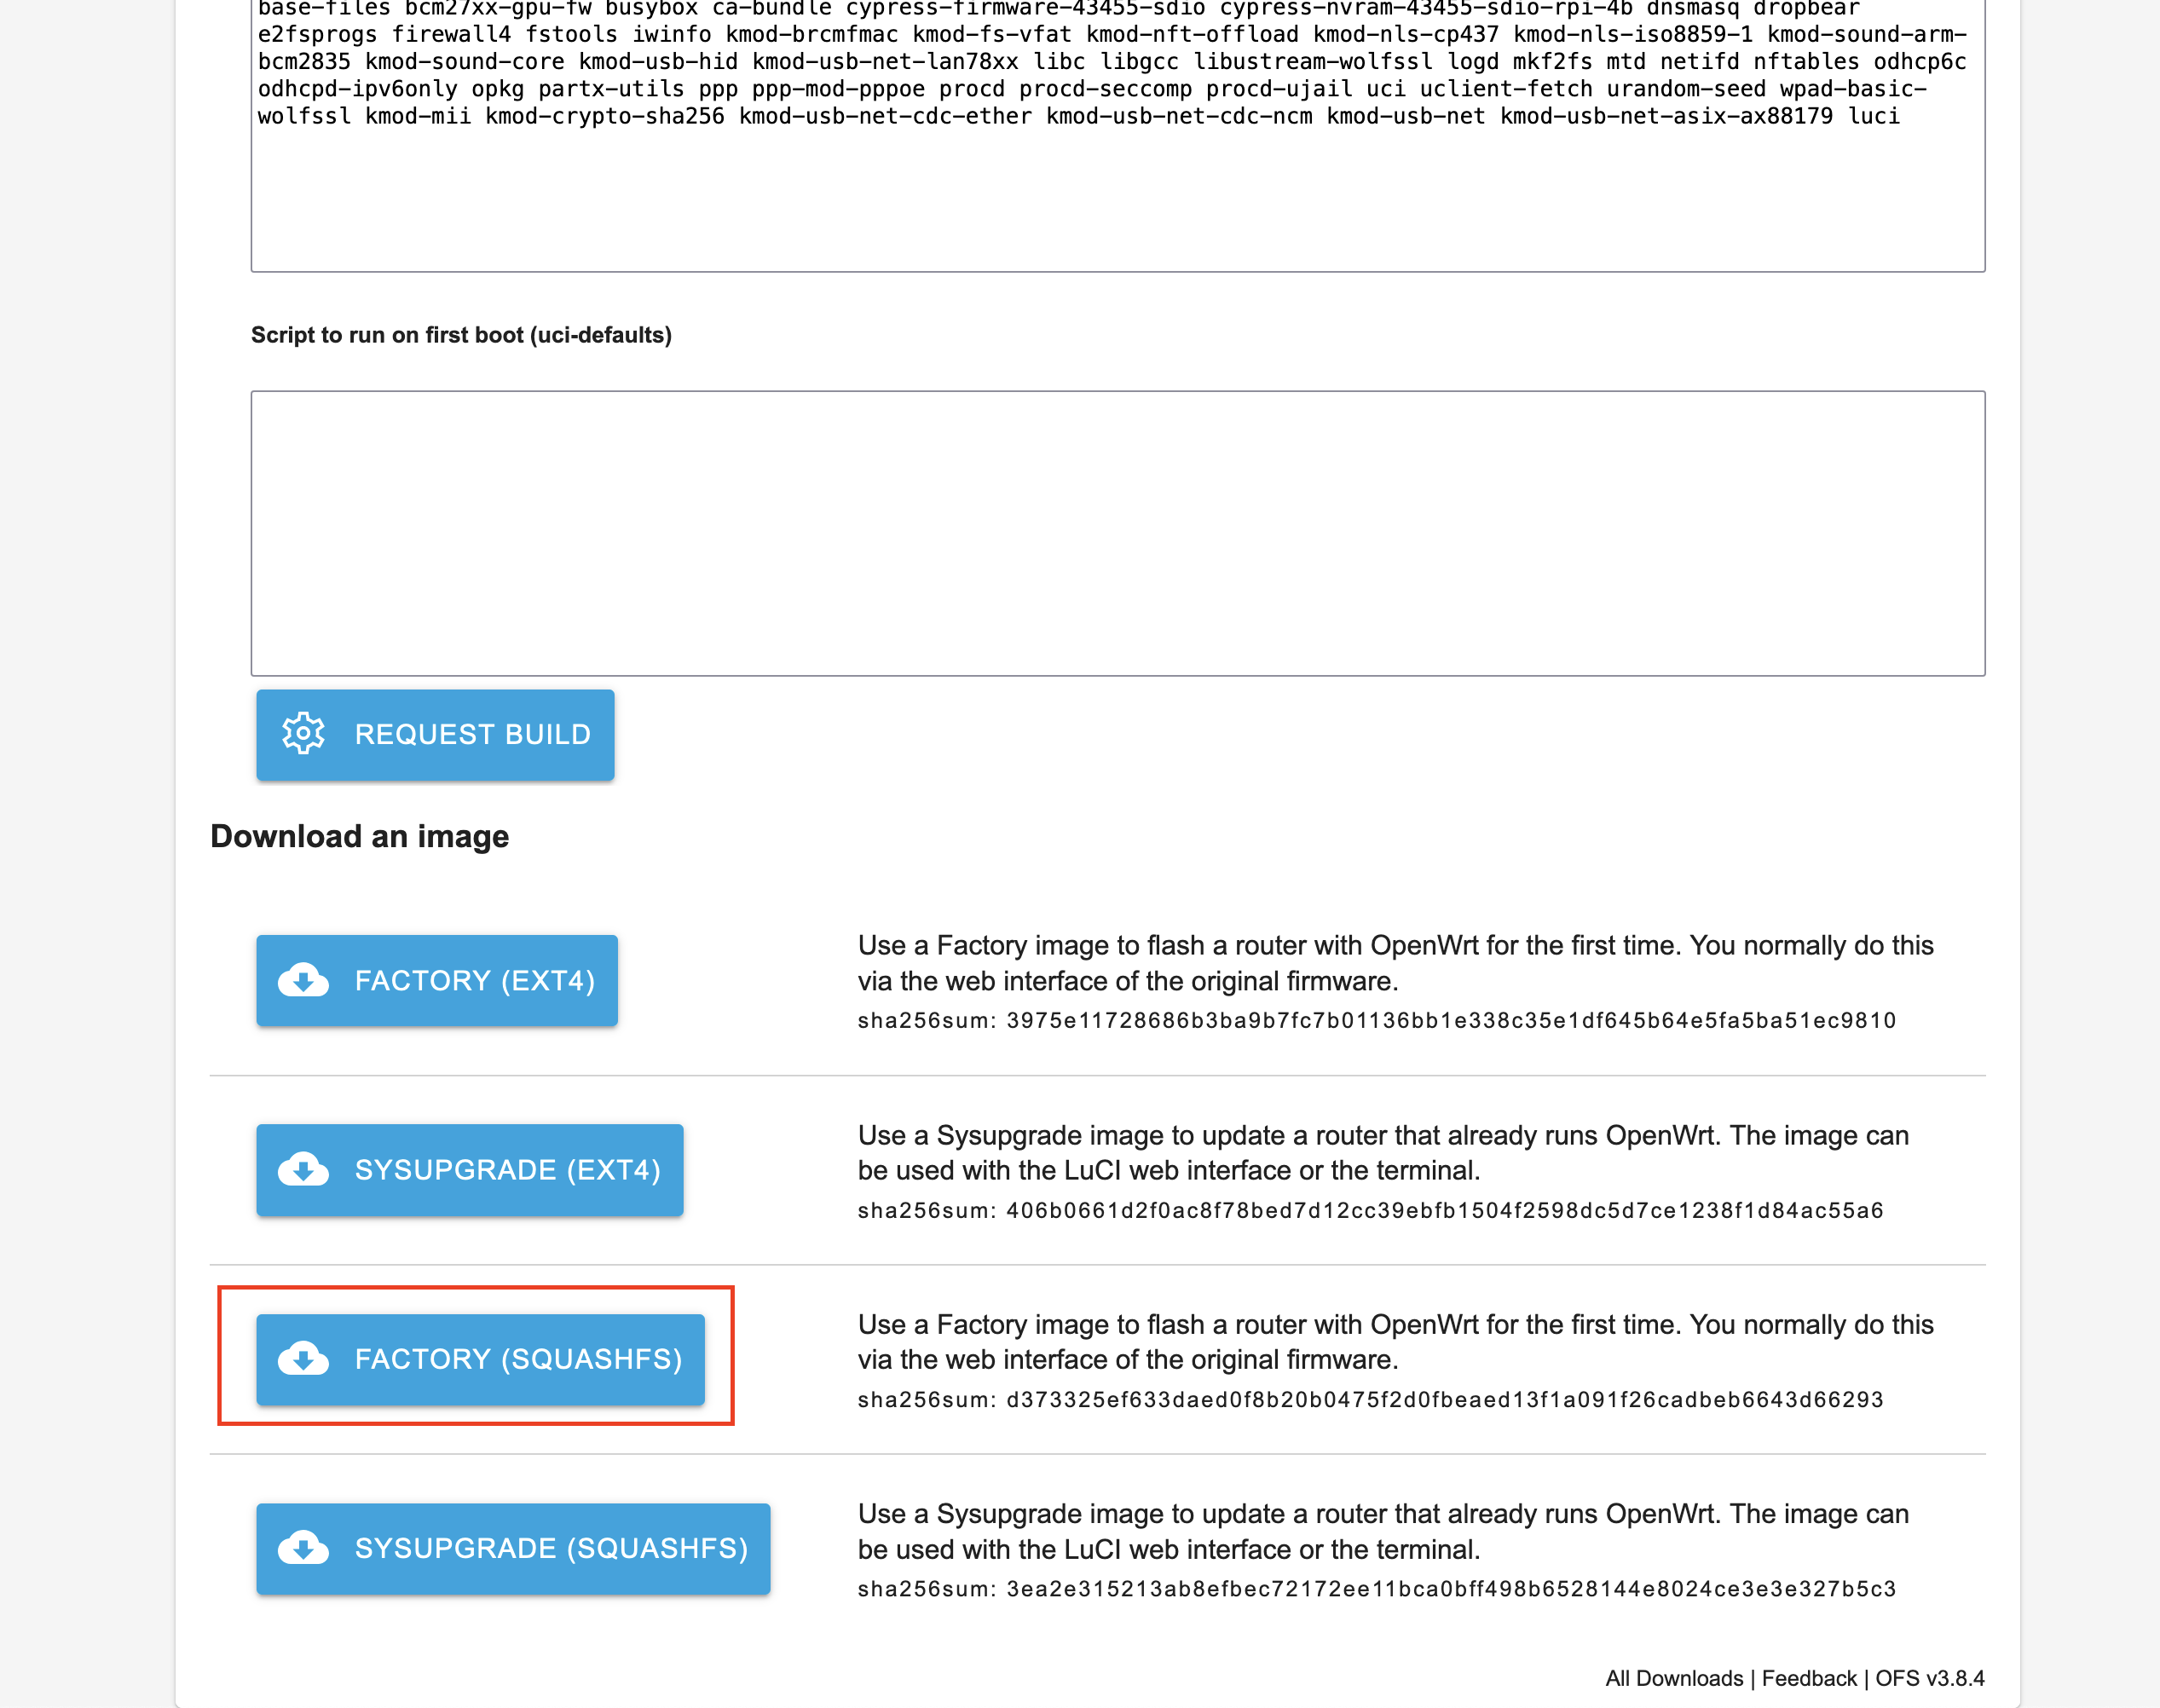
After adding the additional package, click on REQUEST BUILD (it takes few seconds to get custom build ready). Now, download the firmware by choosing FACTORY (SQUASHFS) option. This will download *.img.gz file. Unzip the file, and flash the image to the microsd card using etcher. Insert the microsd card in Raspberry Pi, connect the external LAN dongle to USB3 port and power it ON.
NOTE: Skip this Step 3 if you want to use FACTORY (EXT4) option and resize the microsd card to utilize the entire storage available on the microsd card. Please follow the steps detailed in this post OpenWrt Resize Ext4 Storage. After executing all the steps there, come back here and execute Step 4 and beyond.
🔝
Step 4:
After turning on the Raspberry Pi, connect an ethernet cable to your laptop and the other end to Raspberry Pi’s onboard LAN port.
🔝
Step 5:
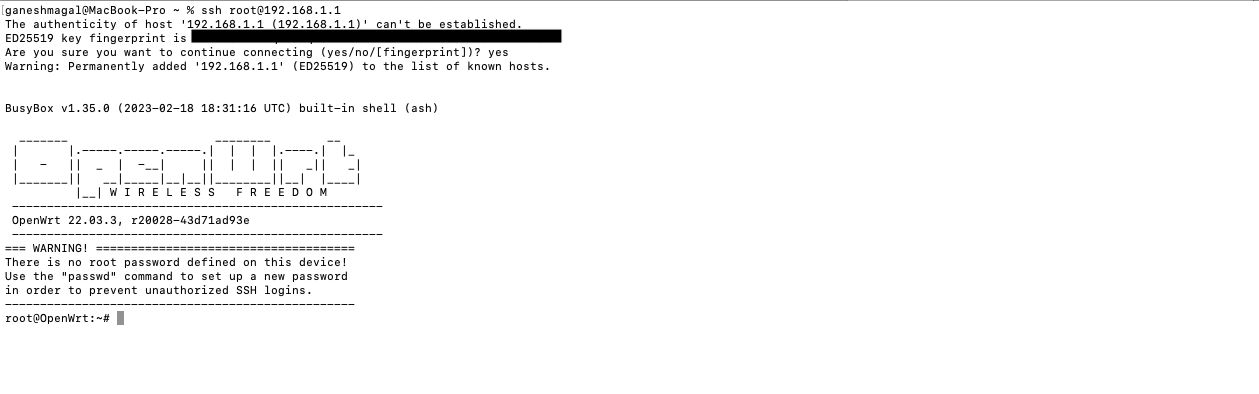
Disconnect WIFI on your laptop (as we will connecting to the LAN connected Raspberry Pi). We will SSH into the Raspberry Pi which is now running openwrt. Open up a terminal(console) and enter the below command (default username: root, default password is empty and default IP address is 192.168.1.1).
ssh root@192.168.1.1
Step 6:
Add a password by running the below command
passwd

Step 7:
We will turn off DHCP for lan interface and remove unwanted parameters. This is done by running the below commands and making the following changes to - /etc/config/dhcp file.
vi /etc/config/dhcp
Add the below line under config dhcp 'lan' (this will turn off DHCP for lan interface)
option ignore '1'
Remove below lines under config dhcp 'lan' (this is not needed)
option start '100'
option limit '150'
This is how the final file will look like:
root@OpenWrt:~# cat /etc/config/dhcp

config dnsmasq
	option domainneeded '1'
	option boguspriv '1'
	option filterwin2k '0'
	option localise_queries '1'
	option rebind_protection '1'
	option rebind_localhost '1'
	option local '/lan/'
	option domain 'lan'
	option expandhosts '1'
	option nonegcache '0'
	option authoritative '1'
	option readethers '1'
	option leasefile '/tmp/dhcp.leases'
	option resolvfile '/tmp/resolv.conf.d/resolv.conf.auto'
	option nonwildcard '1'
	option localservice '1'
	option ednspacket_max '1232'

config dhcp 'lan'
	option interface 'lan'
	option leasetime '12h'
	option dhcpv4 'server'
	option dhcpv6 'server'
	option ra 'server'
	option ra_slaac '1'
	list ra_flags 'managed-config'
	list ra_flags 'other-config'
	option ignore '1'

config dhcp 'wan'
	option interface 'wan'
	option ignore '1'

config odhcpd 'odhcpd'
	option maindhcp '0'
	option leasefile '/tmp/hosts/odhcpd'
	option leasetrigger '/usr/sbin/odhcpd-update'
	option loglevel '4'
Save and close the file.
🔝
Step 8:
We will change the default IP address to 192.168.0.2 (from 192.168.1.1). I’m doing this because my current modem-router’s IP address is 192.168.0.1. This way I will be able to access the openwrt from my current network for configuration. We also specify the DNS and home gateway (current modem-router’s) IP address. This is done by running the below commands and making the following changes to - /etc/config/network file.
vi /etc/config/network
Edit the option ipaddr under config interface 'lan' to the new static IP address (default - 192.168.1.1)
option ipaddr '192.168.0.2'
Add below lines to specify the DNS(using google’s DNS) and home gateway (current modem-router’s) IP address under config interface 'lan'.
option dns '8.8.8.8'
option gateway '192.168.0.1'
This is how the final file will look like:
root@OpenWrt:~# cat /etc/config/network

config interface 'loopback'
	option device 'lo'
	option proto 'static'
	option ipaddr '127.0.0.1'
	option netmask '255.0.0.0'

config globals 'globals'
	option ula_prefix 'fd85:6aba:494a::/48'

config device
	option name 'br-lan'
	option type 'bridge'
	list ports 'eth0'

config interface 'lan'
	option device 'br-lan'
	option proto 'static'
	option ipaddr '192.168.0.2'
	option netmask '255.255.255.0'
	option ip6assign '60'
	option dns '8.8.8.8'
	option gateway '192.168.0.1'
Save and close the file and reboot using below command
reboot
Step 9:
Now unplug the LAN cable from your laptop and plug that to access point’s LAN port. So the connection will be from access point’s LAN port to raspberry pi’s onboard LAN port which is running openwrt. Please note there should be a LAN cable going from modem-router’s lan port to the access point’s Internet port (which is the current setup). So the connections will be:
modem-router (lan port 1) --> LAN cable --> Access point (internet port - the usual setup) -- internet will be working as-is
access point (lan port 1 i.e. ethernet port) --> LAN cable --> Raspberry pi (onboard LAN port) -- new connection this step
Step 10:
Turn on the WIFI on the laptop and open the below address in the browser. This should open up the openwrt’s UI (use root as username and the password which was configured in Step 6).
http://192.168.0.2
Step 11:
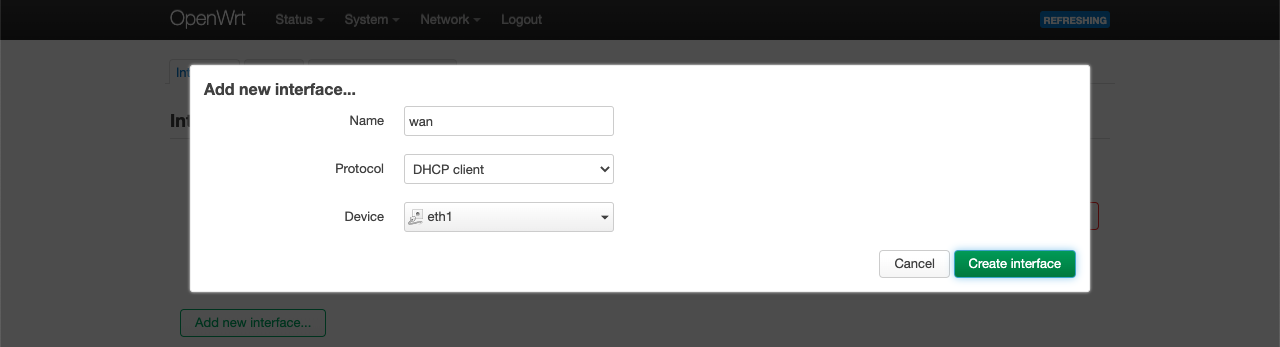
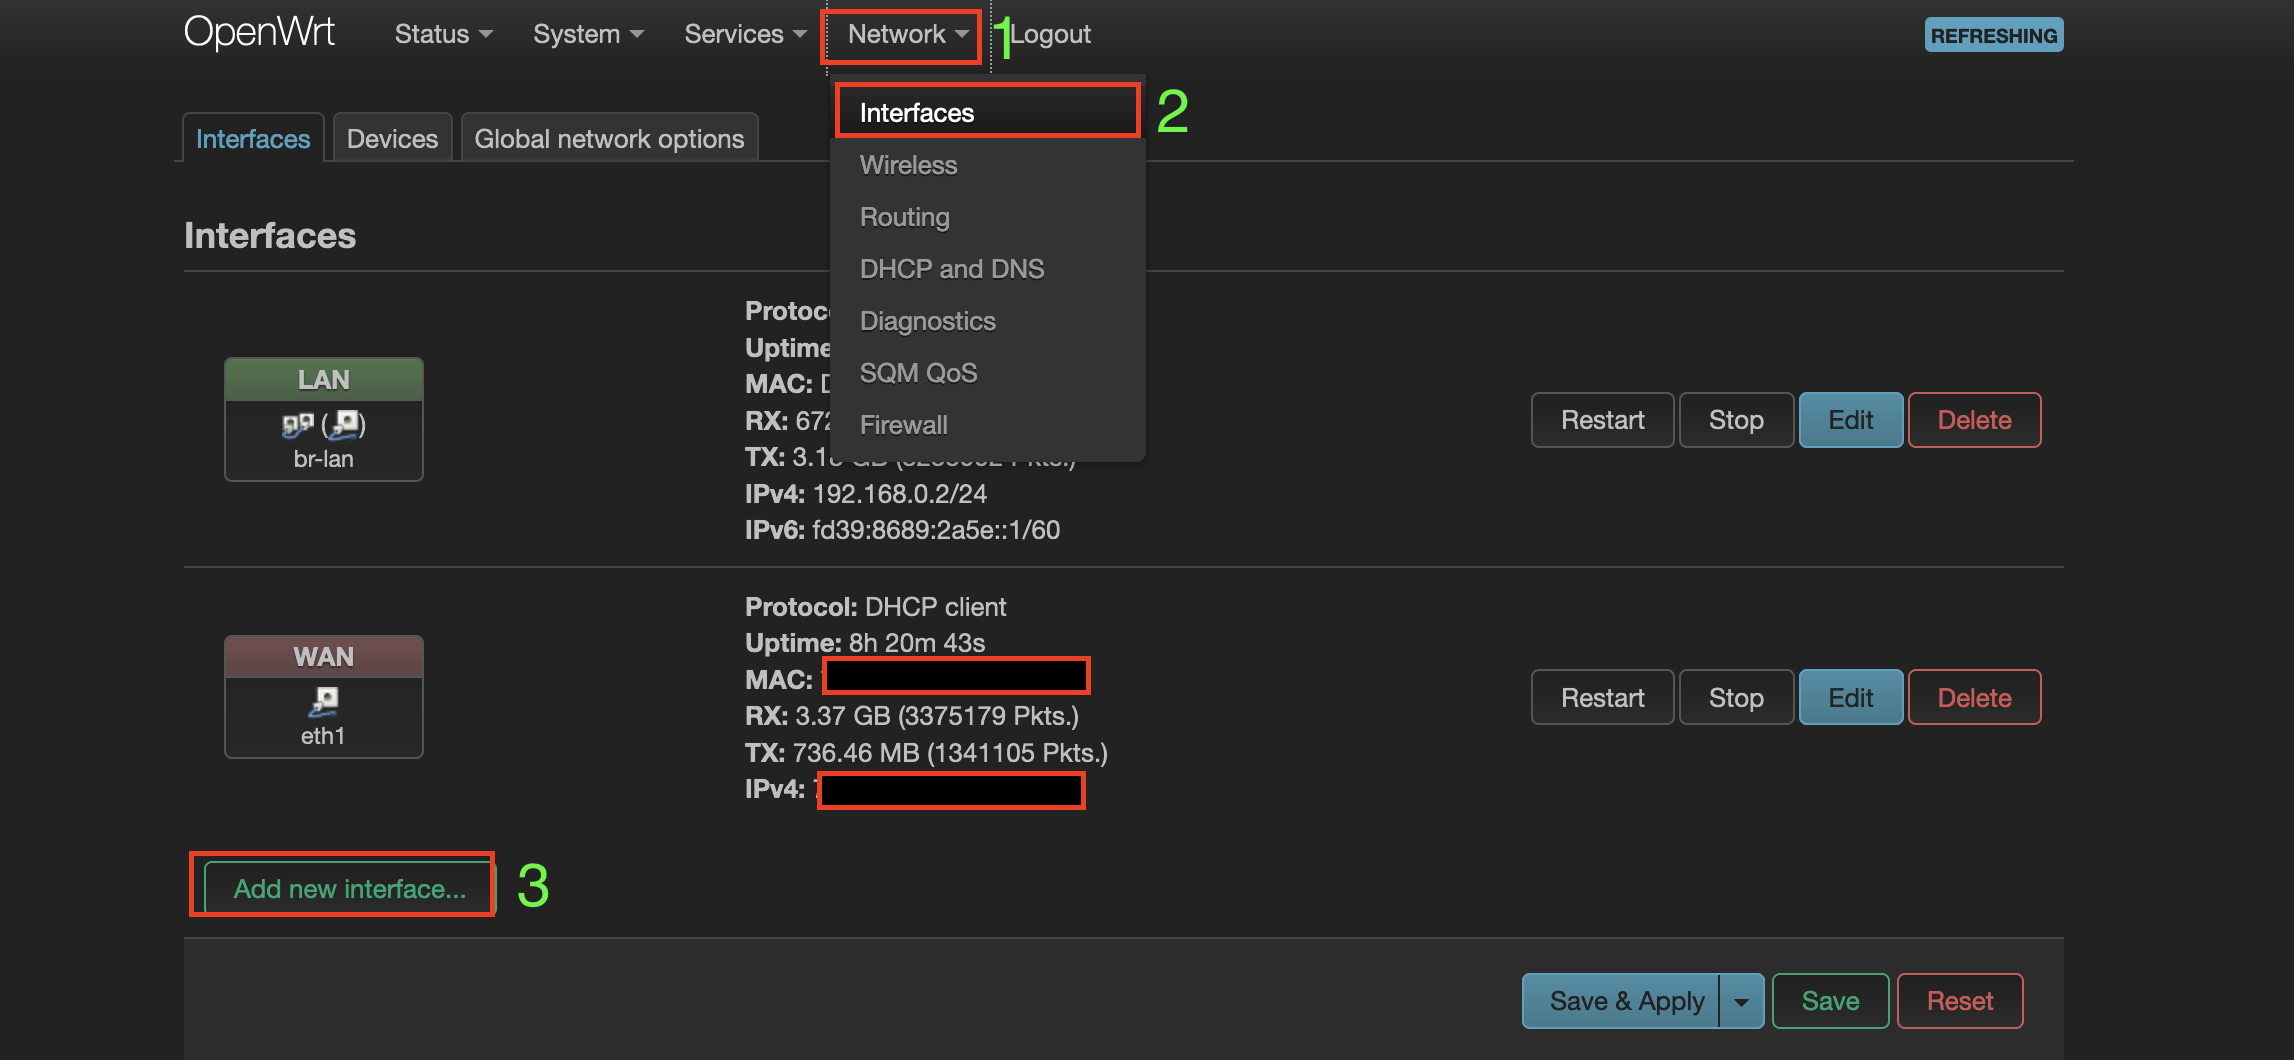
Now we will add a new interface for the external ethernet dongle which we are using. For that navigate to:
Network > Interfaces > Add new interface
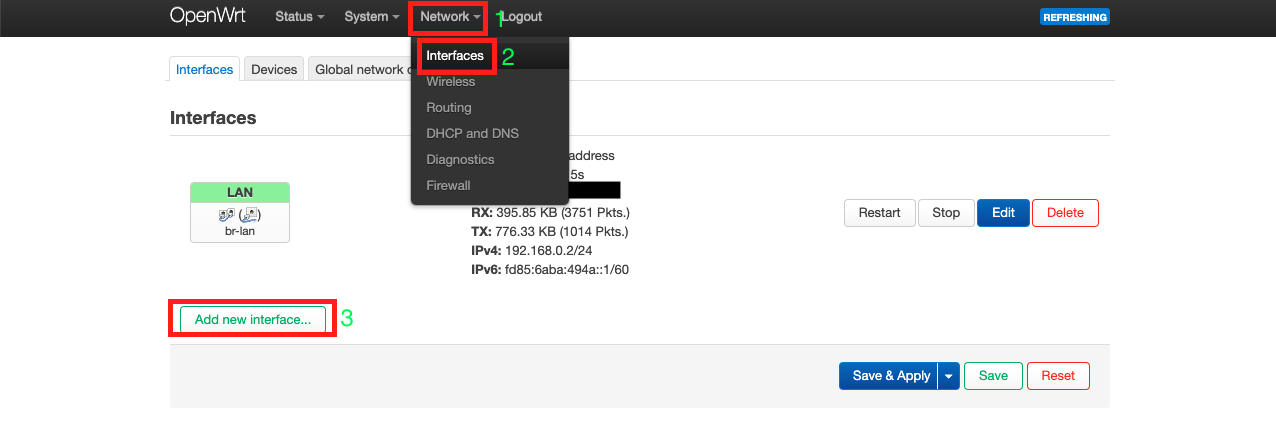
Name the interface wan and protocol as DHCP client and device as eth1
In the firewall settings change it to wan (might be there by default).
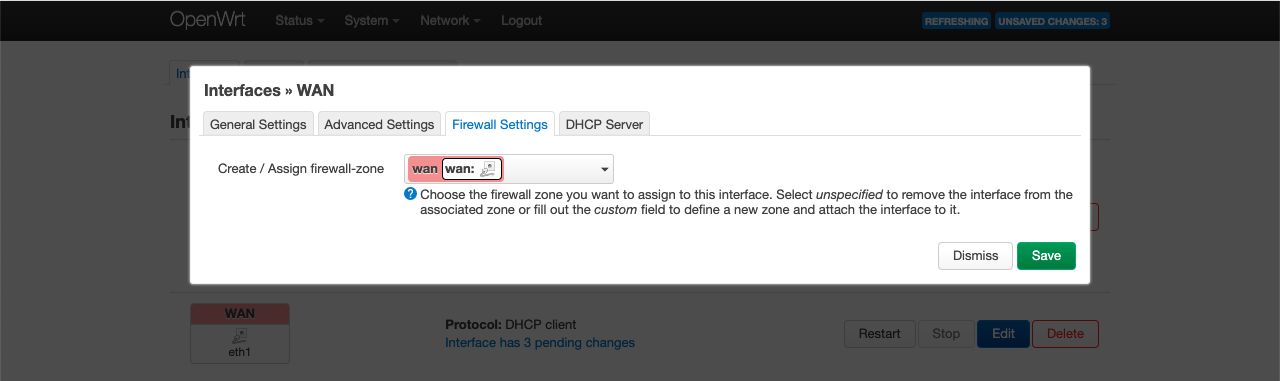
Save the interface and save and apply. So the external LAN dongle is WAN i.e. it will be used to connect to modem-router and the internal LAN port will be used to connect to access point or switch or to computer to access internet.
🔝
Step 12:
Power OFF the raspberry pi. Keep the above LAN connection as is i.e. from Raspberry Pi’s onboard LAN port to access point’s LAN port (done in Step 9). Now connect another LAN cable from home modem-router’s LAN port to Raspberry Pi’s external USB LAN dongle. So the connection will be - From modem-router TO external USB LAN dongle that is connected to Raspberry Pi. We did this because, in Step 11 above we configured the external USB LAN dongle as wan (Wide Area Newtwork). wan needs to be connected to the modem-router/gateway. So the connections will be:
modem-router (lan port 1) --> LAN cable --> Access point (internet port - the usual setup) -- internet will be working as-is
access point (lan port 1 i.e. ethernet port --> LAN cable --> Raspberry pi (onboard LAN port) -- done in Step 9
modem-router (lan port 2) --> LAN cable --> Raspberry pi (external usb to lan port) -- new connection this step
Step 13:
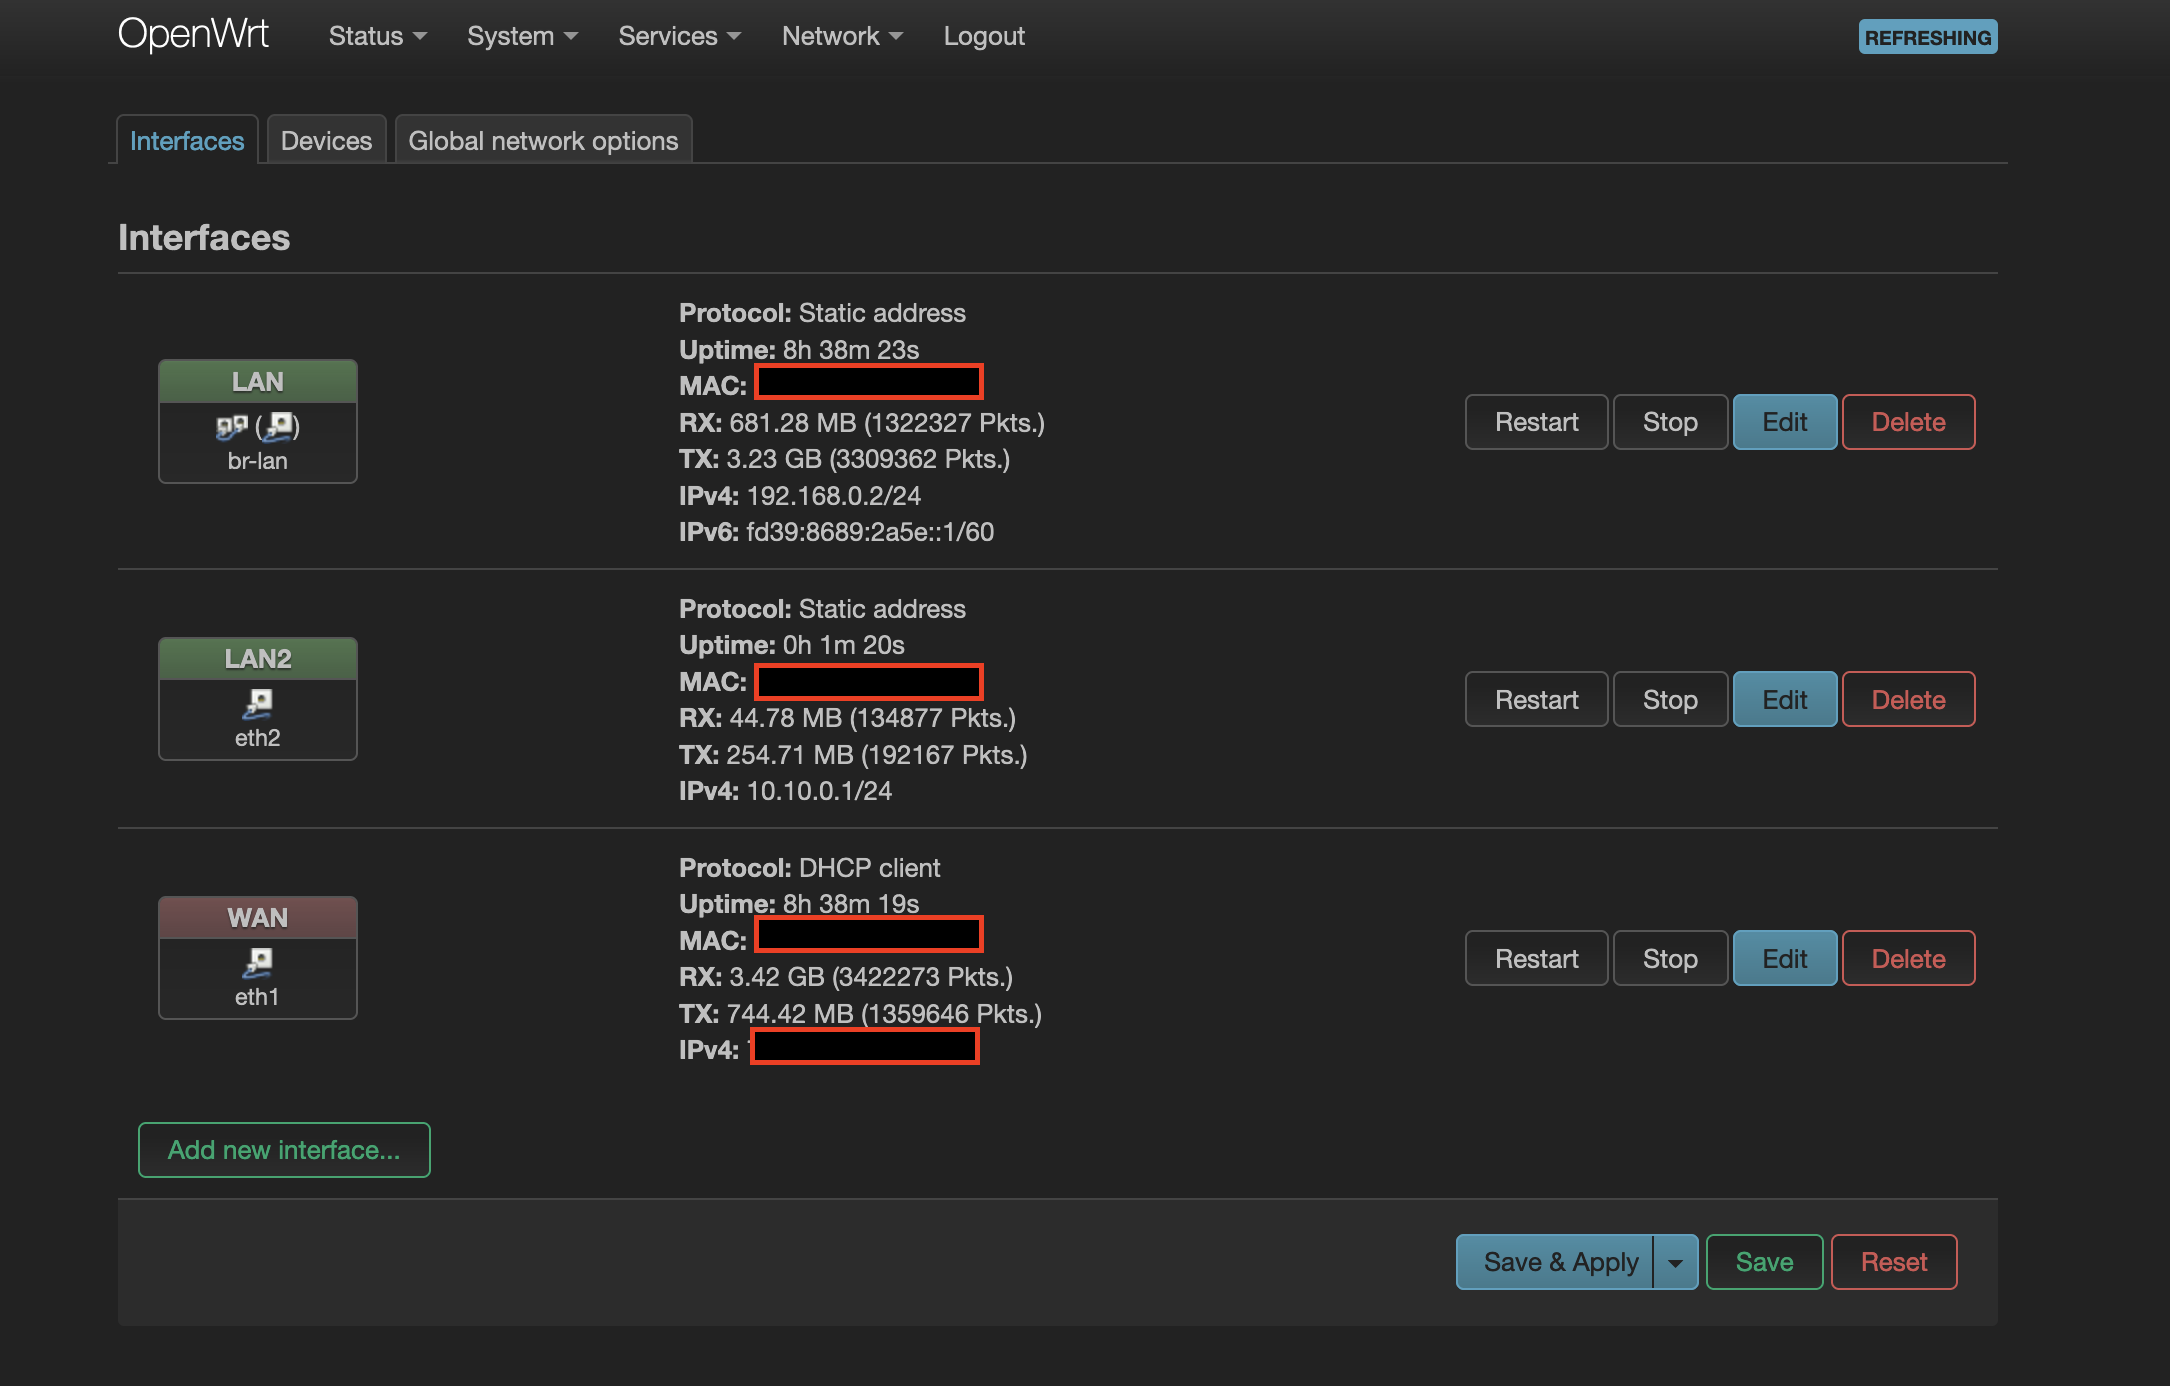
Power ON the raspberry pi. Now we should see both the interfaces will have IP address
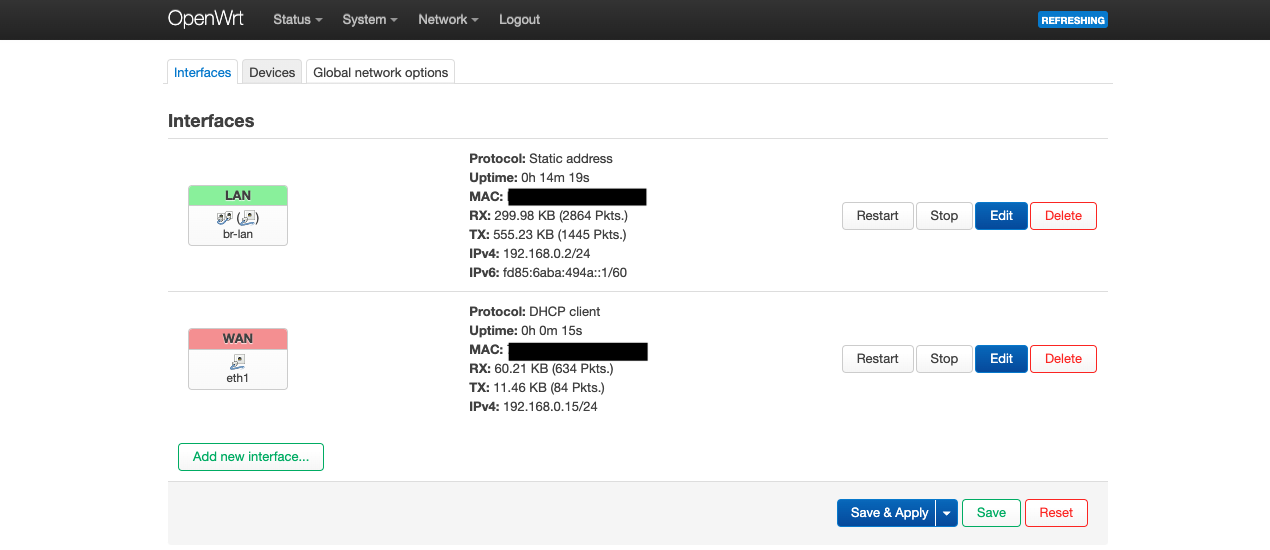
🔝
Step 14:
Now we will revert some of the changes we did in Step 7.
Remove below from /etc/config/dhcp file.
option ignore '1'
Remove below from /etc/config/network file (these were added under lan, these are needed under wan)
option dns '8.8.8.8'
option gateway '192.168.0.1'
Step 15:
Power OFF raspbery pi. Remove the LAN cable from modem-router’s LAN port to access point’s internet port. Now, connect LAN cable from onboard Raspberry Pi’s LAN port to access point’s Internet port. So the connection now will be:
modem-router (lan port 1 or 2) --> LAN cable --> Raspberry pi (external usb to lan port)
raspberry pi (oboard LAN port) --> LAN cable --> access point (internet port)
The connection is what we see in the architecure diagram. Power ON the raspberry Pi. Wait for 5minutes.
🔝
Step 16:
All the devices will be connected automatically because we didn’t do any changes to access point.
🔝
Step 17:
There are a lot of options(packages) that can be installed to analyze the bandwidth usage. Below are some of the packages which I found very useful
Step 18:
These can be installed from the software manager from within openwrt. Follow below steps to install Bandwidthd:
- go to openwrt UI
- System > Software and click on
Update lists... - afer the list has been updated, search for package named
bandwidthd-sqliteand install it - during installation if there are some errors, it will be due to missing dependent packages. Search for the package which caused the installation to fail and search for that package in the similar way done above and install them. Then again try installing
bandwidthd-sqlite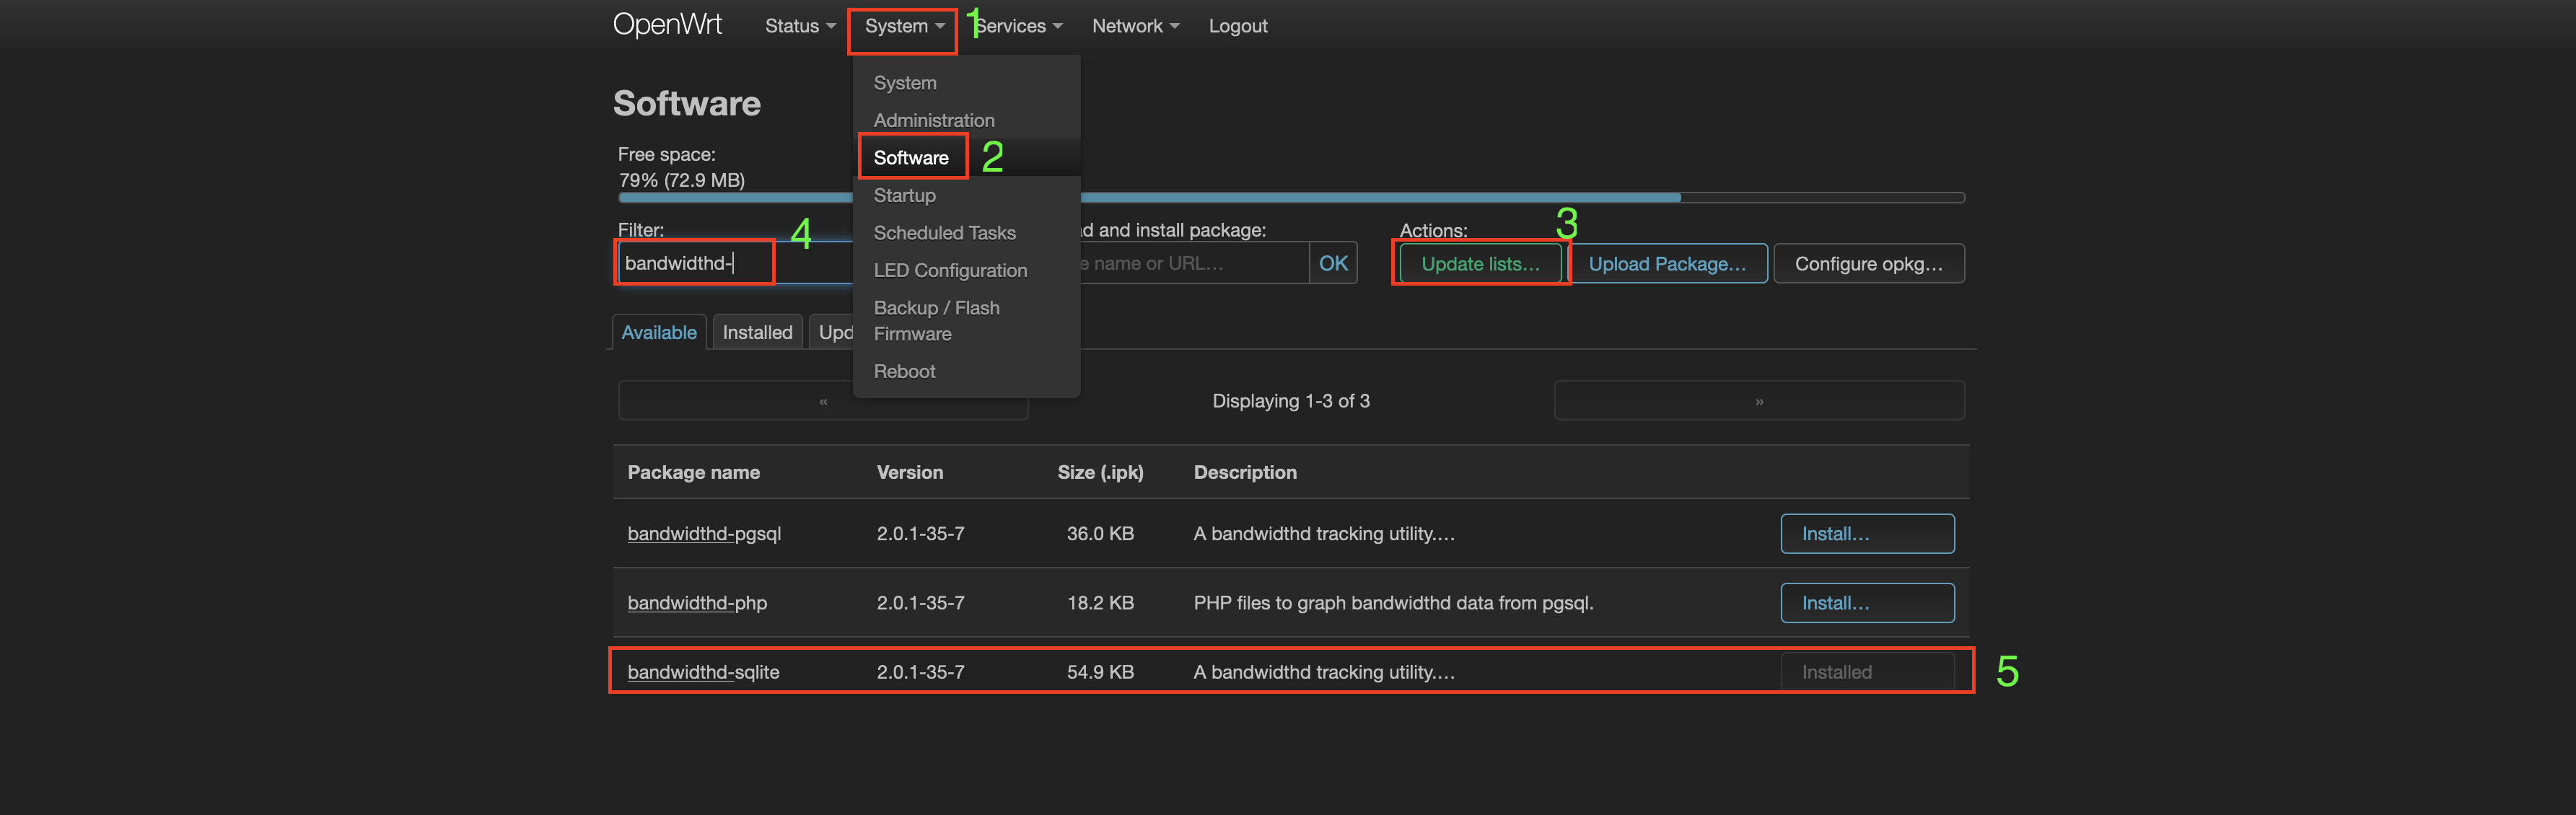
-
After installation, the UI for bandwidthd is accessible here -
http://192.168.0.2/bandwidthd(this is the IP address which was set in Step 8)
- Similarly to install Netlink Bandwidth Monitor, search for the package named
luci-app-nlbwmonand install it. After installation this will be visible under Services > Bandwidth Monitor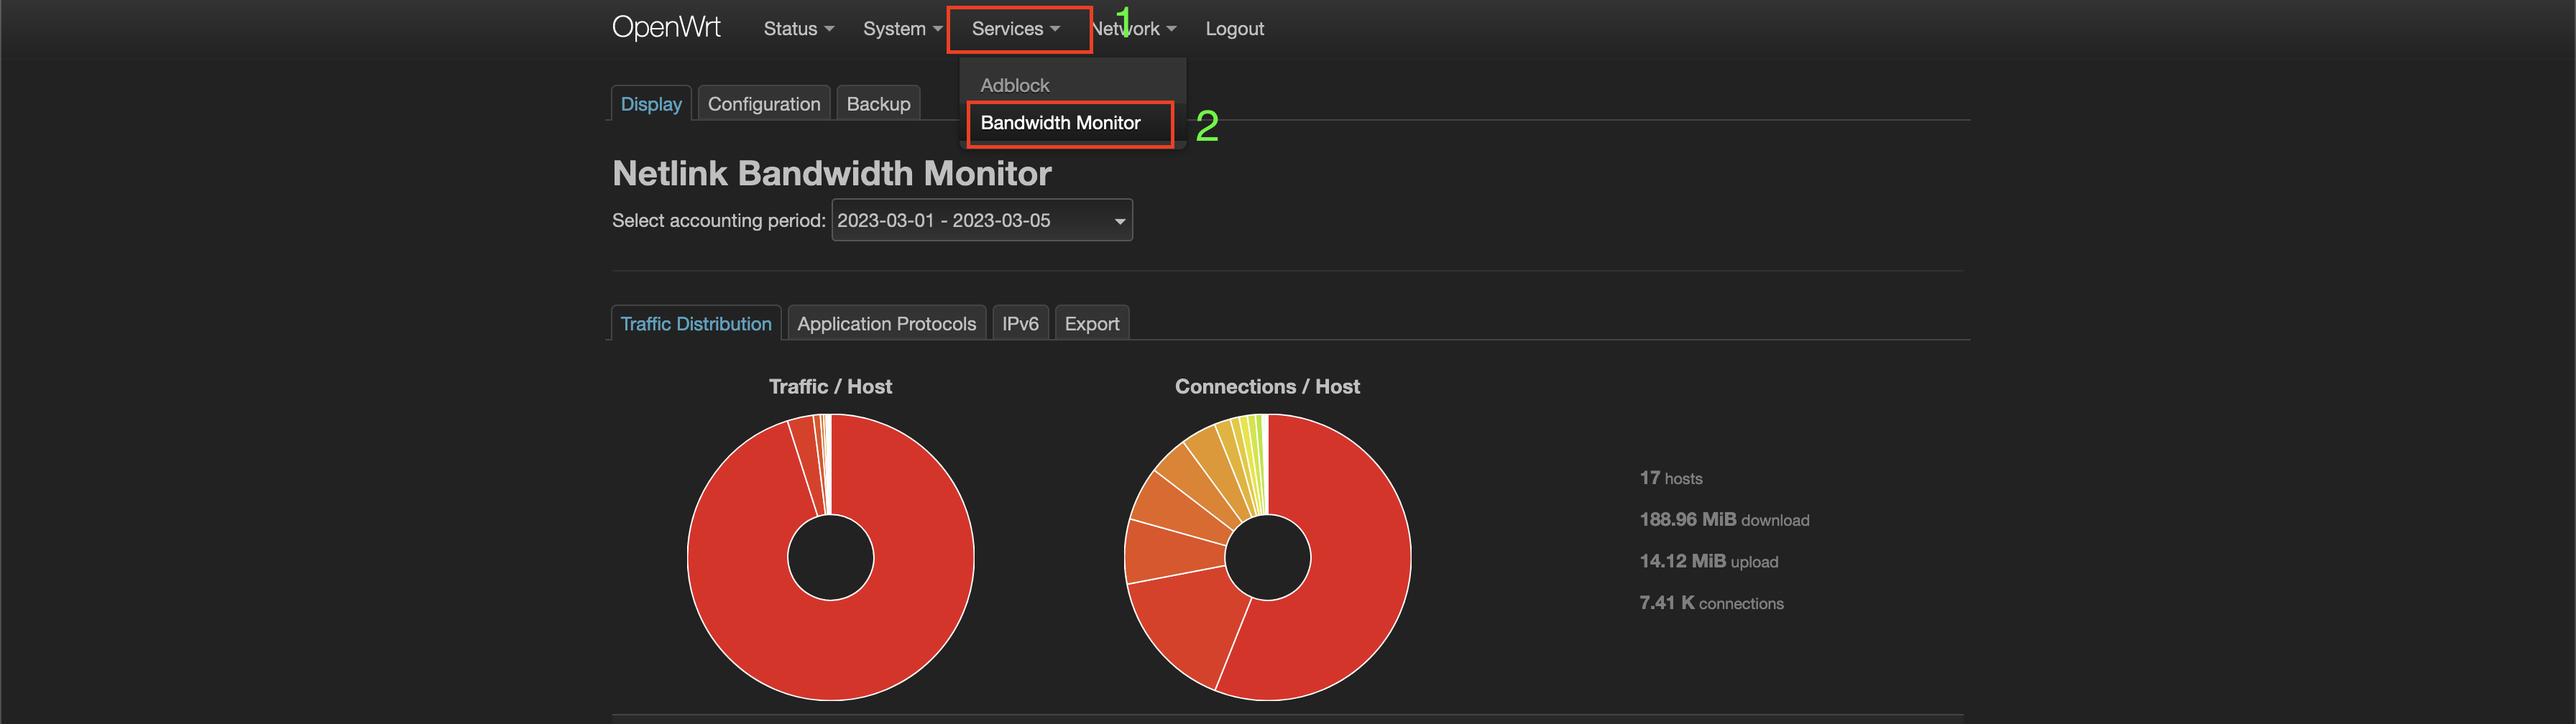
🔝
Step 19:
After the router is setup, make sure you are taking a backup (especially before upgrading firmware). OpenWrt has an inbuilt feature that allows taking backup. It can be found under System > Backup/Flash Firmware. The most important files to get connectivity from the back up are - /etc/config/dhcp, /etc/config/network, /etc/config/firewall. However, when restoring make sure you are using the downloaded zipped file (that is generated by openwrt when taking a backup).
🔝
OTHER USEFUL PACKAGES:
- Adblock - this is used for blocking ads. I was using pihole for a long time and recently switched to adblock which can be bundled with openwrt. You will need to enable reporting after installing the package to view reports (you will see the options after adblock is installed on the UI). Will need to install this package along with enabling reporting -
tcpdumportcpdump-mini. - SQM QOS - this is used for prioritzing traffic and help reduce bufferbloat. The package is
luci-app-sqmand check this for enabling the service and configuring. This shows up underNetwork > SQM QoS. - irqbalance - this is a daemon to help balance the cpu load generated by interrupts across all of a systems cpus. Irqbalance identifies the highest volume interrupt sources, and isolates each of them to a single unique cpu, so that load is spread as much as possible over an entire processor set, while minimizing cache miss rates for irq handlers. Install this package by searching for
irqbalance. After it’s installed, it needs to be enabled from config file that is located in/etc/config/irqbalance. - Attended Sysupgrade - The Attended SysUpgrade (ASU) facility allows an OpenWrt device to update to new firmware while preserving the packages and settings. This is similar to OTA upgrade. We don’t need to download and doing anything manual when upgrading firmware. Search for package named
luci-app-attendedsysupgrade.
For network stability, would encourage installing SQM QOS and irqbalance.
🔝
ISSUE(resolved) WITH MY SETUP:
Initially I had not disabled the router feature on my modem-router combination. This was causing double NAT. There were 2 routers on my network in series. 1st router was in modem-router combination and 2nd router was the Raspberry Pi running openwrt. In my Netgear modem-router (netgear C6250) there is an option to disable router mode. I disabled the router mode. This way I only have 1 router on my network and it’s not a double NAT scenario anymore.
The router mode, is also called bridge mode in some devices. The goal is to disable router functionality in the modem. The architecture (cable connection) all remains the same as before. On the modem-router combination, as soon as the router mode was turned OFF, I lost access to the modem-router’s admin page. The only way to get it back is to factory reset the modem-router.
Apparently for some ISPs, the MAC address is registered with the ISP. So any change made to the modem-router will need you to inform them Raspberry Pi’s MAC address. Luckily it didn’t happen in my case (it just worked). However, after I disabled the router mode, I had to power OFF - modem, Raspberry Pi, access point - waited for few minutes. Restarted - modem, Raspberry Pi and access point. Then again had to wait for few minutes before it all started working.
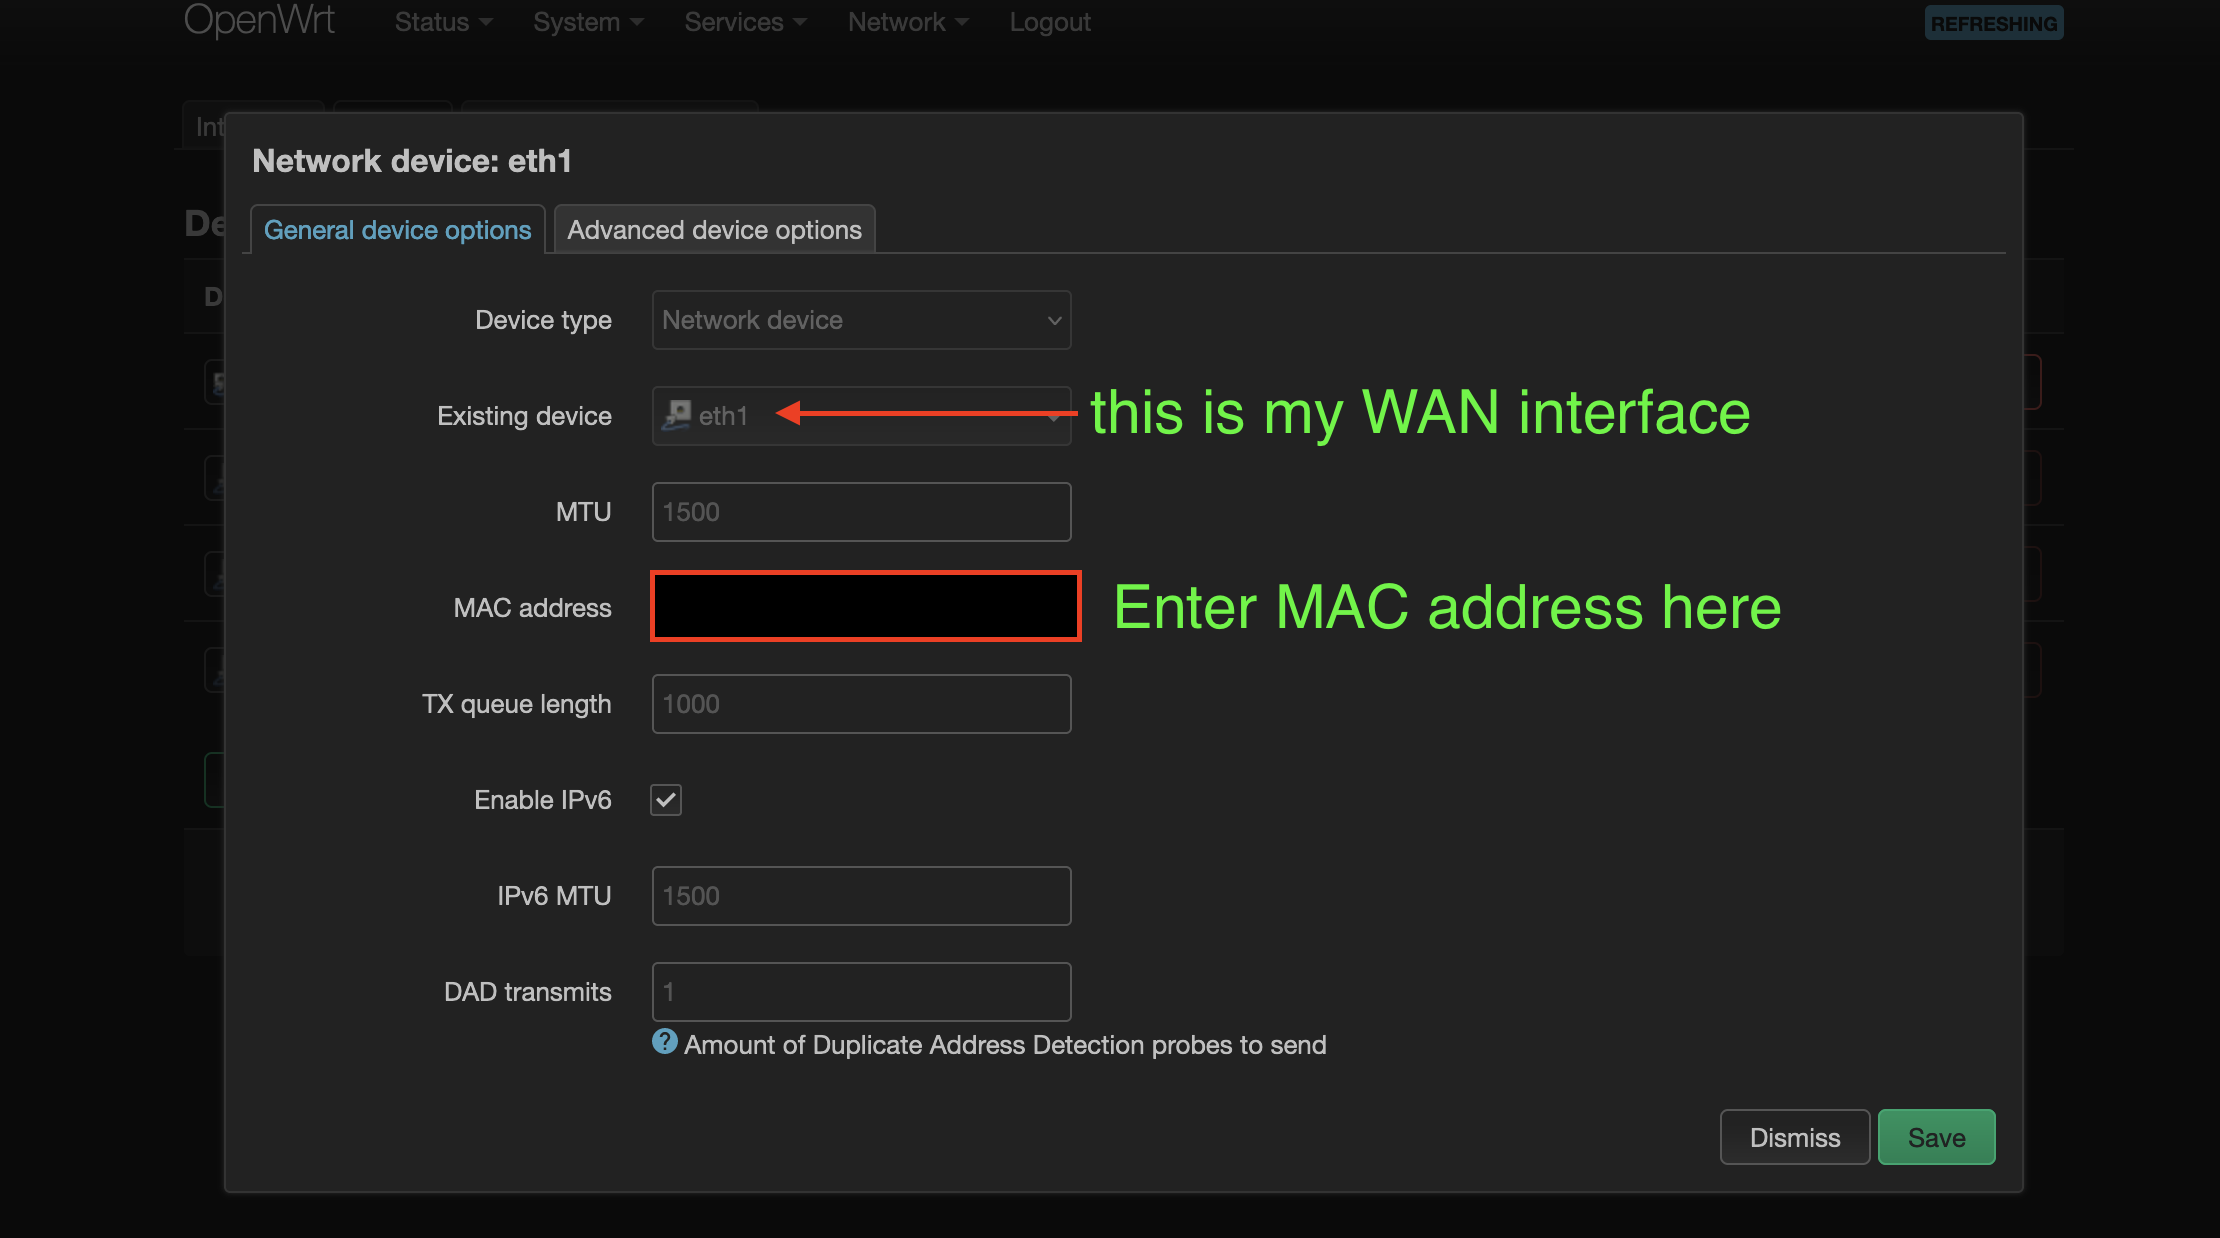
If you don’t want to call ISP to change the MAC address. You can clone the modem-router combination’s MAC address and copy that on the Raspberry Pi. You can spoof MAC address on openwrt by navigating to - Network > Interfaces > Devices > Click on Configure for the WAN interface > Text box to update the MAC address.
SETUP UPGRADE(additional LAN port):
With the above setup (Raspbery Pi acting as router) all the ethernet ports on the Raspbery Pi are used up.
- External USB 3 to Ethernet port: configured as WAN (eth1)
- On-board ethernet port: configured as LAN (eth0)
I wanted to add one more ethernet port(eth2) to the router (Raspberry Pi), which I can use for connecting wired device (laptop, or another access point etc). Below are the steps for configuring 1 more external USB 3 to ethernet port:
Step A:
Connect one more TP-Link USB-Ethernet-Adapter-Gigabit-Switch to USB 3 port on the Raspberry Pi.
Step B:
Login to the openwrt admin page and navigate to - Network > Interfaces > Add new interface
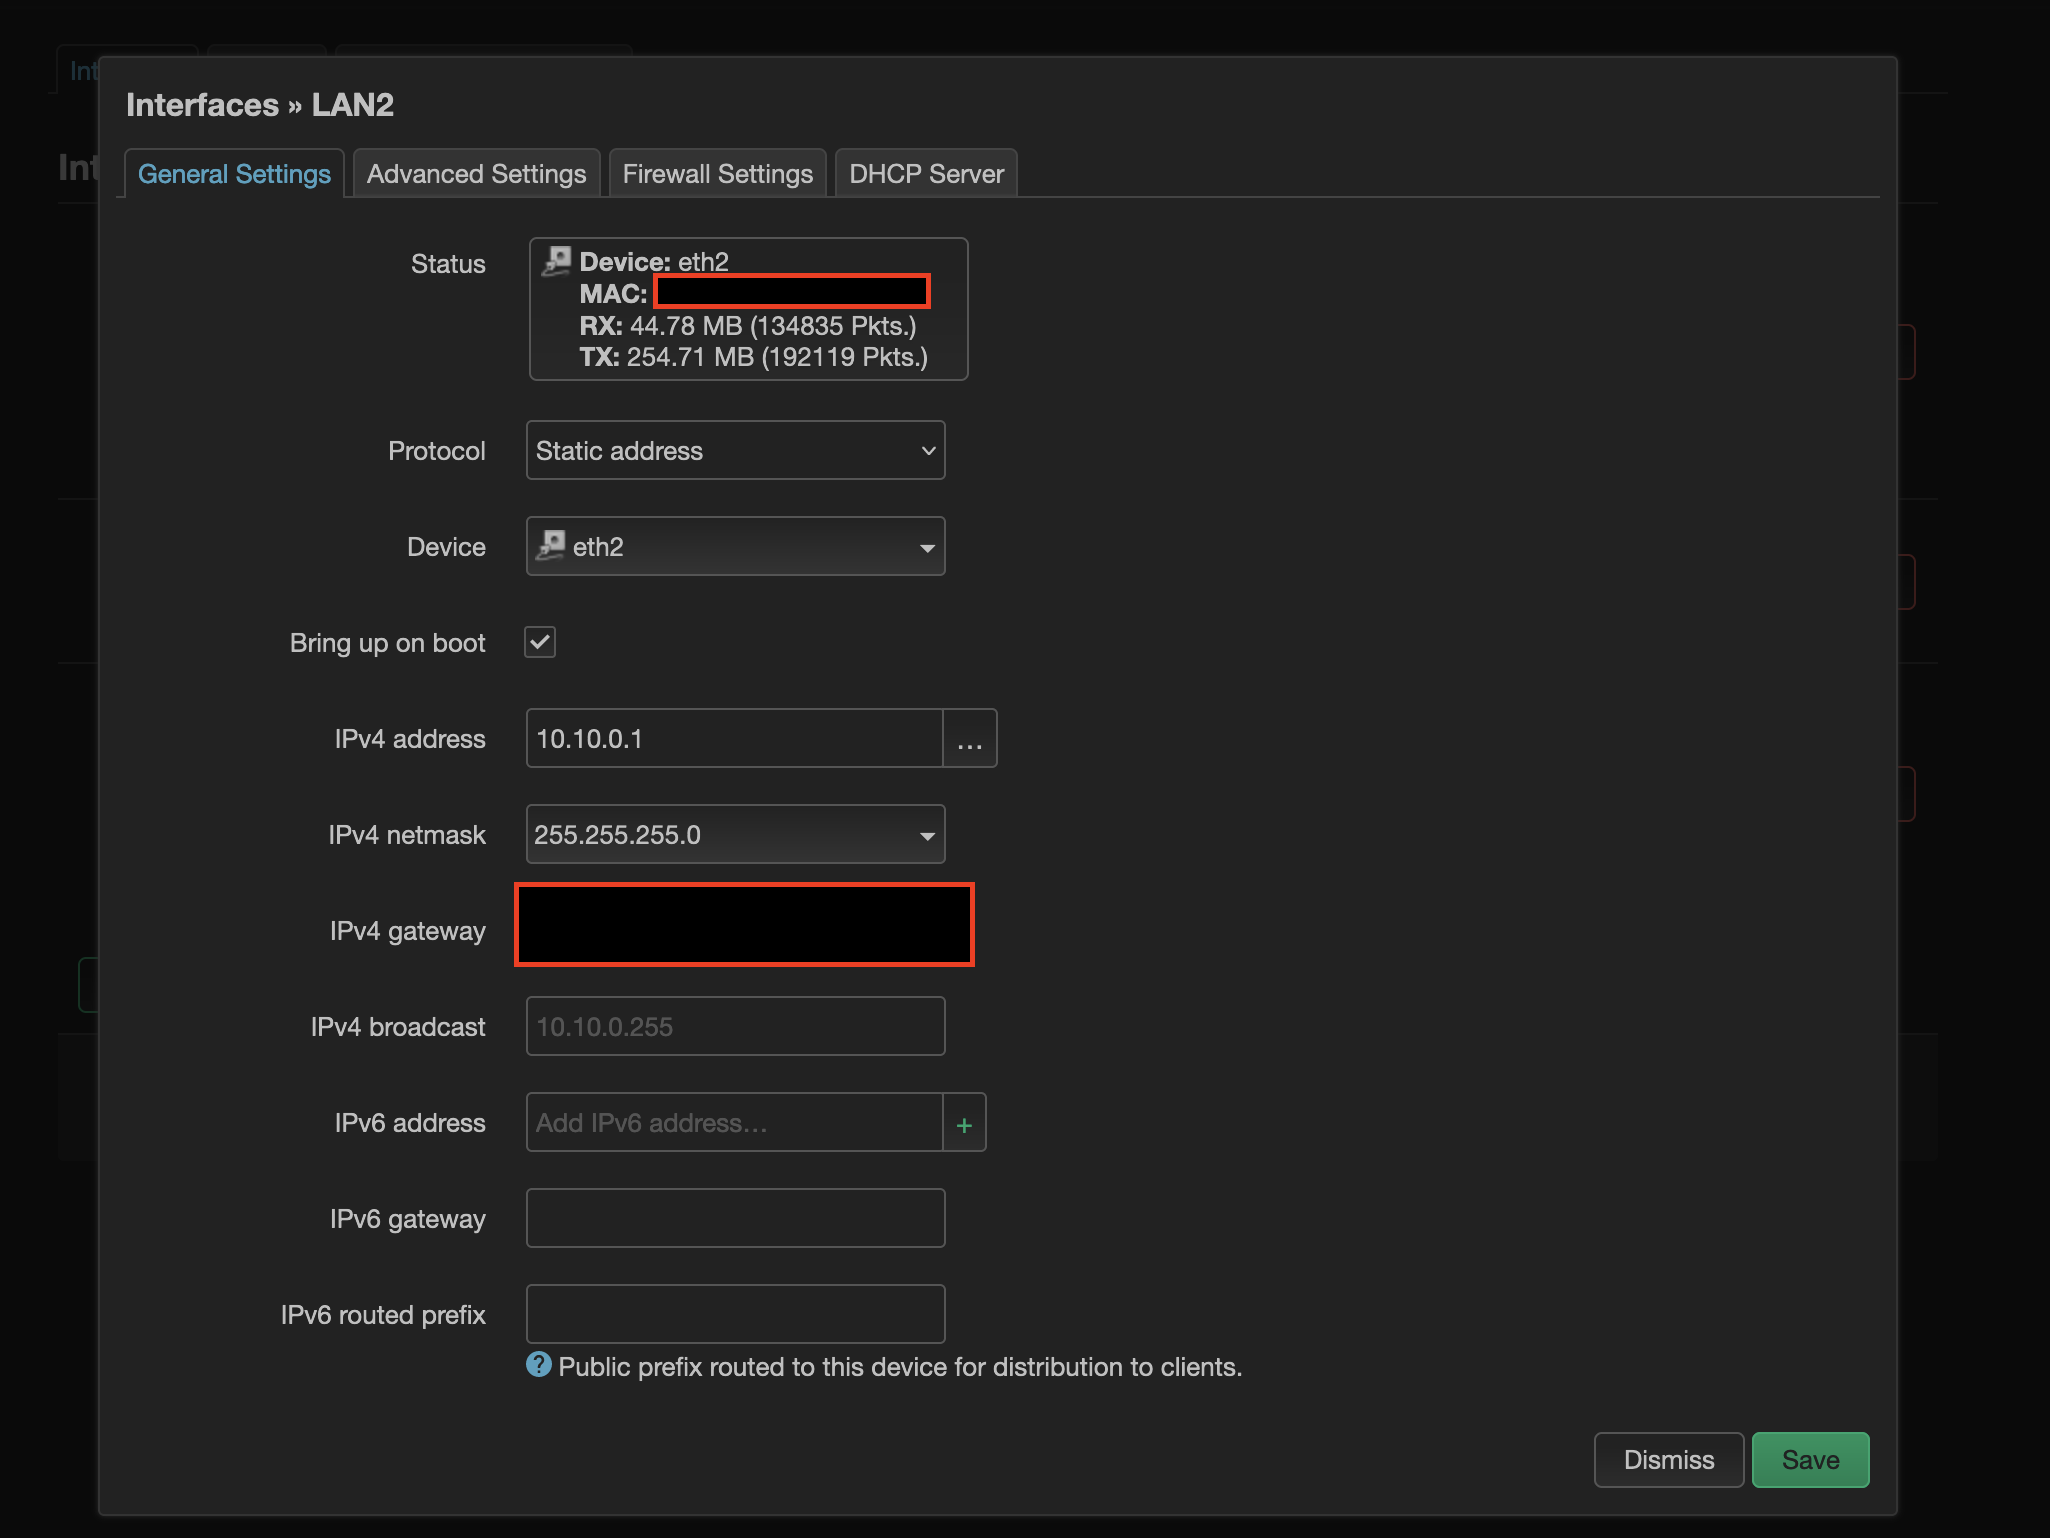
Step C:
Give it any name, say LAN2. Protocol will be Static address and Device will be eth2 (the newly added external USB 3 to ethernet port). Provide a static IP address say 10.10.0.1 , subnet mask as 255.255.255.0. Don’t save yet. The LAN (eth0) was also configured as static IP address with IP as 192.168.0.2. Only WAN (eth1) was configured as DHCP (as it will get IP address from ISP).
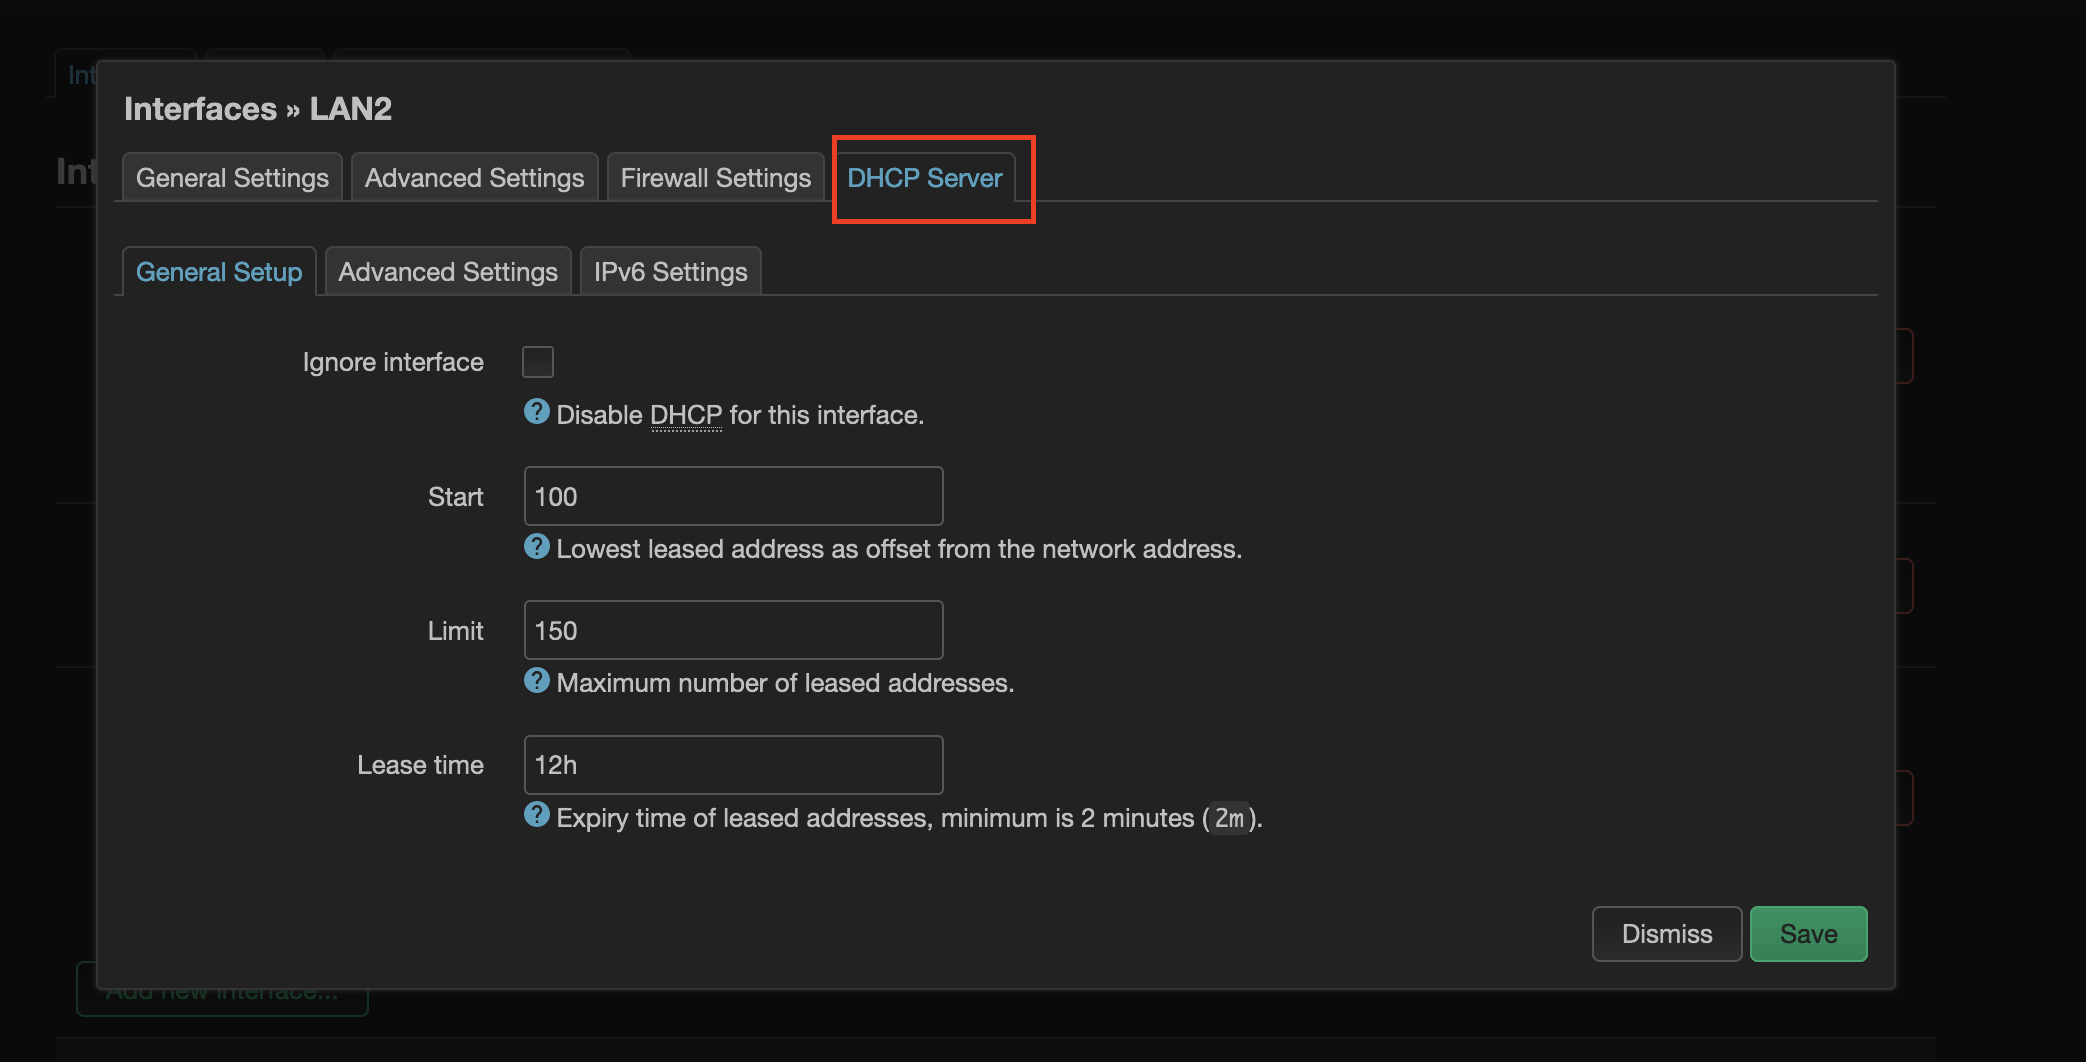
Step D:
Now click on DHCP Server > Set up DHCP Server. Leave everything as-is. Don’t save yet. Since, we want to connect device on this port, so we need DHCP server enabled for this interface too (just like eth0).
Step E:
Now click on Firewall Settings > choose lan and now save it.
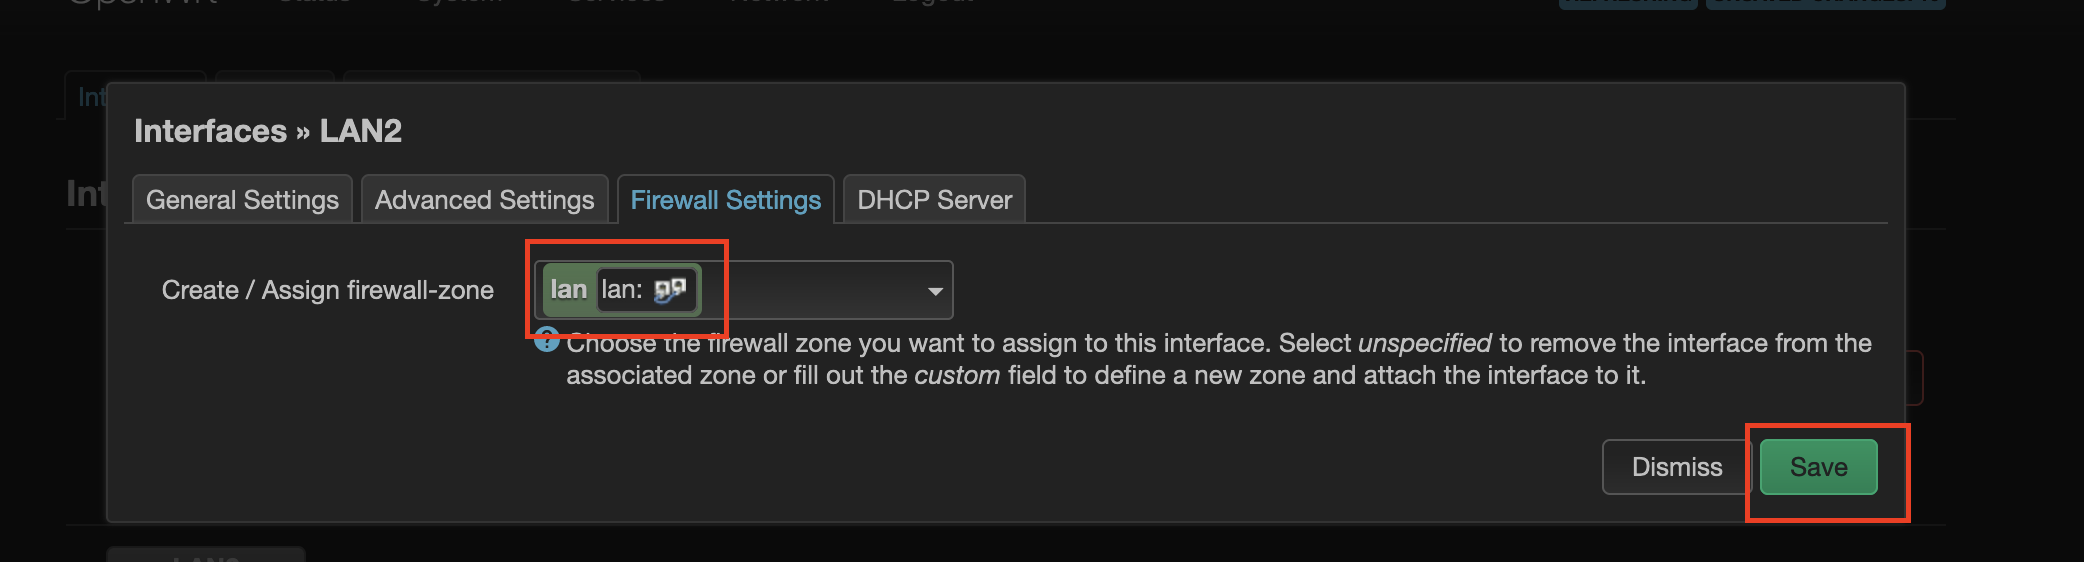
Step F:
The new interface should be visible on UI and if you connect any device (laptop, access point etc) it will get an IP address in the range 10.10.0.x and that device should also have access to the internet. We will also be able to ping devices connected to eth0 (with range 192.168.0.x) as we have defined lan in firewall settings (Step E). I will explore firewall settings in openwrt in my next article.
Below is the upgraded architecture:
GLOSSARY:
Bufferbloat: Bufferbloat is a software issue with networking equipment that causes spikes in your Internet connection’s latency when a device on the network uploads or downloads files. Bufferbloat can make web browsing slower, make video calls stutter, and cause VoIP calls will break up. Real-time games will lag. Bufferbloat causes degraded connectivity anytime your Internet connection is under heavy use by any user or application. If a large upload or download of data is happening, other applications and users will slow down.
Imagine that you have a sink with a very narrow drain. Your friend pours a large bucket of water into it. The sink is full and draining very slowly. You have a spoonful of oil that you want to get down the drain as soon as possible. You pour it into the sink. But of course, it doesn’t drain quickly - the water in the sink needs to drain first. Shoot! The sink is a buffer - a “queue” for liquid. When your friend poured in the bucket of water, they filled the queue. Anything new will take a long time to drain. Instead of water and oil, networks have different flows of packets. Your router is like the sink, and your connection to the ISP is the narrow drain (since it’s probably the slowest link in your network). When someone on your network sends a large file, a lot of packets get sent all at once. The router temporarily “buffers those packets”, holding them before they’re sent. Any new data packets get stuck behind the existing queue of buffered packets. They will arrive at the destination much later than if the router’s buffers hadn’t been full. Certain routers have smart algorithms (usually called “SQM”) that ensure that time-sensitive packets flowing through the router don’t get delayed, even when large files are being downloaded or uploaded. Continuing with the liquid analogy, these routers offer a way to admit just the right amount of water into the sink so the drain pipe is always full, but a new spoonful of oil will drain out immediately. source
Double NAT:
Double network address translation, happes when two routers are placed in series in a network. This can happen when a router is connected to another router, or when a modem-router combination device is used in conjunction with another router. When double NAT occurs, it can cause issues with connectivity and network performance. This can result in issues with online gaming, video streaming, and other network-intensive applications.
🔝