Flashing Nrf52840 Open Thread Border Router
I have compiled the details for flashing nRF52840 with thread firmware. Followed by using the flashed dongle with raspberry pi. This article will help in creating otbr (open thread border router) using raspberry pi and nRF52840 dongle as thread dongle.
TABLE OF CONTENTS:
- Steps involved
- Flashing thread firmware
- Installing otbr
- Combining HA and otbr thread network
- References
Steps involved:
nRF52840 can be used as a thread border router. There are few things, that needs to setup/configured:
- A. Flashing nRF52840 thread firmware
- B. Installing otbr on raspberry pi (which will use nRF52840 dongle for thread).
- C. Adding the otbr on raspberry pi (which will use nRF52840 dongle for thread) to the HomeAssistant’s thread network (this way we will have more thread border routers (tbr) on the same network which will increase the reliability of the network)
Flashing thread firmware
Step 1:
Get the raspberry pi setup (use only 32bit version of raspbian OS). Login to raspberry pi instance. Don’t connect the nRF52840 dongle to raspberry pi (it will happen in B)
🔝
Step 2:
Clone the OpenThread nRF528xx platform repository into the current directory:
$ git clone --recursive https://github.com/openthread/ot-nrf528xx.git
Step 3:
Enter the ot-nrf528xx directory:
$ cd ot-nrf528xx
Step 4:
Install OpenThread dependencies:
$ ./script/bootstrap
Step 5:
Build OpenThread for the nRF52840 Dongle:
$ script/build nrf52840 USB_trans -DOT_BOOTLOADER=USB -DOT_THREAD_VERSION=1.2
This creates an RCP image at build/bin/ot-rcp.
🔝
Step 6:
Convert the RCP image to the .hex format:
$ arm-none-eabi-objcopy -O ihex build/bin/ot-rcp build/bin/ot-rcp.hex
Step 7:
Now copy over the .hex file i.e. ot-rcp.hex to your laptop on which you will install nRF Connect for Desktop - choose the OS based on where you are installing it. This tool is needed to flash the .hex file onto to the USB dongle.
🔝
Step 8:
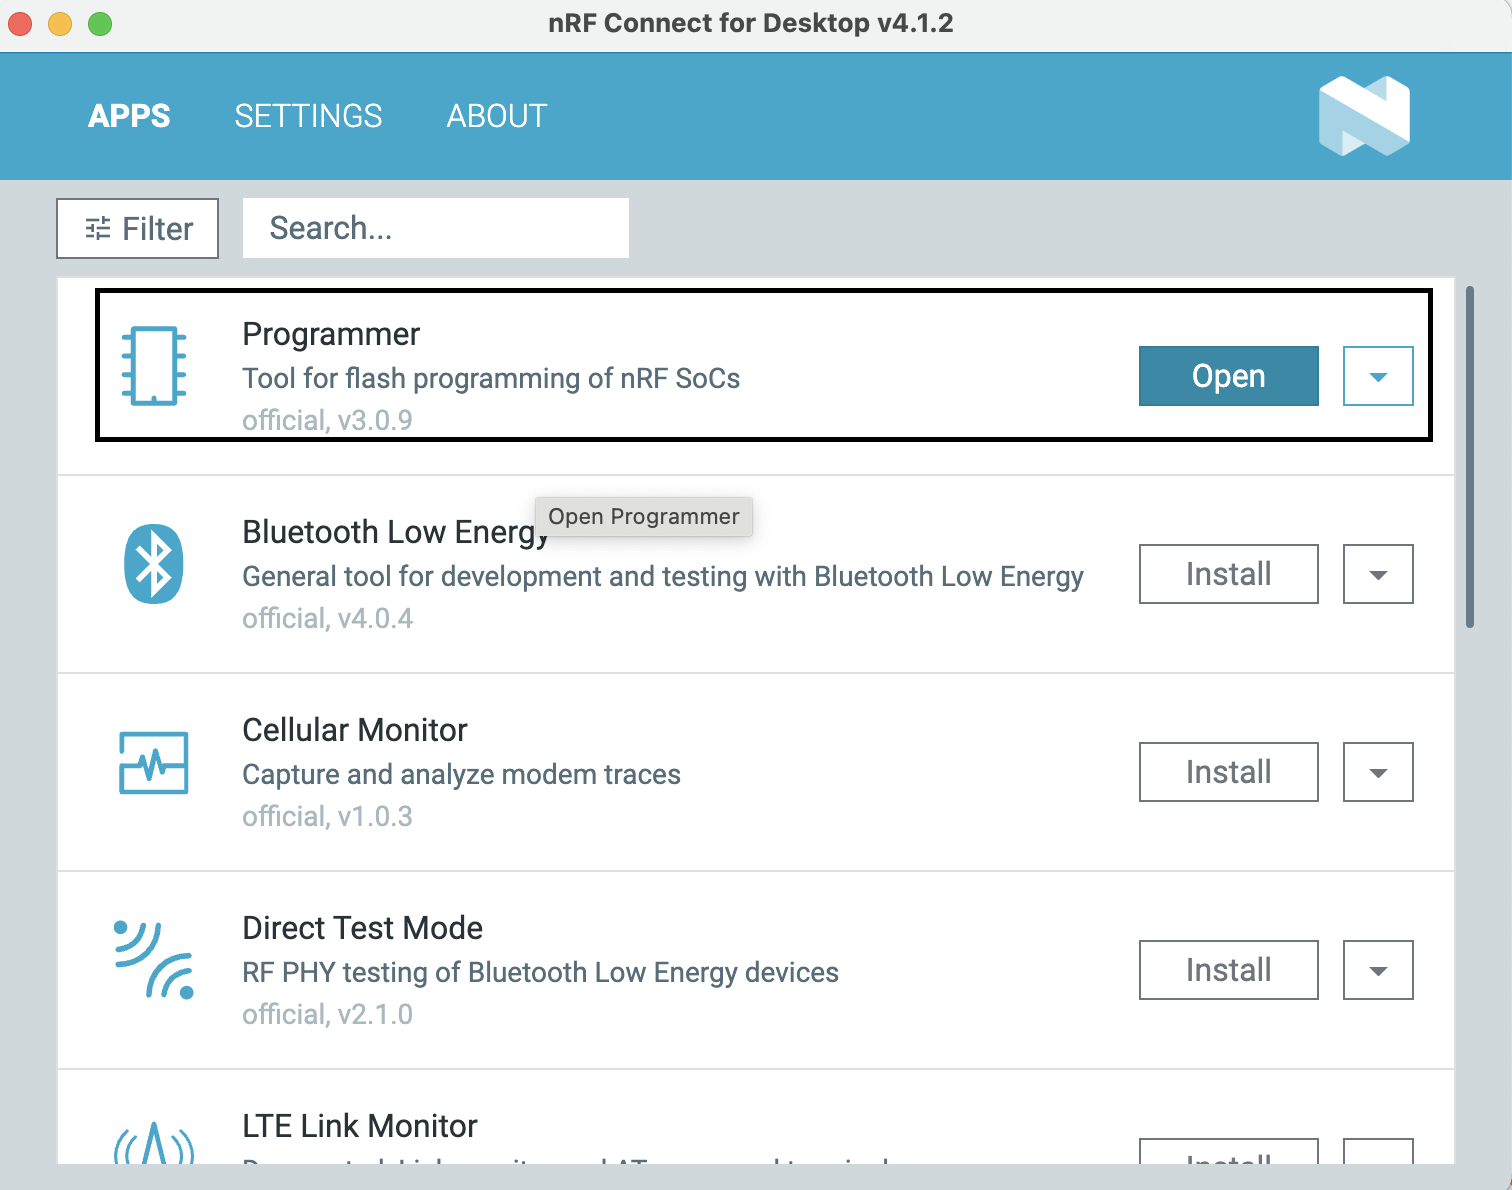
After installing nRF Connect for Desktop. Open the application and install Programmer (the first option on the list) tool.
🔝
Step 9:
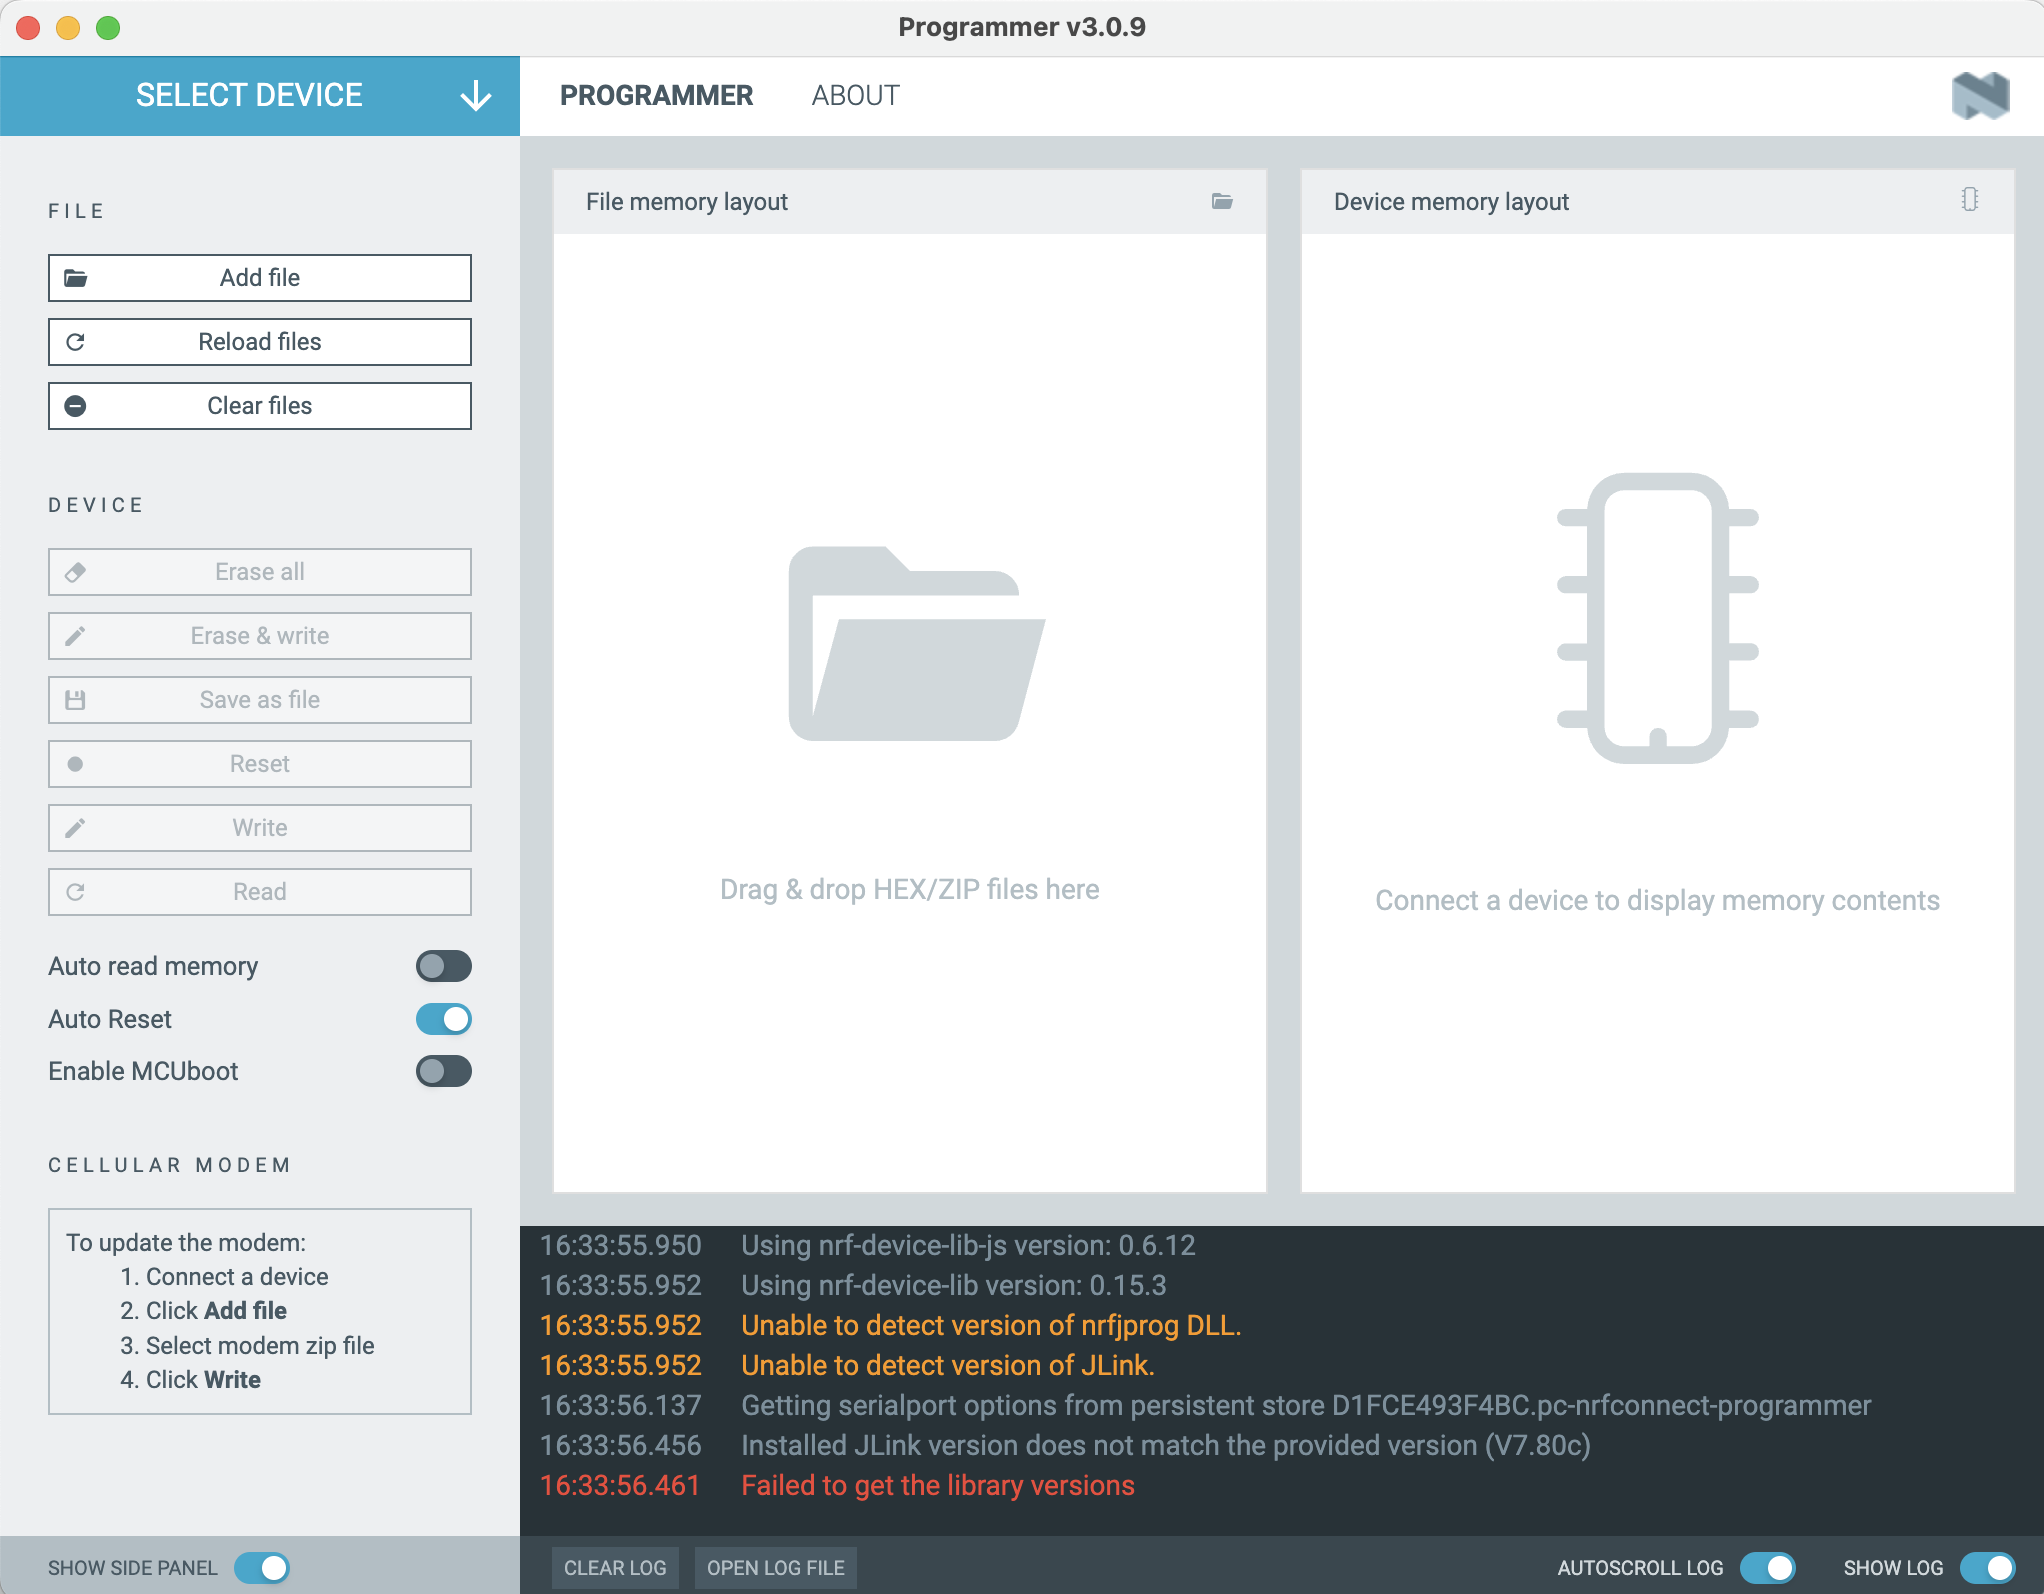
Once Programmer is installed. Open the Programmer tool.
🔝
Step 10:
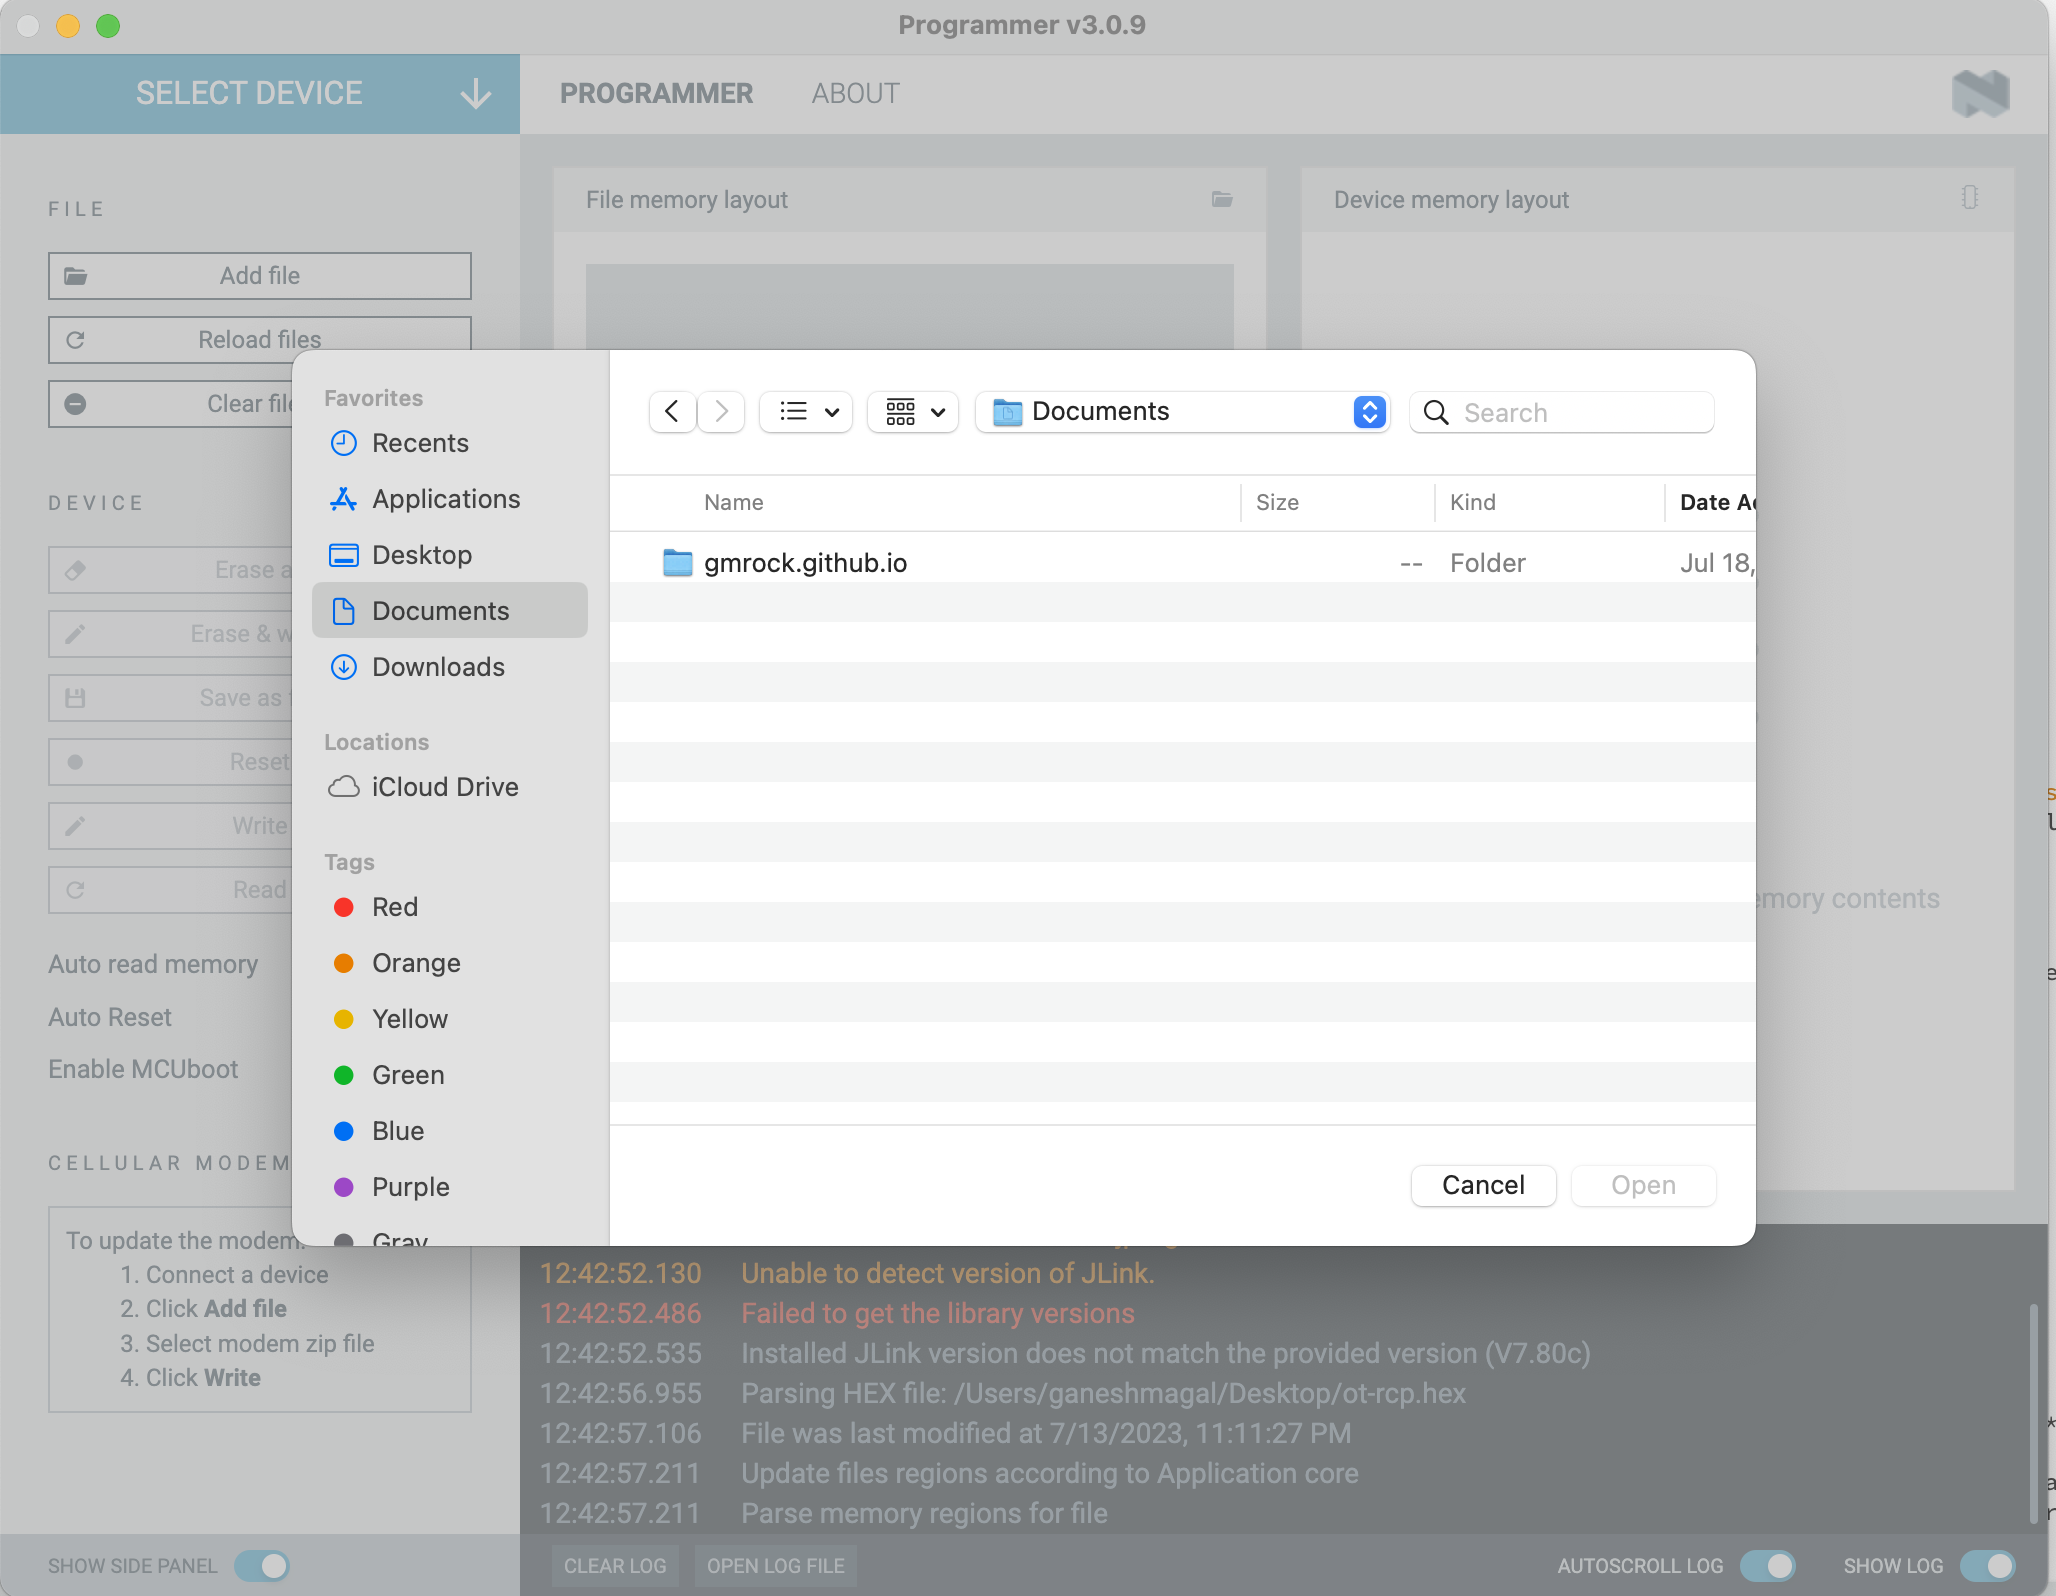
Now connect the USB dongle to computer where the tool has been installed (the red light on the dongle should keep blinking red, if not do a reset of the board. To reset refer this article). Choose the .hex file which we copied over from Raspberry pi - this is done by clicking on the Add file.
🔝
Step 11:
Select the device by clicking on SELECT DEVICE. The device will be the usb dongle.
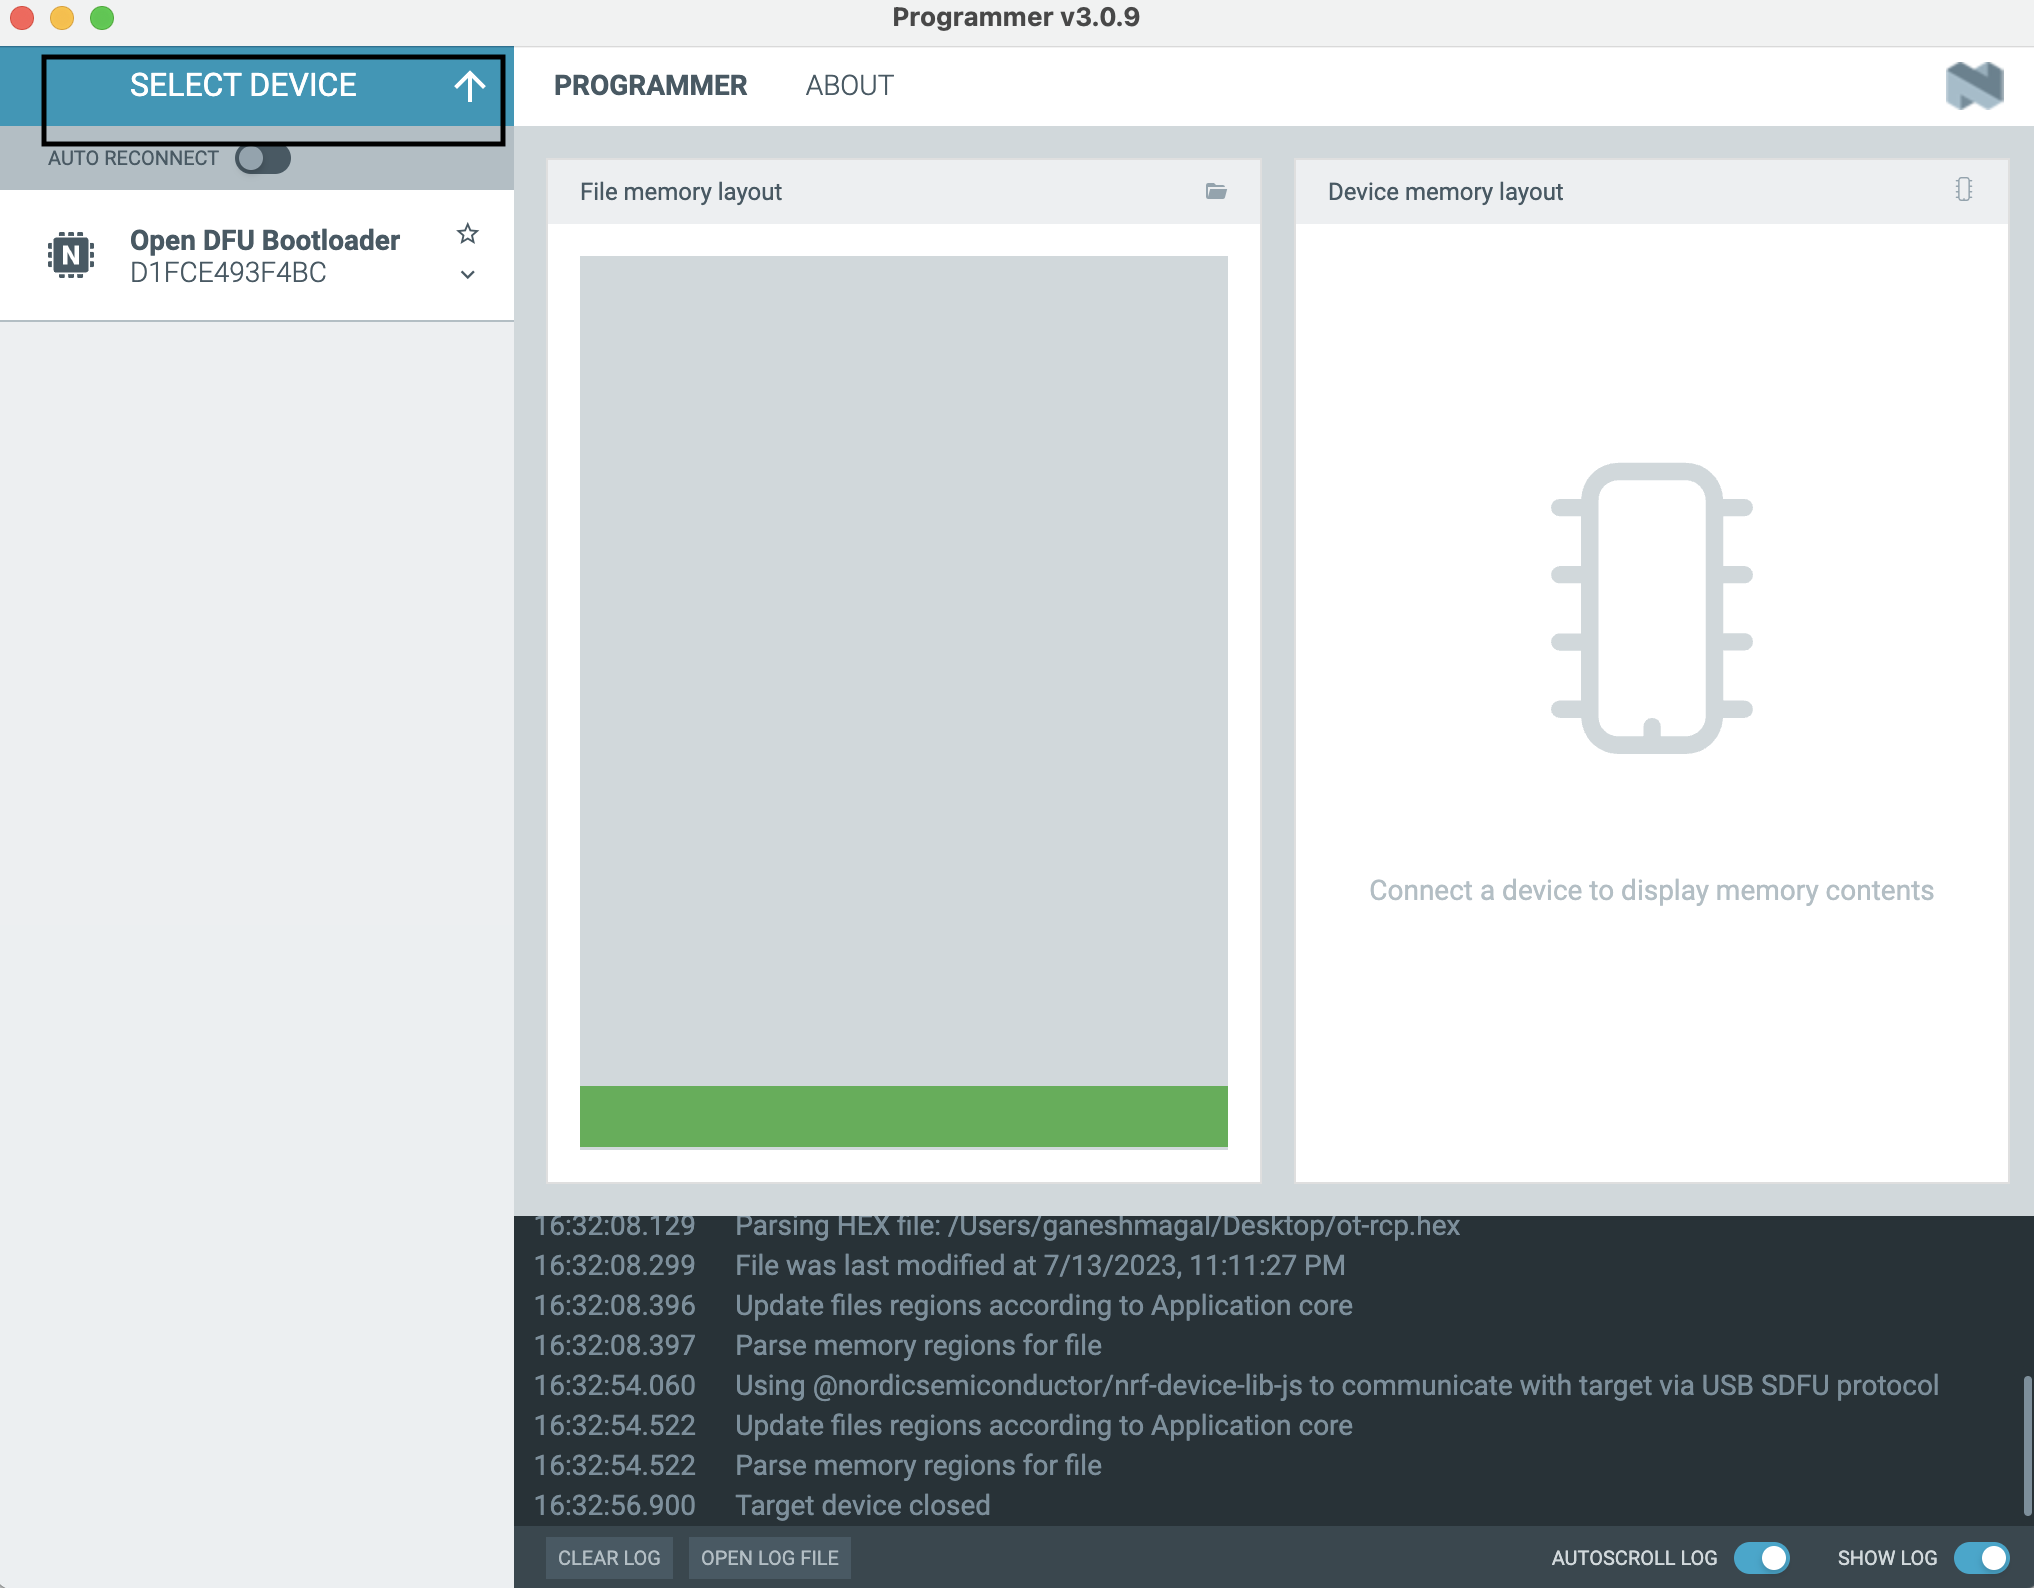
🔝
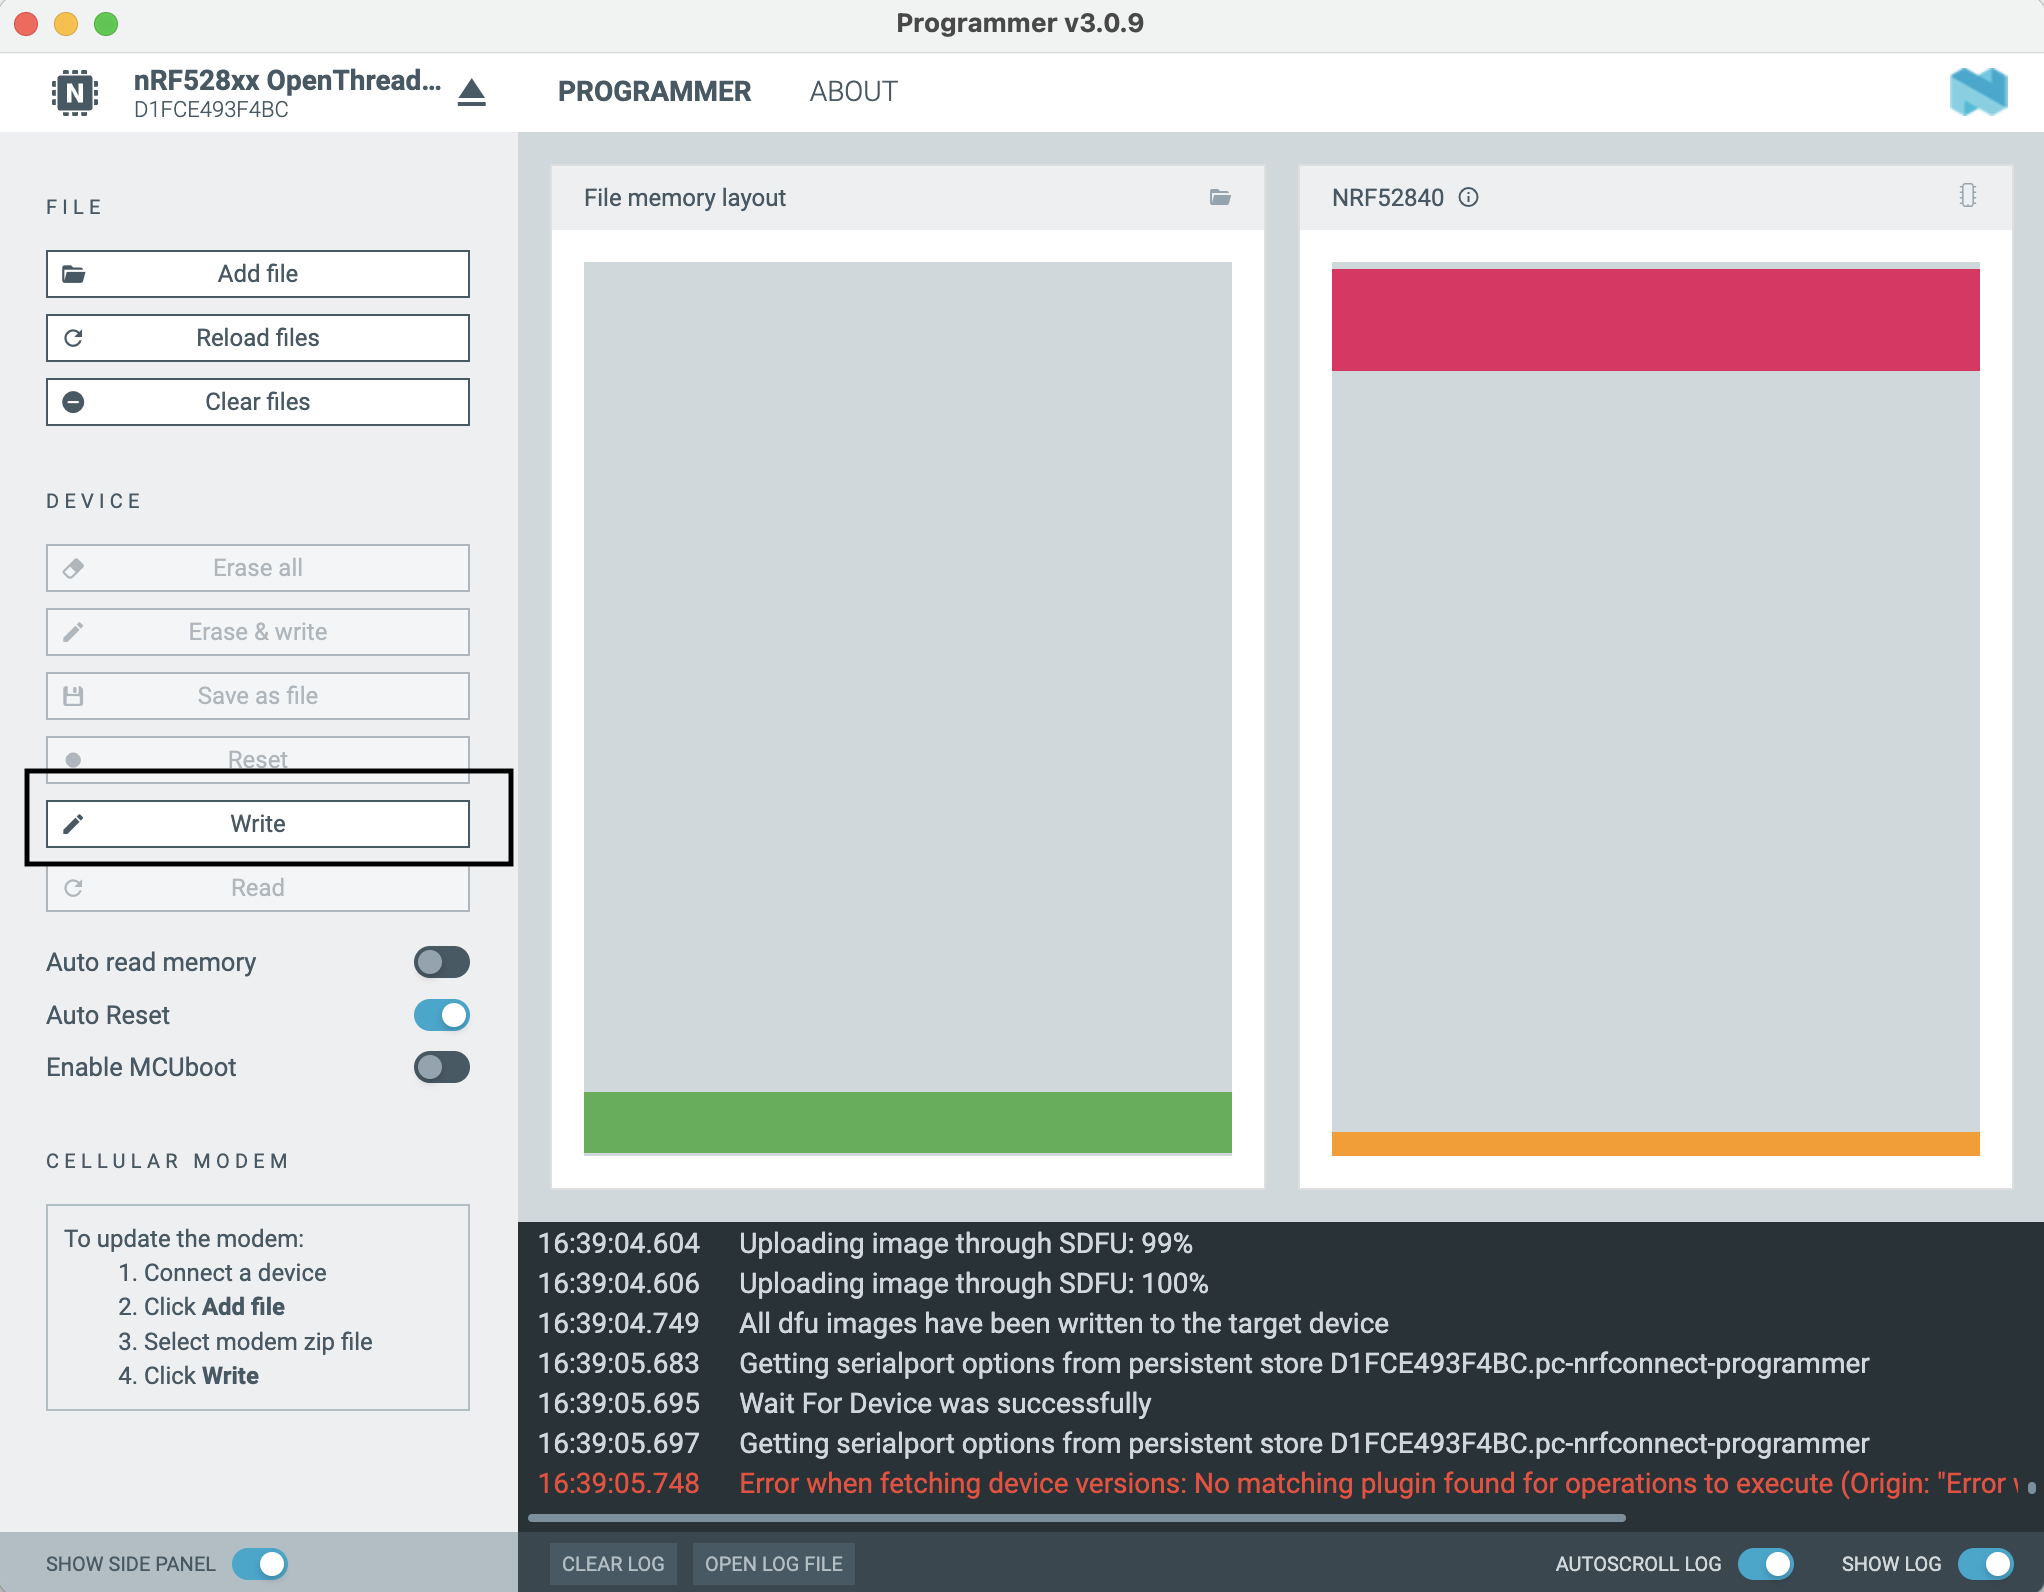
Step 12:
Click on Write and flash the hex file to the usb dongle. It shouldn’t take more than 1-2mins. Once it’s flashed the red blinking light on the dongle should stop blinking.
🔝
Step 13:
Now disconnect the USB dongle and plug it in to the Raspberry pi (which we are planning on using as otbr).
🔝
Installing otbr
Now we will, download and compile the otbr software on raspberry pi.
Step 1:
Clone the OTBR repository:
git clone https://github.com/openthread/ot-br-posix
Step 2:
Enter the ot-br-posix directory and bootstrap
cd ot-br-posix

./script/bootstrap
Step 3:
Compile and install otbr
$ INFRA_IF_NAME=eth0 ./script/setup
Here eth0 is the lan interface (you can find by running ifconfig command on the raspberry pi). If using wifi, use the appropriate interface
🔝
Step 4:
Now run the below command to find where the usb dongle is connected
ls /dev/tty*
To find out where the USB dongle is connected, run the above command without the USB dongle connected and then again run with USB dongle connected. In my case it was /dev/ttyACM0.
🔝
Step 5:
Verify if the location is accurately set:
cd /etc/default
cat otbr-agent
The otbr-agent configuration file contains your Thread interface name, Ethernet or Wi-Fi interface name, and RCP serial port name.
OTBR_AGENT_OPTS="-I wpan0 -B OTBR_INFRA_IF_NAME spinel+hdlc+uart:///dev/ttyACM0 trel://OTBR_INFRA_IF_NAME"
thread interface name - wpan0
Step 6:
Restart the raspberry pi
🔝
Step 7:
Check if the otbr is up:
sudo systemctl status
If the setup script was successful, the following services appear in the output:
mdns.service
otbr-agent.service
otbr-web.service
You can also check each service individually:
sudo service mdns status
sudo service otbr-agent status
sudo service otbr-web status
Reset the RCP once with:
sudo ot-ctl reset.
Step 8:
Verify if RCP is all up and working correctly:
sudo ot-ctl state
ot-ctl is a command line utility provided with OTBR. It is used to communicate with the Thread PAN interface (default is wpan0) that otbr-agent is bound to in the RCP design.
If the RCP is successfully running and the node is not a member of a Thread network, the output should be similar to the below:
disabled
If the output is OpenThread daemon is not running, troubleshoot with the following:
Verify that the RCP serial device is present. For example, if the device should be attached to /dev/ttyUSB0:
    ls /dev/ttyUSB*
    /dev/ttyUSB0
Reset the RCP with:
sudo ot-ctl reset.
Check the RCP status again with:
sudo ot-ctl state.
Now the otbr thread network is up and running.
🔝
Combining HA and otbr thread network
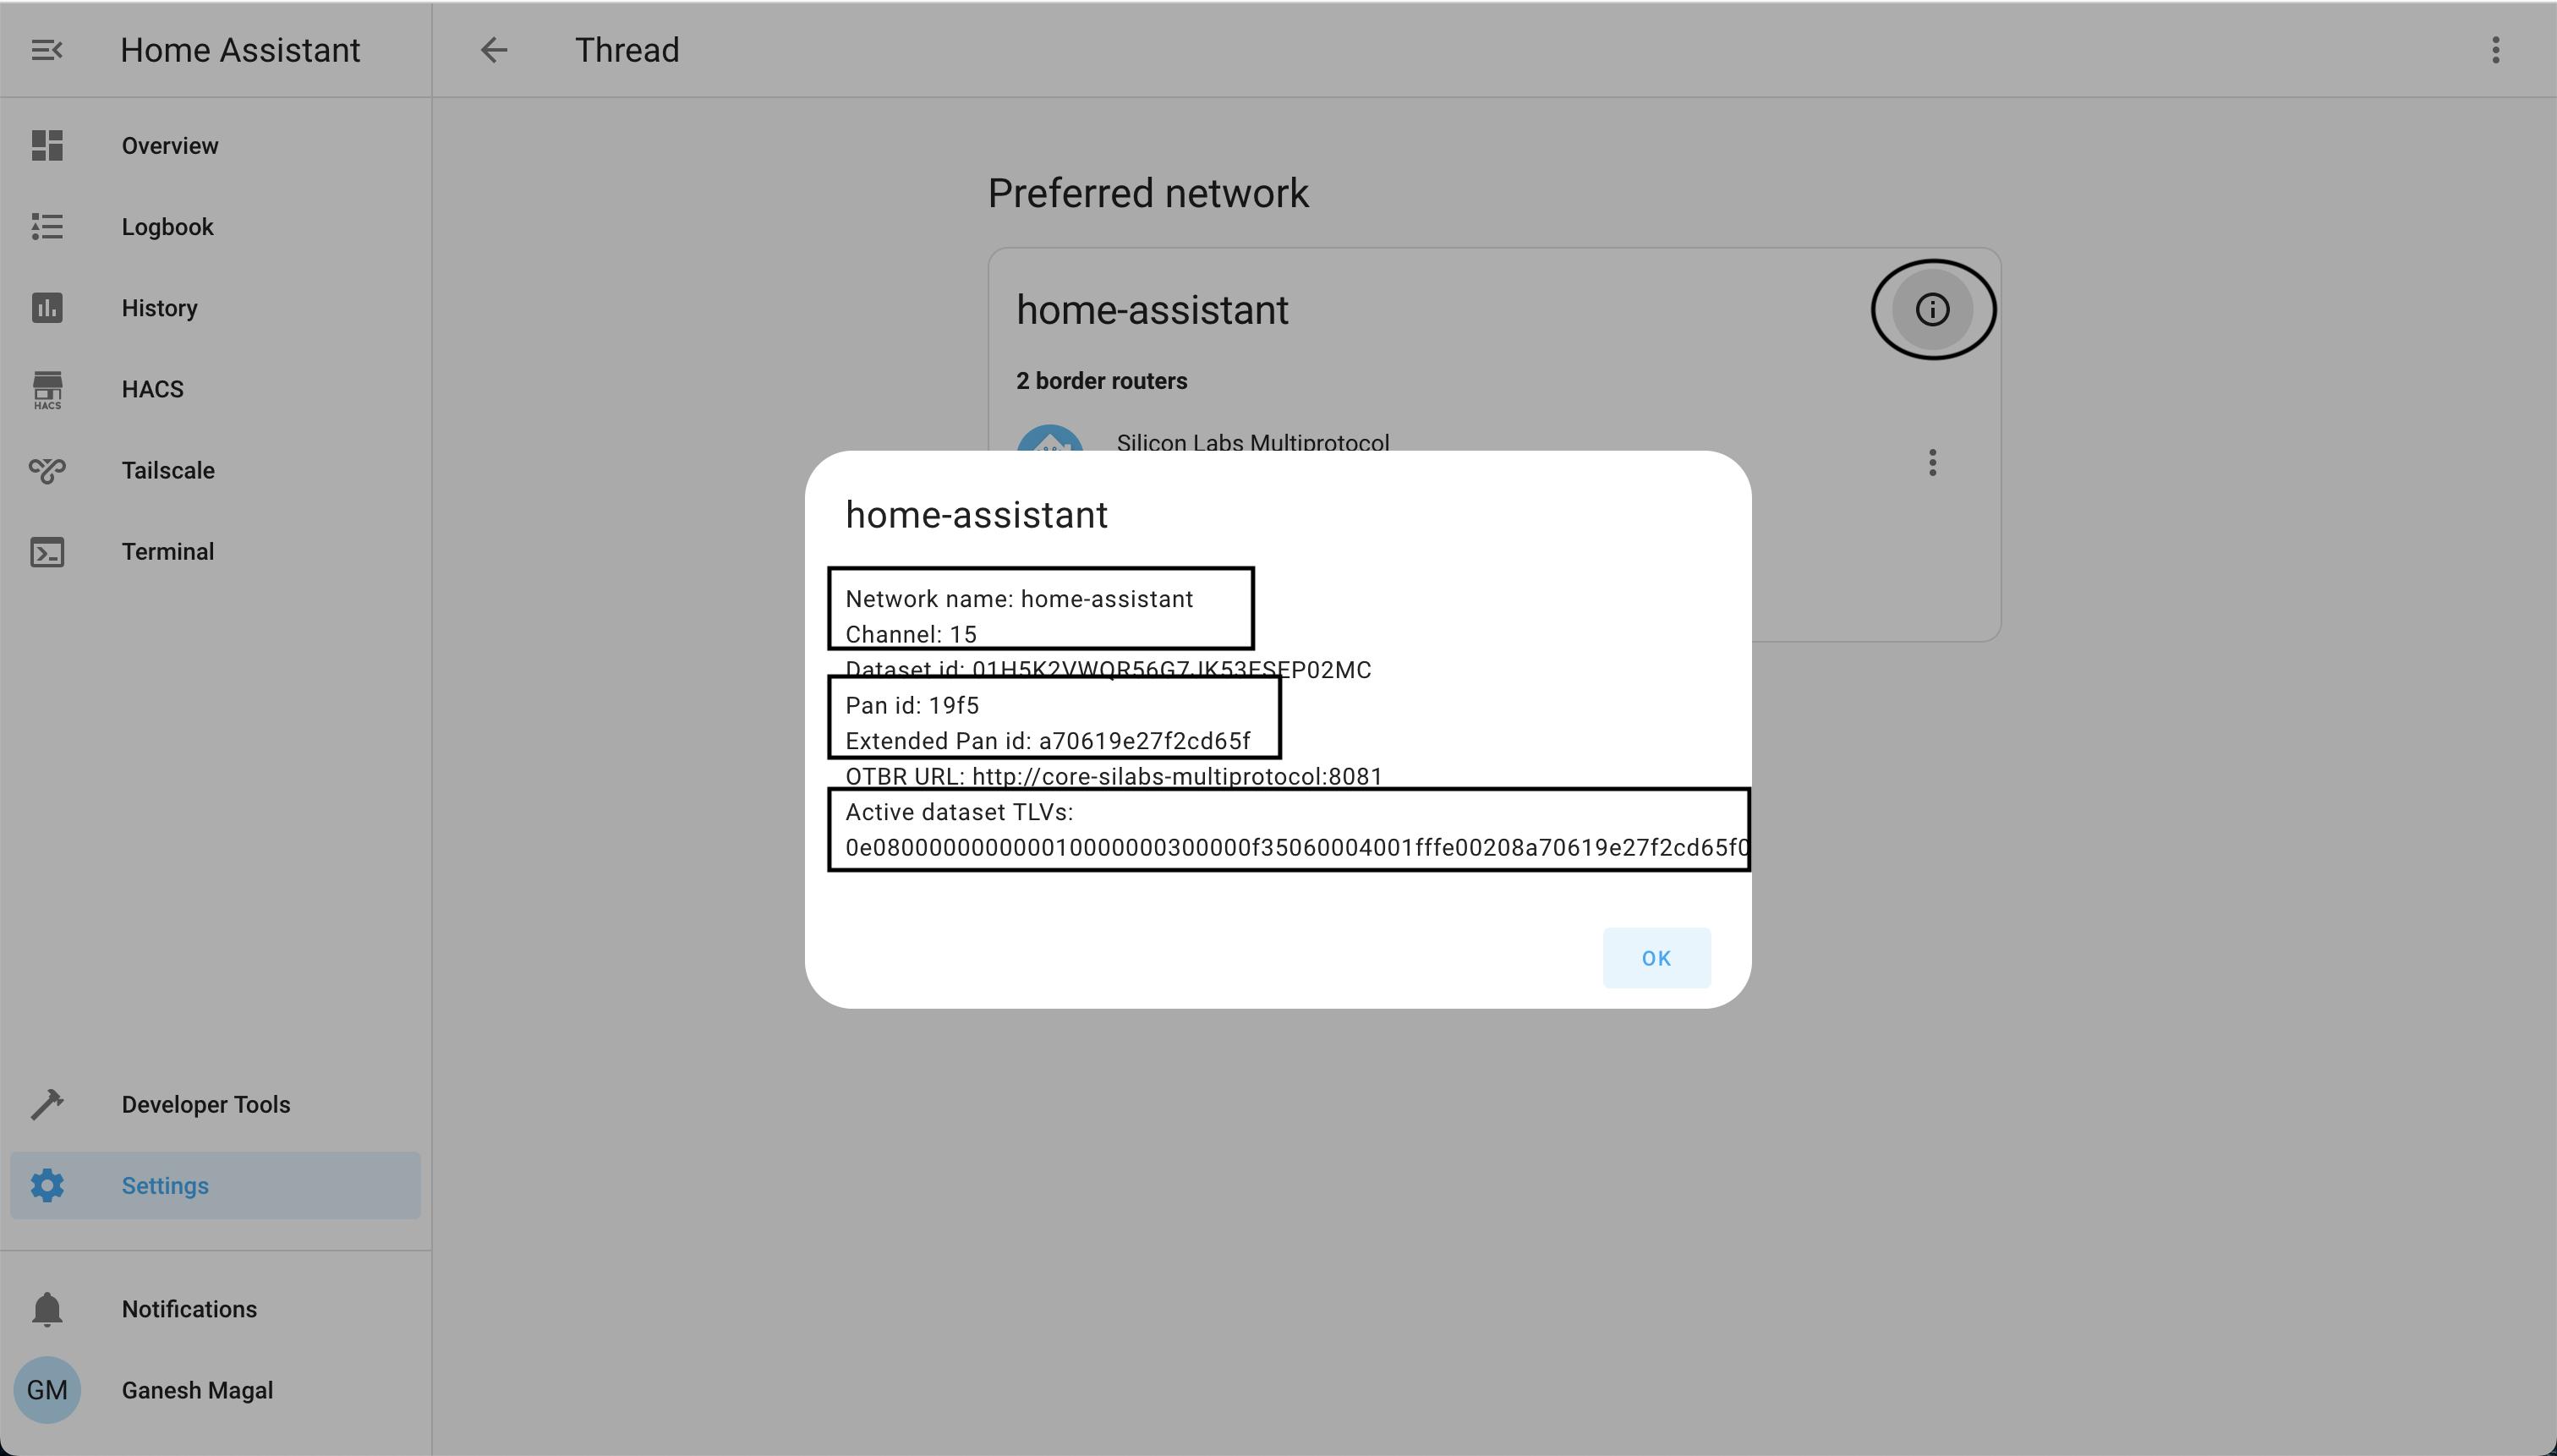
Step 1:
Open HomeAssistant and navigate to
Settings > Devices and Services > Thread > Configure
On this page click on the i and see the current HA’s thread network details.
🔝
Step 2:
Now navigate to the otbr’s(running on raspberry pi, that was configured in B above) web page. It will be on the below url
http://<raspberry_pi_ip_address>:80
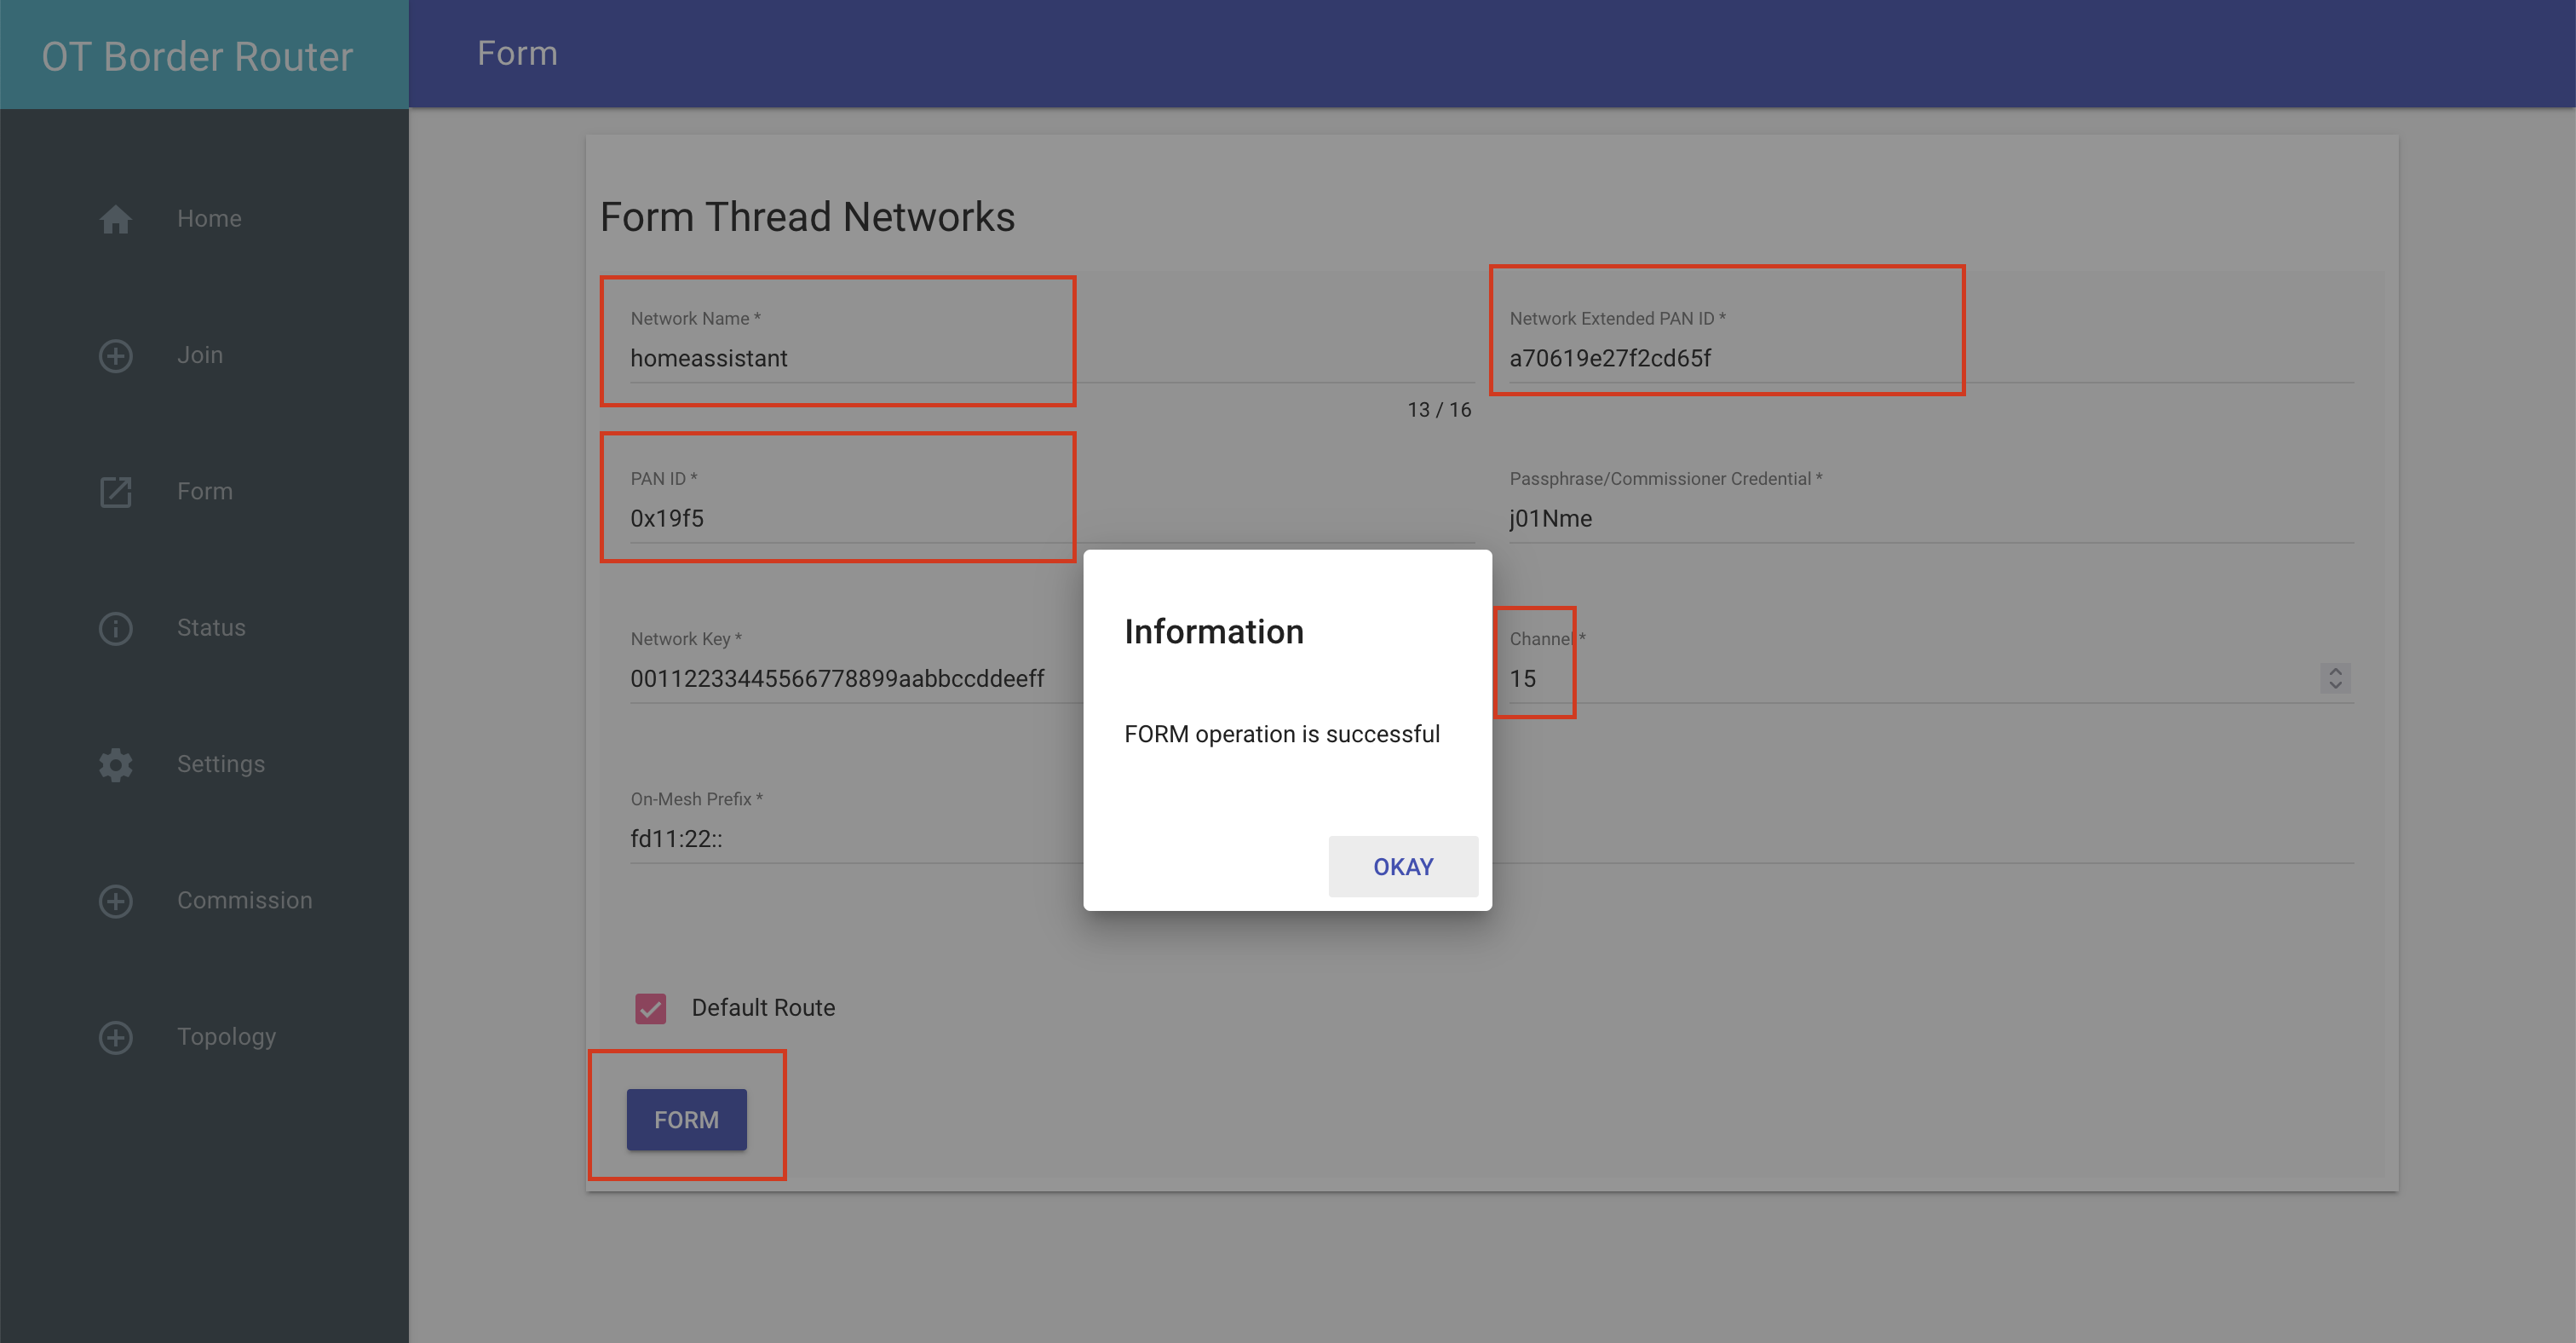
Step 3:
Now navigate to Form on the left panel and fill in the details from HA’s network - network name, channel, pan id, extended pan id here and form. Now the otbr running on raspberry pi has joined the HA’s thread network.
This can also be done using, command line (had to use this with raspbian OS 64bit as web component wasn’t getting installed). Follow the below steps:
- Network name:
gmagal@rpiutil:~ $ sudo ot-ctl dataset networkname home-assistant Done - Channel:
gmagal@rpiutil:~ $ sudo ot-ctl dataset channel 15 Done - Pan id:
gmagal@rpiutil:~ $ sudo ot-ctl dataset panid 0x19f5 Done - Extended Pan id:
gmagal@rpiutil:~ $ sudo ot-ctl dataset extpanid a70619e27f2cd65f
Done
Source for these commands - ot-ctl commands
Step 4:
Now we will use command line in the otbr setup to add the active data set of HA to the otbr. It’s done by following the below command. This is a needed step to complete the integration of HA and otbr thread networks.
gmagal@otbr1:~ $ sudo ot-ctl
This starts the ot-ctl command. Now set the HA’s active dataset TLVs to otbr setup:
gmagal@otbr1:~ $ sudo ot-ctl
dataset set active <enter_the_HA_active_data_set_tlvs>
Example:
gmagal@otbr1:~ $ sudo ot-ctl
dataset set active 0e080000000000010000000300000f35060004001fffe00208a70619e27f2cd65f0708fd996562f0858f4e0510c0855461810d737e7a0db99205516844030e686f6d652d617373697374616e74010219f504108894f1a19b948408b10488e246b782280c0402a0f7f8
Done
>
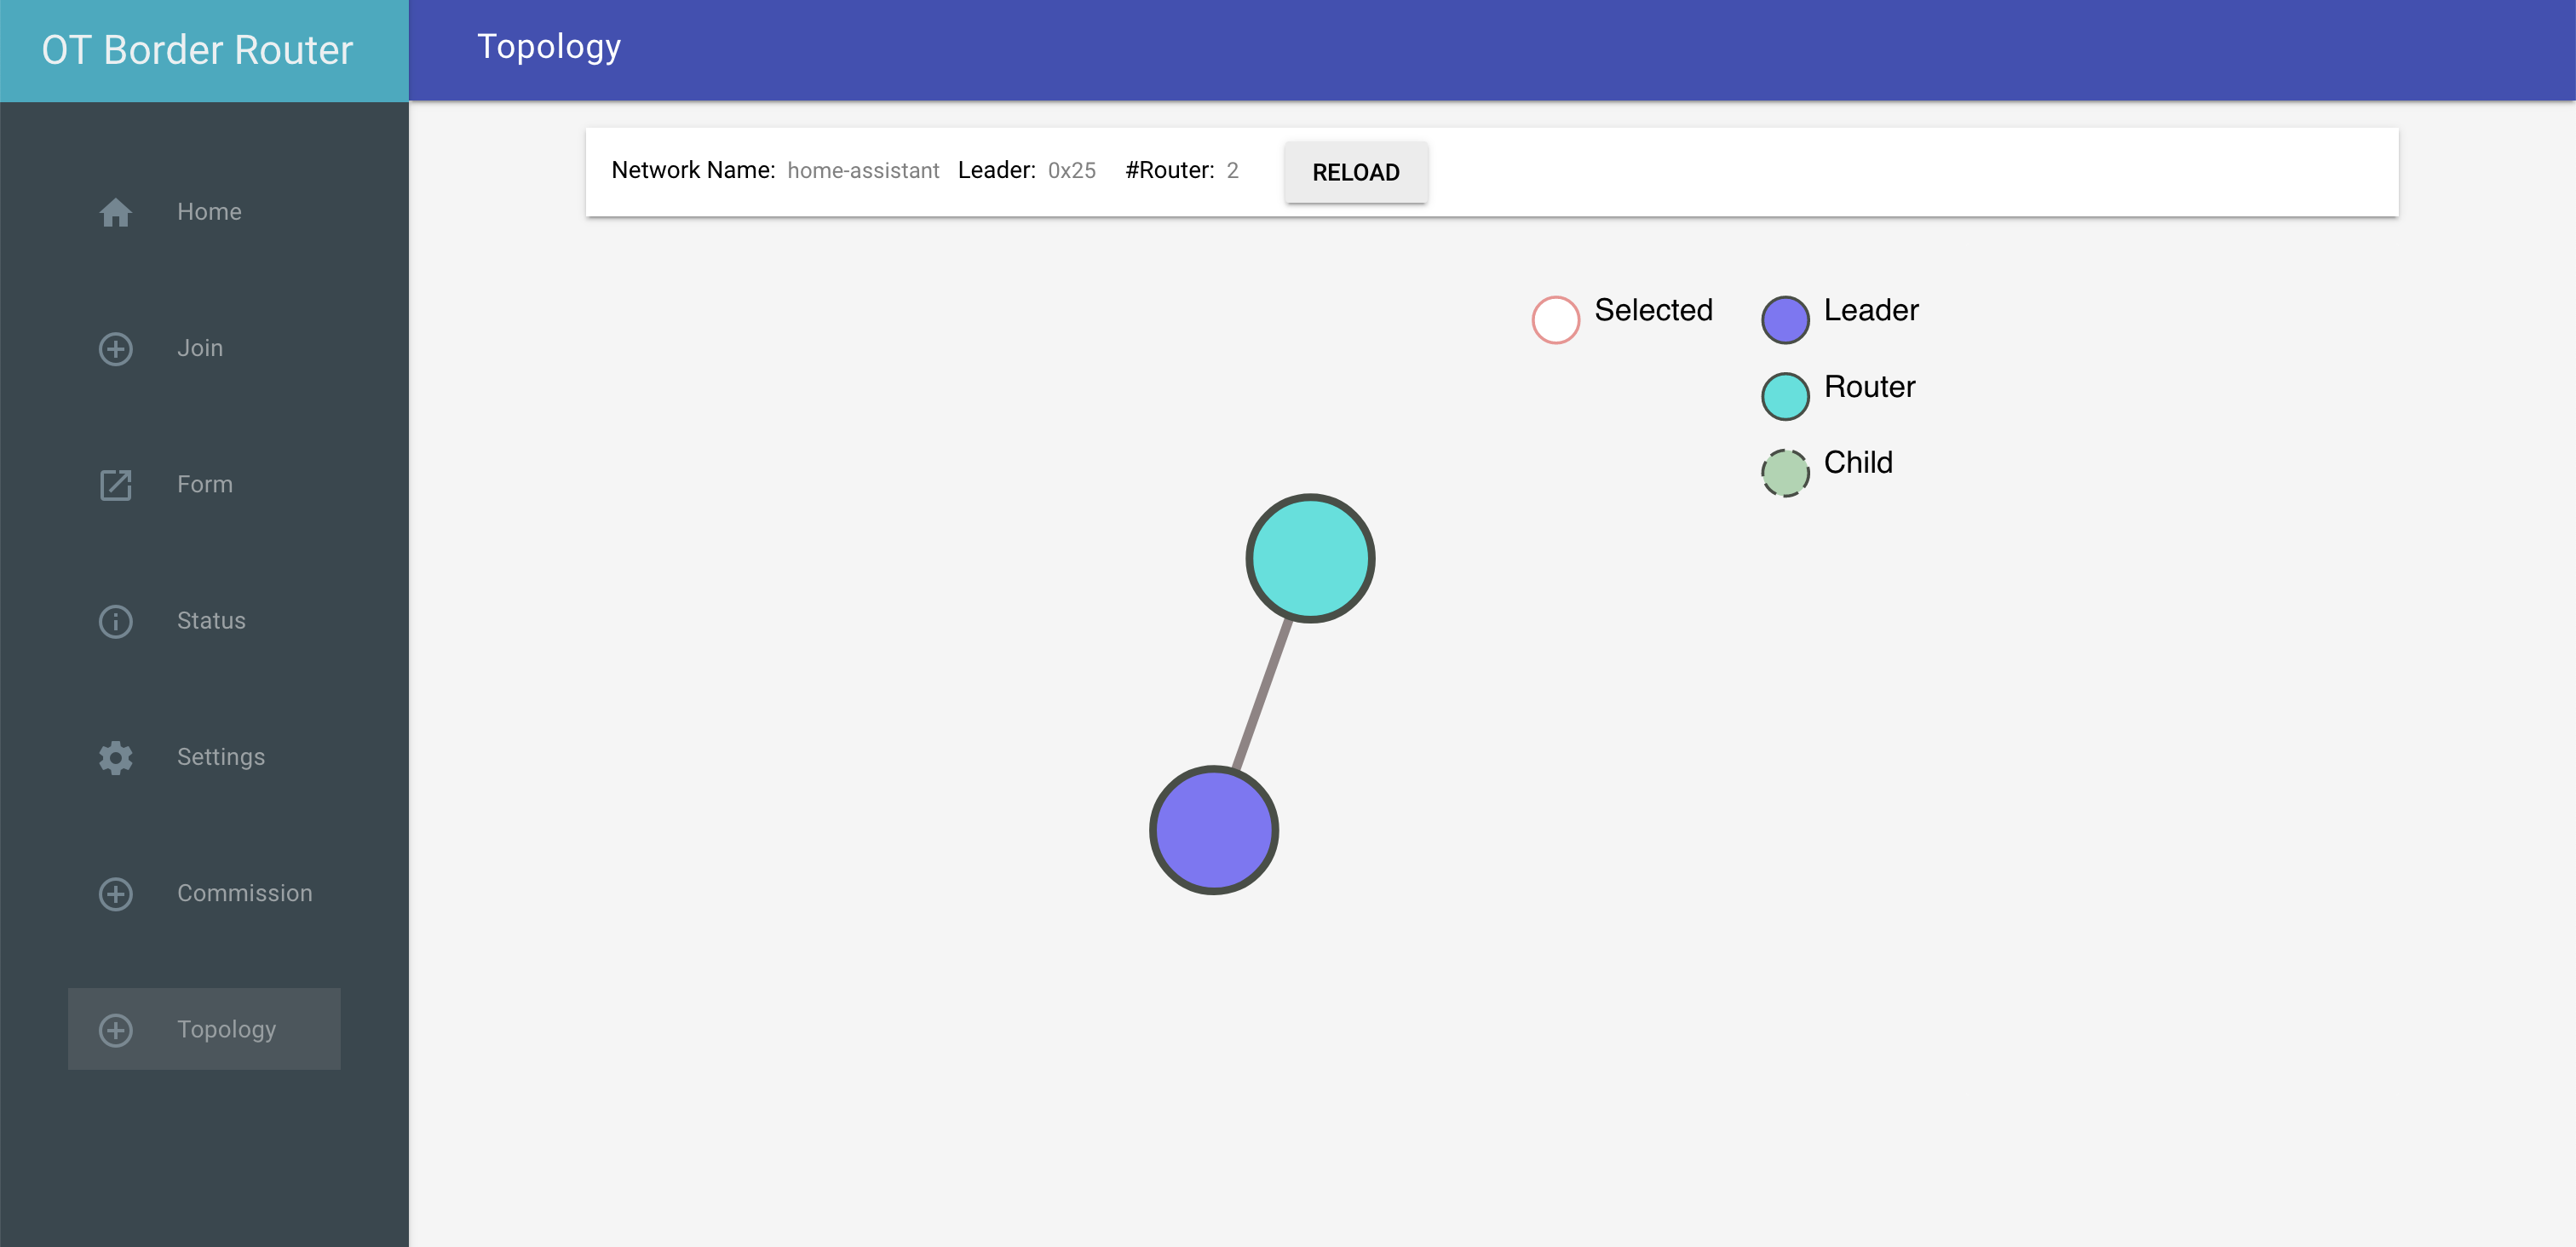
Done. When you click on Topology in otbr page, it should look like below (the HA and otbr are on the same thread network).