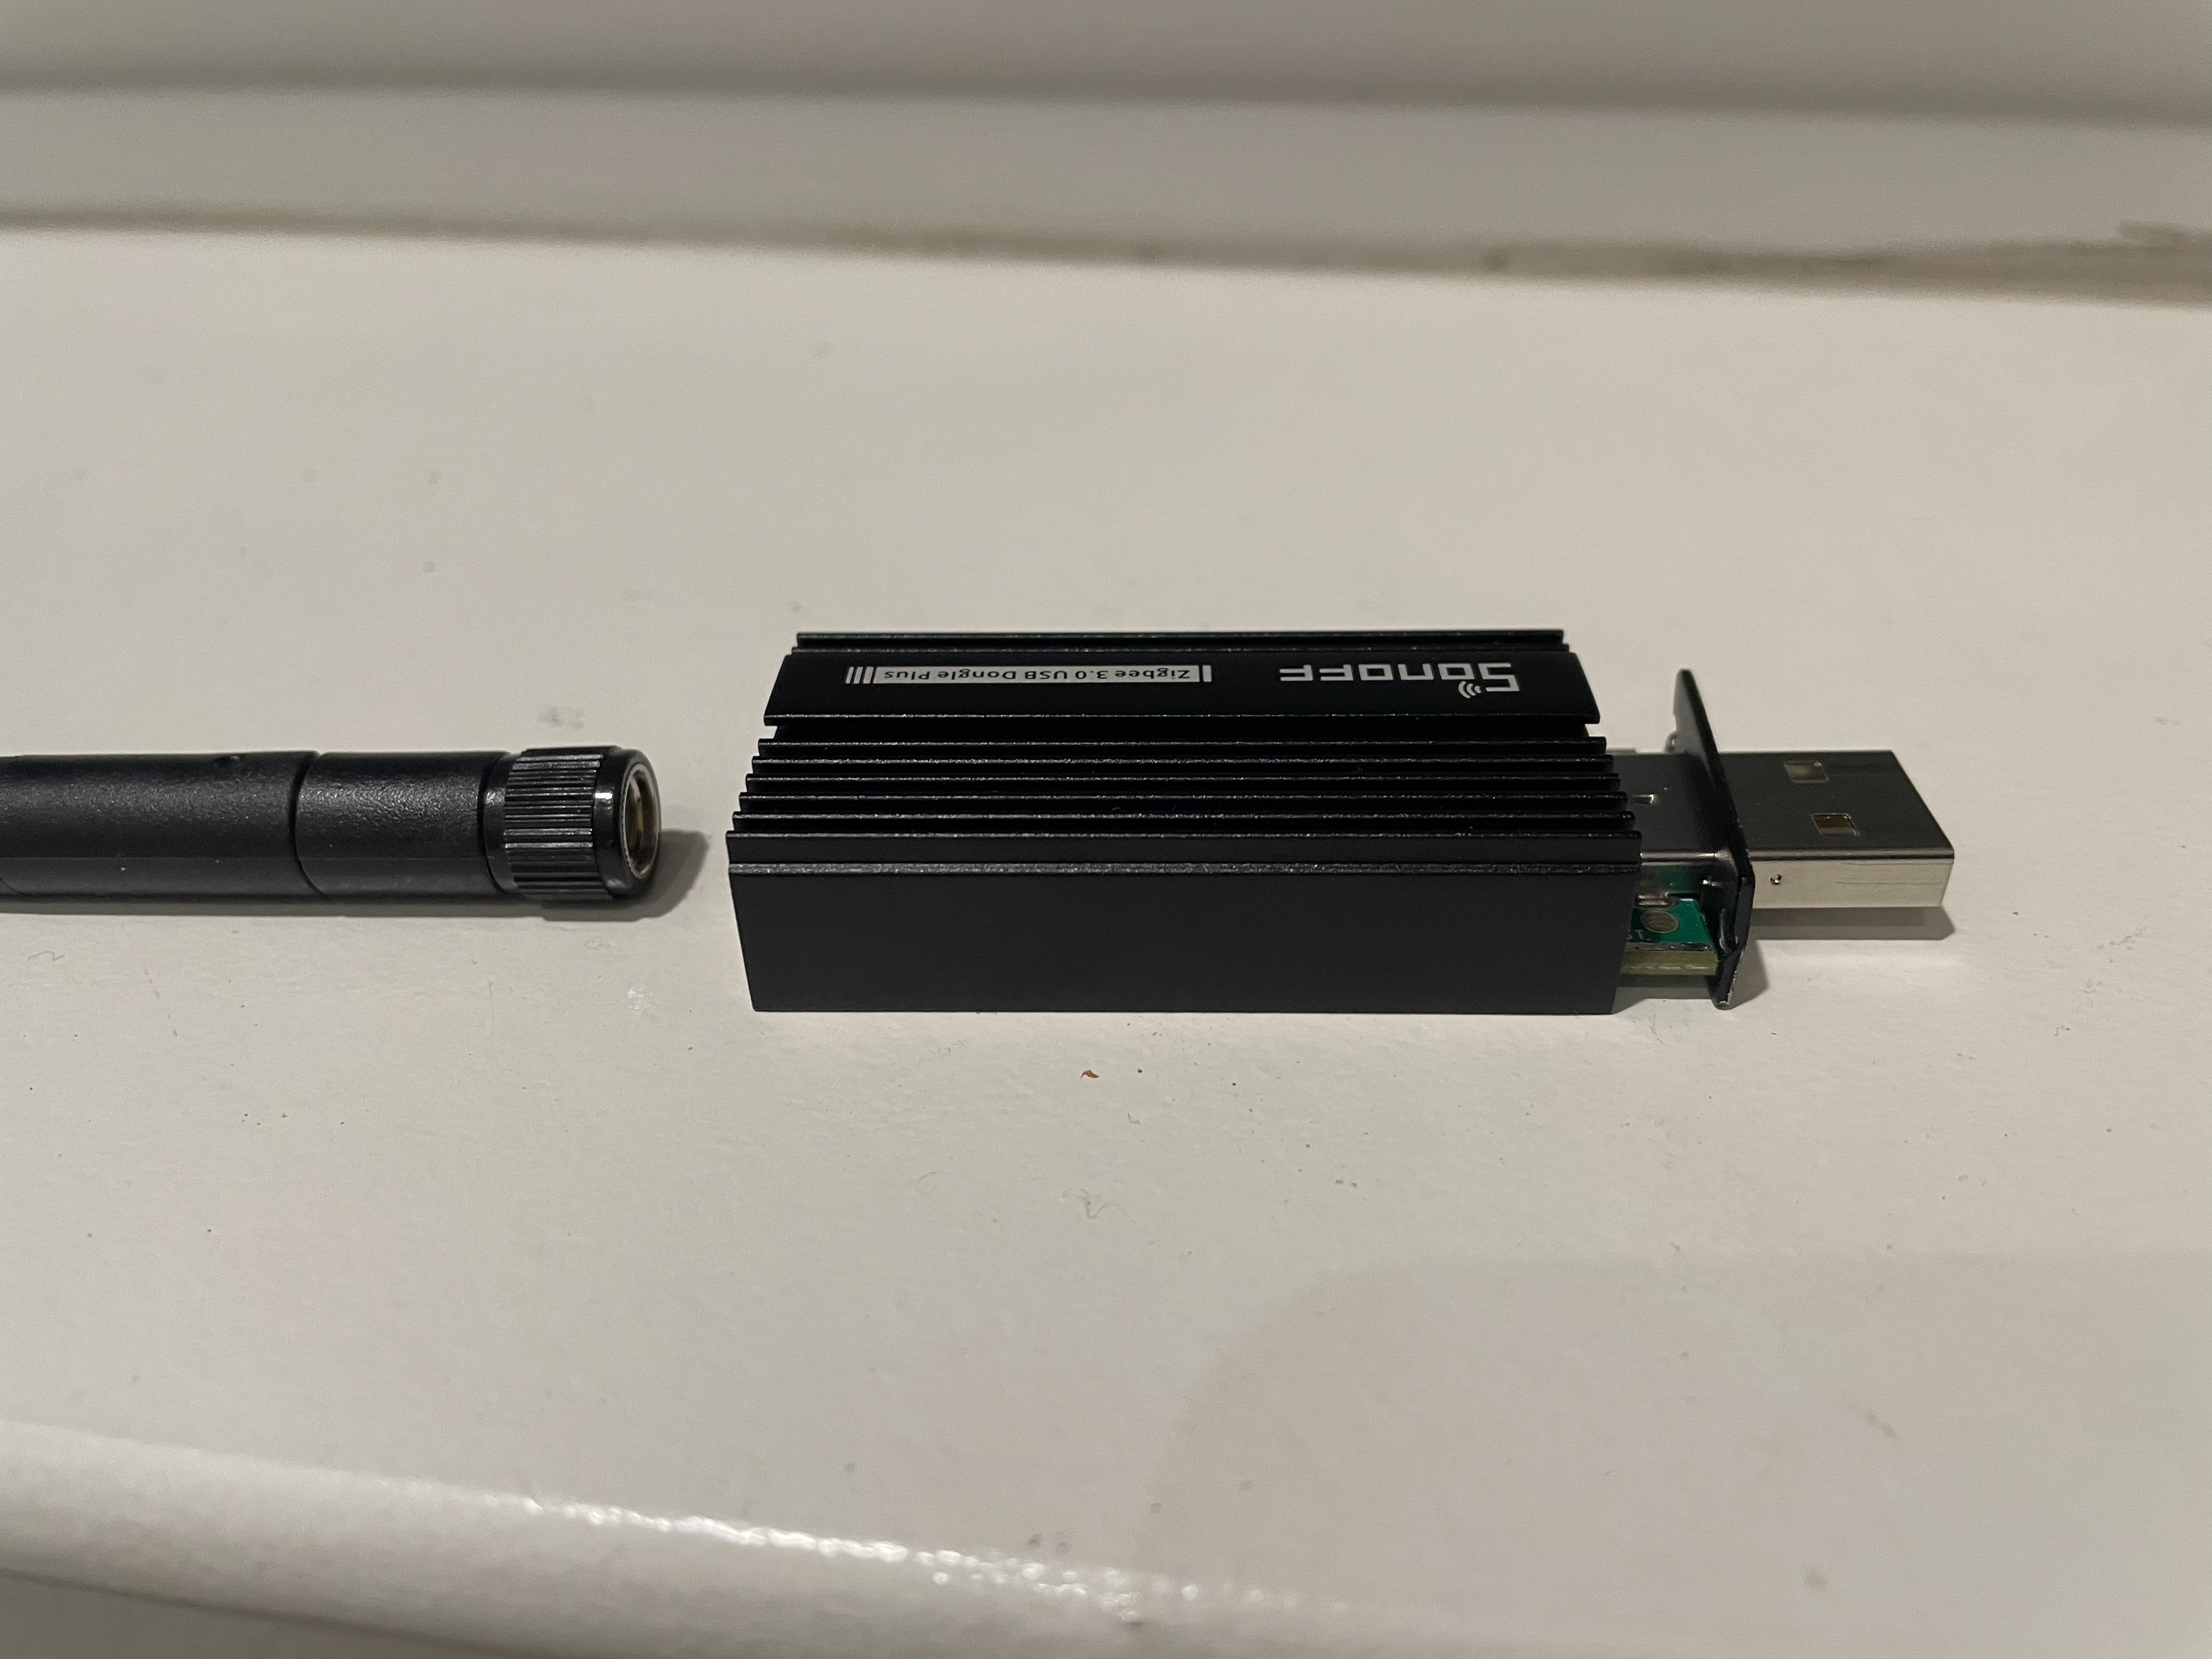
Flashing Sonoff Zigbee Dongle Plus E
I have compiled the details for flashing SonOff Zigbee dongle plus E with router firmware on Linux 🐧 and MAC OS.
Why flash firmware:
- upgrade
- alternate (opensource) option
- convert a Zigbee coordinator into a Zigbee router (this was my use case)
Apparently, the SonOff Zigbee dongle plus E acts as a very good router (I have started using it as router and so far it’s reliable).
Step 1:
Download the router firmware
- SonOff Zigbee dongle plus E router firmware
- SonOff Zigbee dongle plus E coordinator firmware (incase we want to reflash the coordinator firmware)
🔝
Step 2:
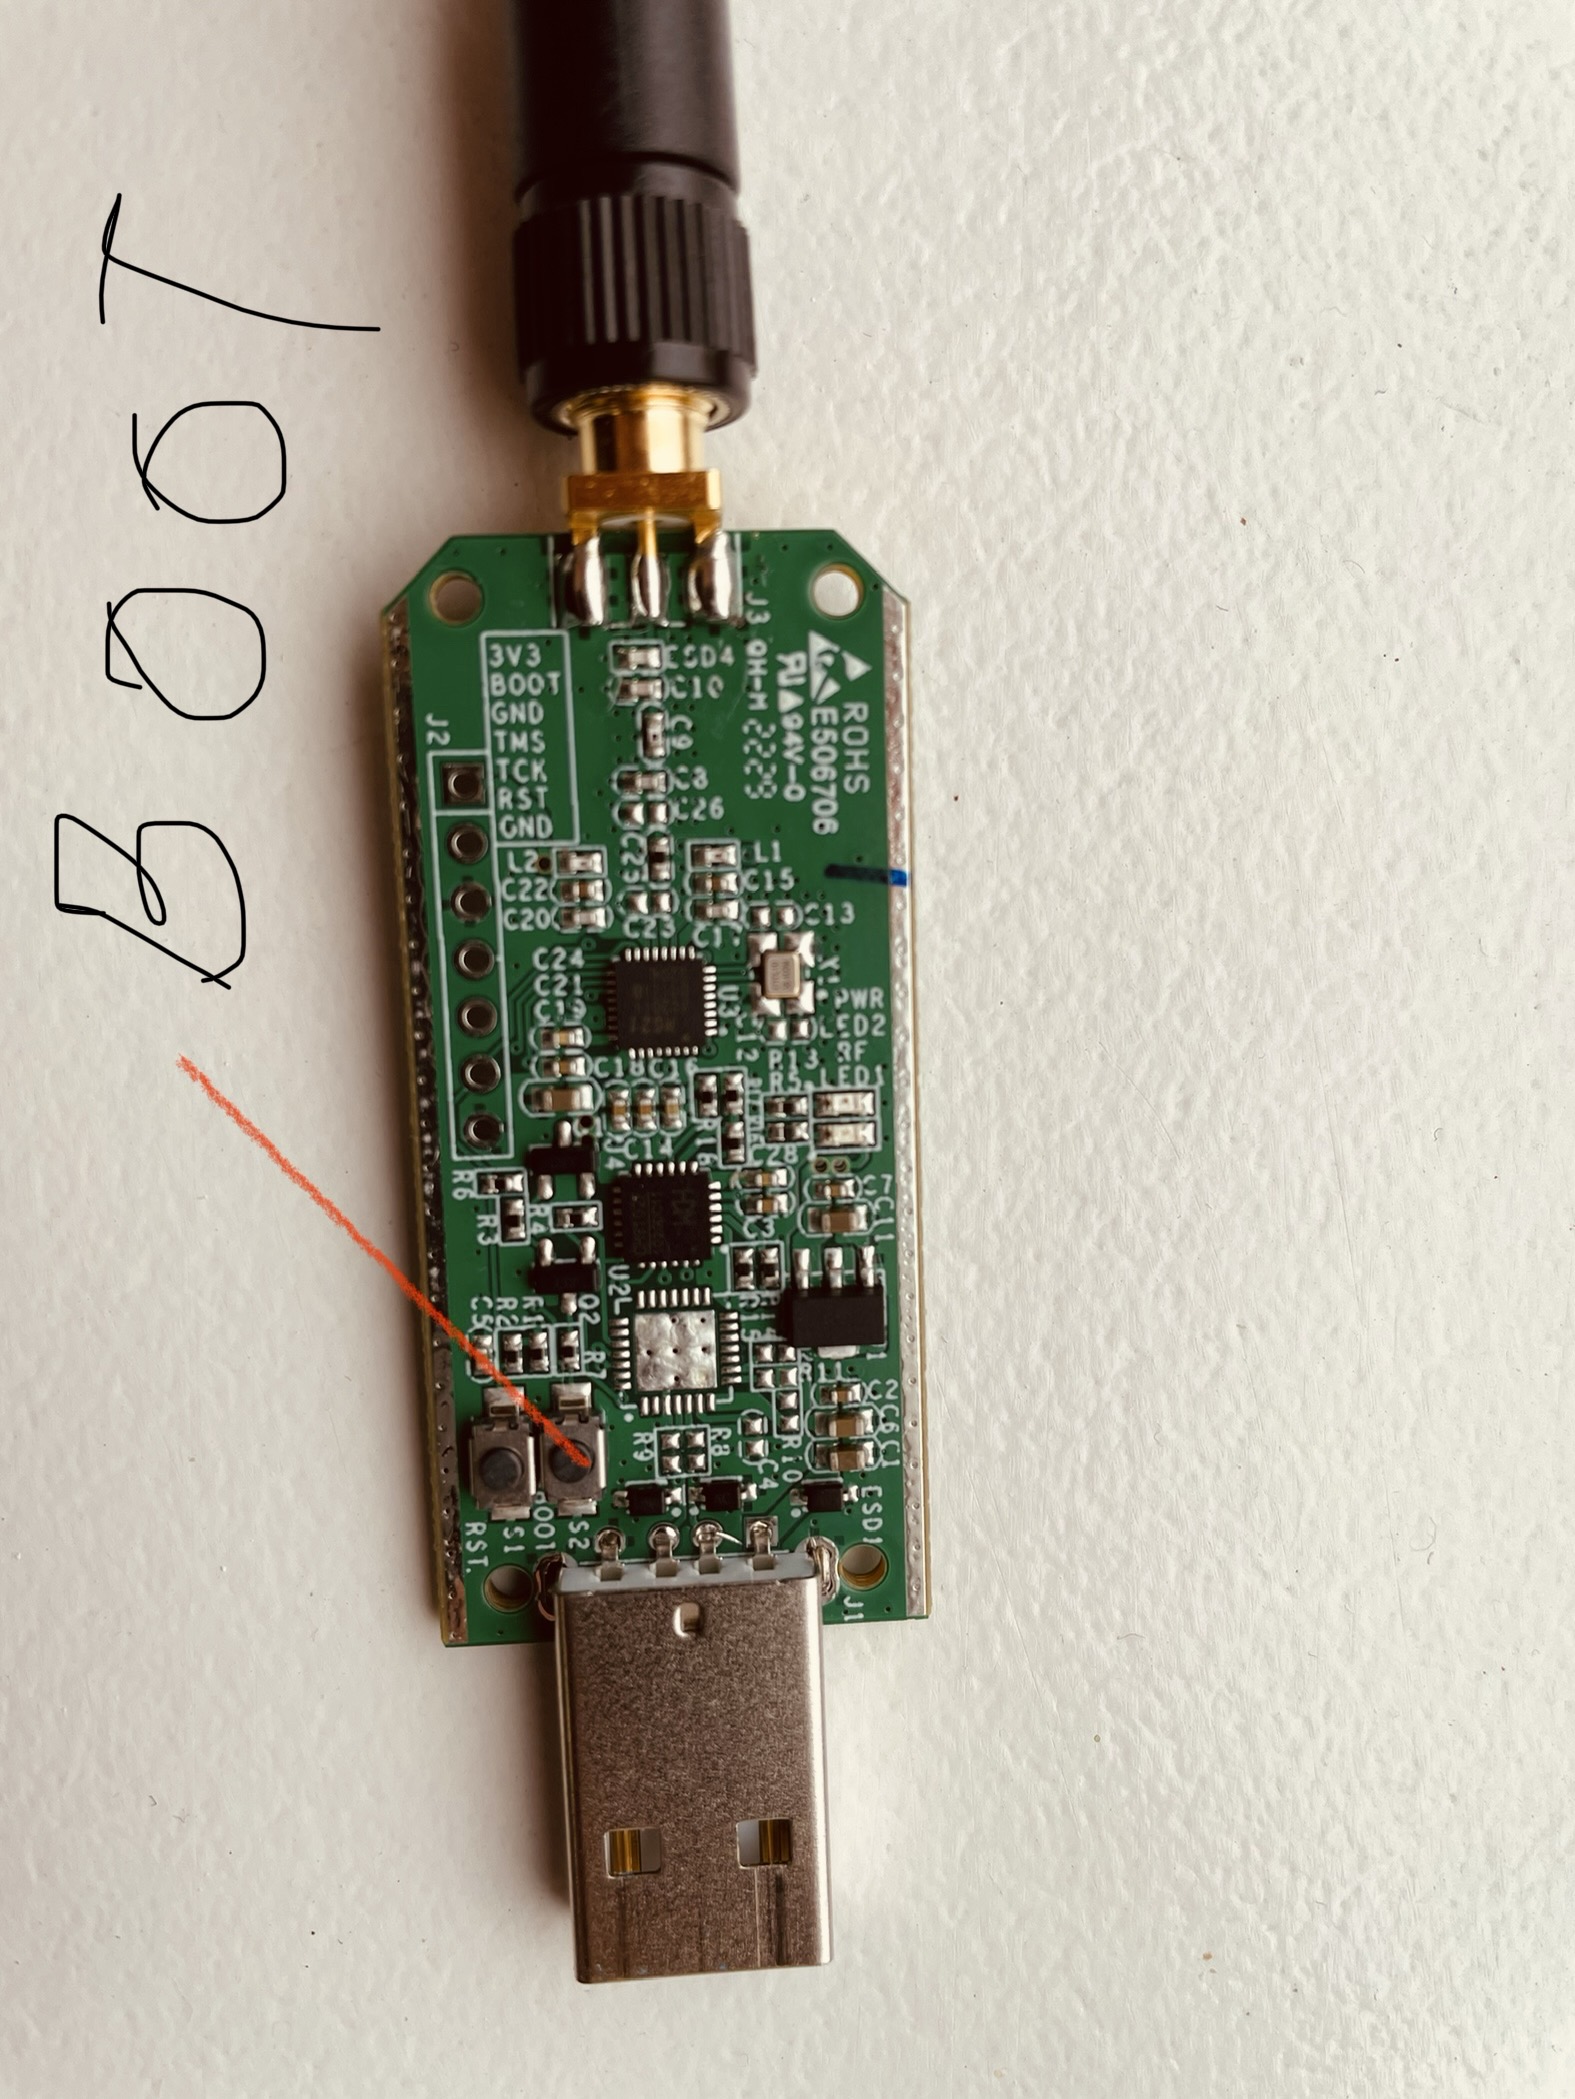
🪛 Unscrew SonOff Zigbee dongle plus E’s case. We will only need to unscrew the 2 screws that are on the side of the USB port. This is to get access to the boot button on the board.
Step 3:
Download and install minicom. There are other tools that can also be used such as
coolterm. If using coolterm execute the steps detailed below under For MAC OS.
For Linux OS:
- run the below command:
sudo apt-get install minicomminicom has a dependency on lrzsz.
lrzszis needed for XMODEM,YMODEM and ZMODEM communication. On linux platform, when minicom is installed using above command, this dependency is automatically installed. However, on MAC OS, this dependency is not installed with minicom. Follow the below steps to install minicom and the dependency on MAC OS.
For MAC OS:
- run the below command to install minicom:
brew install minicom - run the below command to install the dependency lrzsz:
brew install lrzsz - minicom internally uses
sxfor XMODEM communication (this can be changed in Step 7File transfer protocolsconfiguration page to make it uselsx. If we decide to do so, we can skip below steps and jump to Step 4). If we take a look at the installation’sbindirectory oflrzszthere is nosxexecutable. There islsxexecutable which is same assx.
ganesh@magal:/usr/local/Cellar/lrzsz/0.12.20_1/bin$ ls
lrb	lrx	lrz	lsb	lsx	lsz	rz	sz
/usr/local/Cellar/lrzsz/0.12.20_1/bin is the location where homebrew installed lrzsz.
- we will create a symlink called
sxand link it tolsxwhich is already inside thebindirectory.
ln -s /usr/local/Cellar/lrzsz/0.12.20_1/bin/lsx /usr/local/Cellar/lrzsz/0.12.20_1/bin/sx
- should see like this now:
gmagal@magal:/usr/local/Cellar/lrzsz/0.12.20_1/bin$ ls lrb lrx lrz lsb lsx lsz rz sx sz - one last thing that needs to be done is to add
sxto PATH. If using zsh as shell, create~/.zshrcif not already present:gmagal@GMAGAL-M-M1D2:$ nano ~/.zshrc - add below line to the
/.zshrcfile:export PATH=/usr/local/Cellar/lrzsz/0.12.20_1/bin:$PATH - reopen terminal and type
sxsee if the command was found. Ifsxcommand is not found, the PATH has not been set in the correct file (belowsnippet showssxcommand was found):gmagal@magal:~$ sx sx: need at least one file to send Try `sx --help' for more information.
Step 4:
Run the below command and make a note of all the devices that show up:
ls /dev/tty*
Sample output:
gmagal@masterrpi:~ $ ls /dev/tty*
/dev/tty    /dev/tty11  /dev/tty15  /dev/tty19  /dev/tty22  /dev/tty26  /dev/tty3   /dev/tty33  /dev/tty37  /dev/tty40  /dev/tty44  /dev/tty48  /dev/tty51  /dev/tty55  /dev/tty59  /dev/tty62  /dev/tty9
/dev/tty0   /dev/tty12  /dev/tty16  /dev/tty2   /dev/tty23  /dev/tty27  /dev/tty30  /dev/tty34  /dev/tty38  /dev/tty41  /dev/tty45  /dev/tty49  /dev/tty52  /dev/tty56  /dev/tty6   /dev/tty63  /dev/ttyAMA0
/dev/tty1   /dev/tty13  /dev/tty17  /dev/tty20  /dev/tty24  /dev/tty28  /dev/tty31  /dev/tty35  /dev/tty39  /dev/tty42  /dev/tty46  /dev/tty5   /dev/tty53  /dev/tty57  /dev/tty60  /dev/tty7   /dev/ttyprintk
/dev/tty10  /dev/tty14  /dev/tty18  /dev/tty21  /dev/tty25  /dev/tty29  /dev/tty32  /dev/tty36  /dev/tty4   /dev/tty43  /dev/tty47  /dev/tty50  /dev/tty54  /dev/tty58  /dev/tty61  /dev/tty8
Step 5:
Keeping the boot button pressed on SonOff Zigbee dongle plus E connect it to the computer’s USB port. Only steady red LED will glow.
Step 6:
Now, run the same command as Step 4:
ls /dev/tty*
Sample output:
gmagal@masterrpi:~ $ ls /dev/tty*
/dev/tty    /dev/tty11  /dev/tty15  /dev/tty19  /dev/tty22  /dev/tty26  /dev/tty3   /dev/tty33  /dev/tty37  /dev/tty40  /dev/tty44  /dev/tty48  /dev/tty51  /dev/tty55  /dev/tty59  /dev/tty62  /dev/tty9
/dev/tty0   /dev/tty12  /dev/tty16  /dev/tty2   /dev/tty23  /dev/tty27  /dev/tty30  /dev/tty34  /dev/tty38  /dev/tty41  /dev/tty45  /dev/tty49  /dev/tty52  /dev/tty56  /dev/tty6   /dev/tty63  /dev/ttyACM0
/dev/tty1   /dev/tty13  /dev/tty17  /dev/tty20  /dev/tty24  /dev/tty28  /dev/tty31  /dev/tty35  /dev/tty39  /dev/tty42  /dev/tty46  /dev/tty5   /dev/tty53  /dev/tty57  /dev/tty60  /dev/tty7   /dev/ttyAMA0
/dev/tty10  /dev/tty14  /dev/tty18  /dev/tty21  /dev/tty25  /dev/tty29  /dev/tty32  /dev/tty36  /dev/tty4   /dev/tty43  /dev/tty47  /dev/tty50  /dev/tty54  /dev/tty58  /dev/tty61  /dev/tty8   /dev/ttyprintk
This time we see the USB device - /dev/ttyACM0. This will be needed for configuring minicom
🔝
Step 7:
Run the below command to start minicom
sudo minicom -s -c on
This will pop-up below screen in the terminal.
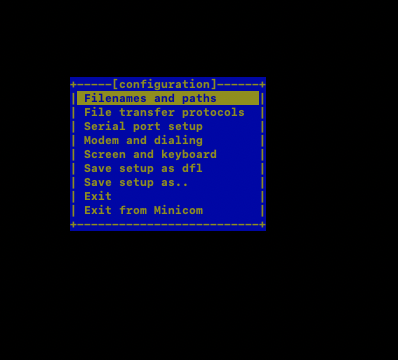
We can navigate the screen using keyboard arrows. To choose a specific suboption enter the alphabet next to it. Below are the things that needs to be configured before we can flash the device:
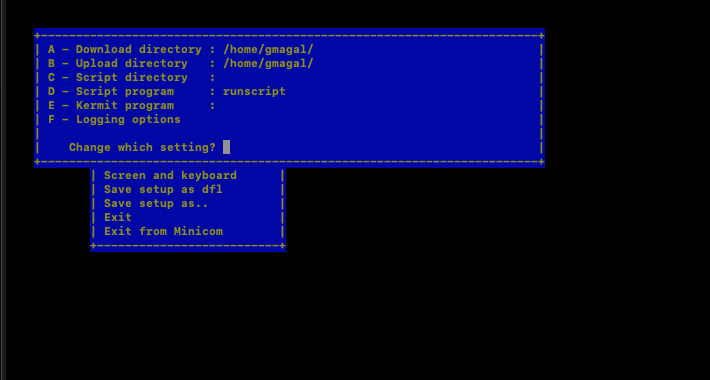
Filenames and paths: Provide the directory path where we have downloaded the router firmware
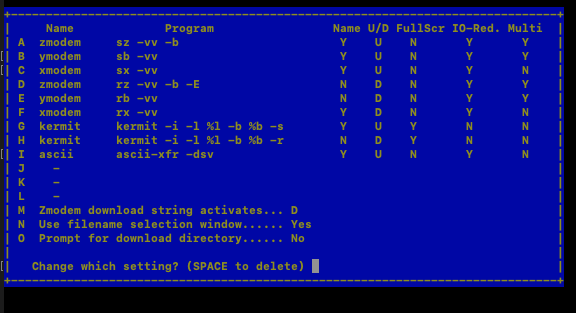
File transfer protocols: XMODEM should be enabled (it’s enabled by default). If we need to change XMODEM to use command aslsxthat needs to changed it in this screen.
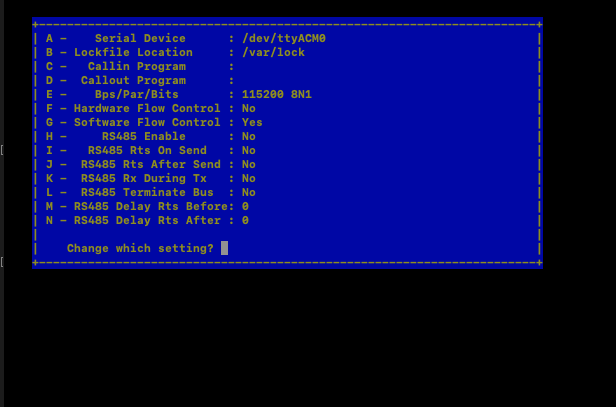
Serial port setup: This is the option where we should specify the Serial Device (which we obtained in Step 6 above). The baud rate should be 115200 (default)
Save the Setup as df1: Save the configuration.
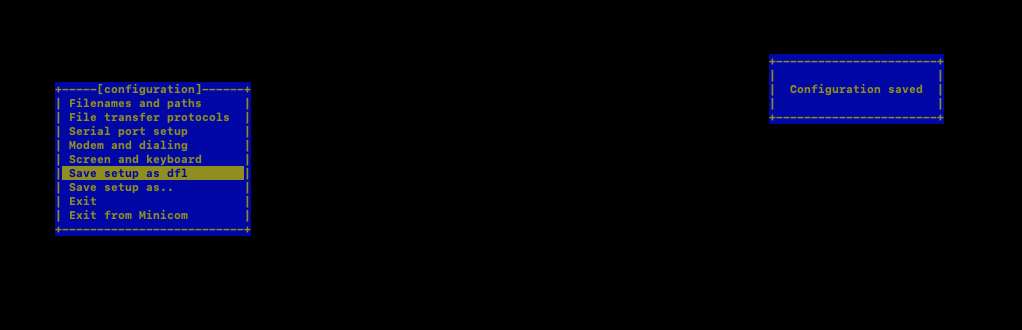
Exit: Exit from the configuration screen. This should take to the command screen
🔝
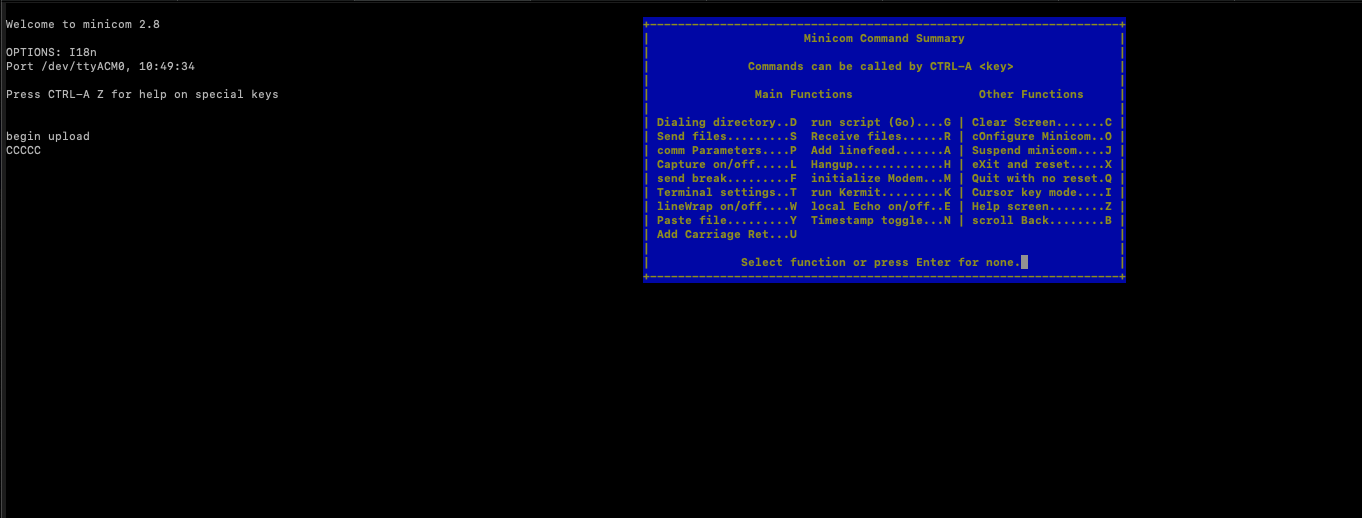
Step 8:
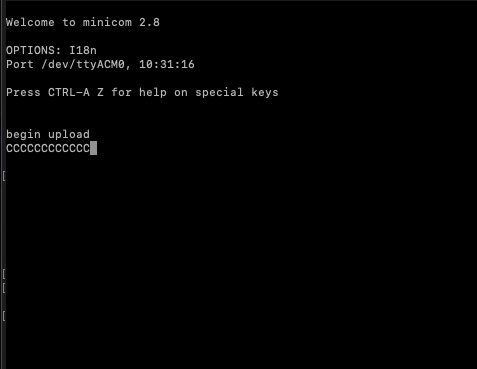
Now press 1 on the keyboard, we should see something like below, the upload connection is established to the USB device:
Step 9:
Now press control and a together, leave it and press z on the keyboard, this should open up the available options. s is used for sending file to the device (on MAC OS, META key needs to be mapped to OPTIONS key which can be done from terminal > keyboard preferences).
Step 10:
Press s, now we should see options like below:
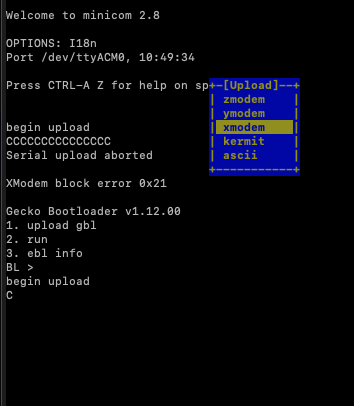
Step 11:
We need to choose xmodem protocol. Use keyboard arrow to navigate to xmodem and hit return on the keyboard. This should open up a dialog box inside terminal showing all the files available that are inside the directory that was configured in Step 7 Filenames and paths.
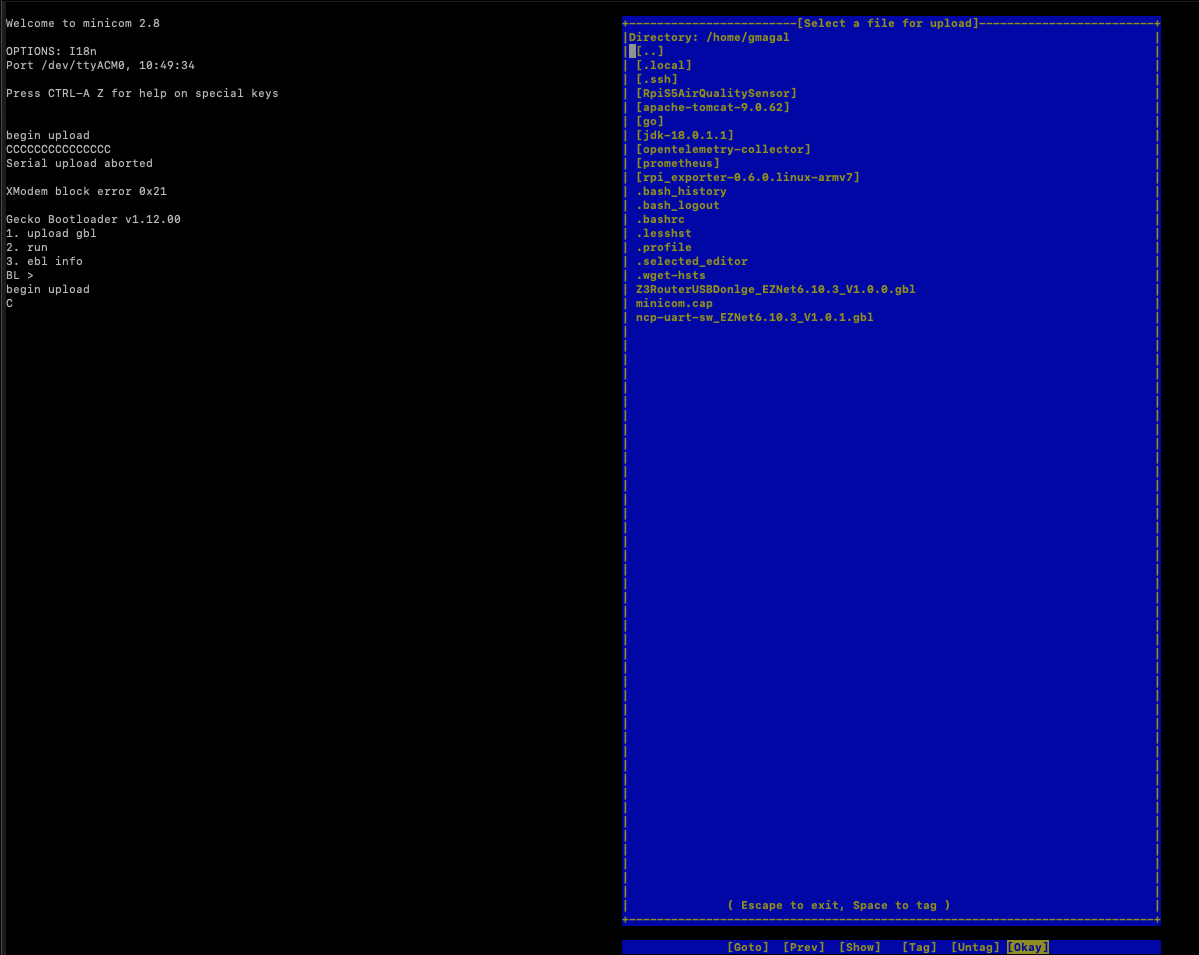
Step 12:
Using keyboard arrow key navigate to the firmware file and hit space bar to choose that file, followed by return. This should start the upload process. Once completed we should see something like:

Step 13:
Now disconnect SonOff Zigbee dongle plus E from the computer.
🔝
Step 14:
🪛 Screw back the case and plug it into any USB outlet with 5V DC (minimum 1Amp current). The router should be in pairing mode.
🔝
Step 15:
Using Homeassistant or zigbee2mqtt we can pair the new router with the zigbee coordinator.
🔝